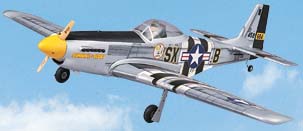
Great Planes P-51 ARF
This endeavor was to be quick .. after all it's an ARF right?? Well if you read my Tiger60 section, you'll remember that I'm a member of the Slow Builders Club. Another excuse, which I'm sure that a number of you are familiar with is money. My wife goes along with me on a lot of my endeavors in this hobby but the finances can only bend so far ... and then they break.
|
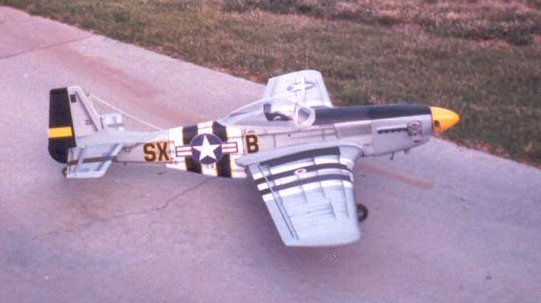
Unfortunately, this one bit the dirt. I have another and will post more info, with pics, whilst building it. However, you must remember, I am of the slow builders club. |
One evening, while out to dinner with my wife and her mother, the subject of a static display by our club came up. This was to be at a local Balloon race. I said that I didn't have a decent plane to put on display and that I wasn't going. She suggested that I build an ARF at the setup as a demonstration of what it's like to work on these planes. Also as advertisement to get some business. After all, one of the reasons for building the Hobby room addition to the house was to make some money building for other people. I wasn't hot on the idea of getting just any old ARF. I mean I was gona be stuck with it if it didn't sell at the Balloon Races.
So I said that I would do it if I could get this Great Planes P-51. She thought about it and said yes. No time was wasted. After we finished dinner we went directly to Hobby Bench and I purchased the P-51. I have wanted one for a long time. Since the wing in this model was based on their Ultra Sport I figured that I would get a decent aerobatic plane and one that looked impressive ... if to no one but me.
Now we come to the "other things" that are needed. I'm sure that most of you reading this understand that it takes a little more to get a plane flying. In this case I needed ... ok I wanted ... a servo for the retractable landing gear that cost $70.00. At least the Futaba version. There is advertised a less expensive version. However, as my friend said, "Do you want to trust your new plane to one of those?" Hmmmmm, good question but ... I still only got so much money.
While contemplating the costs of various items needed to make this craft flyable I did try to do some work on it. Now the instructions tell you to glue the wing together and then try to work the rods through the wing for the landing gear. I have always found it easier to fish things through the wings before they are joined. But I glued the wing joiners together and checked their fit into the wing. They didn't fit!! Someone at the factory got sloppy with the glue ... on both wings! I had to figure out how to dig down in the hole to remove the glue and not tear up the foam or balsa. This task was finally accomplished but it really shouldn't have been required in the first place.
So I'm still wondering about the correct way to put in the retracts. I decided to just put the wing together the way the instructions said and then put in the retracts. Well I should have done a trial fit before I put the glue on. I do believe that either the slot for joiner was crooked or there was still to much glue in there and it twisted the wing. I finally used a small clamp on the trailing edge and then a 'C' clamp up on the leading edge area. I'm not particularly fond of the idea that the wing is already under stress. I did the bad thing once again ... I got in a hurry.
Now the wing is together and the wire rods for the landing gear have to be snaked down through the small tight areas that were provided for them. They were nice and straight with just a small bend like the instructions suggested. However, by the time they were in place there was a lot of twisting and bending involved. I sincerely hope that they will work properly. This will be my first plane with retracts.
Moving to the little dowels that go in the front of the wing. Those can be a little challenge in themselves. The holes are small and it is a tight fit. I'm sure glue is needed to keep them seated for a long time but sure ain't much.
The tail wheel seems fairly simple but I encountered one little peculiarity. I placed the ring supports in the spaces provided and drilled small holes in the center of them. Then after cutting the slot in the tail more towards the bottom I glued the hinge in and screwed in the screws. Next I turned the fuselage over and to my surprize the screws were at the very edge of the small plywood that they screwed into. This didn't look strong enough. I added some epoxy around the screws.
Aligning the wing to the fuselage is fairly straight forward. You plug the front dowels into the holes in the formers and then measure the distance from wing tips to a pin in the center of the tail. Naturally, you move the wing to adjust it so the distances are equal. Mine was a tight fit. So tight that I had to sand the back edge to get the wing seated. Now this is all well and good ... IF ... that was all there was to it. However, later you are going to glue some plastic pieces to the top and bottom of the wing and install some wing/fuse faring. Not good!!
Now, I like most of you, am fairly intelligent. No Einstein, but not stupid either. Most of the time I am a slow builder. Unfortunately, there are times when I get in a hurry and don't stop to think. Course it would have been nice if Great Planes had mentioned my problem in the manual. Take care when placing the plastic pieces on the wings. The bottom one has a section of the fuselage on it. Make sure that it will align. In the manual, you are told to put the top piece on first. Well, put the wing in the fuselage first and lay the bottom plastic piece on the wing, line it up properly and mark the spots for reference. Then remove the wing and use the reference points to position the top piece. Now when it is glued in, it will be in reference to a properly aligned bottom. (No .. I didn't do this and my bottom is offset!!)
On to the other problem. Remember above that I mentioned how tight my wings fits?? Well guess what..? After putting the plastic pieces on it doesn't fit at all!! Be prepared to do a lot of sanding in order to get the wing into position along with all the plastic parts. Don't make my mistakes. Don't glue until you are sure that the parts are aligned and they will fit. I know that is common sense but sometimes when you are "trusting" some instructions you slip and forget the cautions that you normally take.
This plane was to be my special pride and joy. I have always wanted one and this one seemed to have it all for an economical price and not a lot of work. Now it is spoiled.