Welcome to Our Website!

The System
A Hewlett Packard:
 DM4-2165DX - Core i3 2.2GHz - 6GB RAM - 640GB HDD
  Entertainment Notebook PC
  Public release date: August-2011

Interesting that my latest "Super Computer" arrived on my wife's birthday. In the past we have had problems cause "I was accused spending to much time on my Computer." However, now we are older and she is interested in Computers, mainly gaming. In fact, now I can almost reverse the situation and tell her that she is spending to much time on her computer. -But- we know better...

I am calling this a "Super Computer" ... just because. Really, to me it is another wonder of this modern computing world. I got my current Desktop 5 years ago, Jan 25th, 2007, just 5 days before Microsoft released Vista!! -And- I am still very, very happy with it. It is a Dual Core machine, one of the first. In fact it really is not a "Dual Core". It has a two processor core -but- it is called a Pentium D. This new Laptop is not called a Dual Core either. It is an "i3". No matter. They both are Fast and Furious. -And- most of all ... I'm satisfied and happy with both.

This particular Laptop is just the right size for me, between a netbook and laptop. Light and a great size, great for simple internet use and to carry around on service calls and to coffee shops. Im not much of a gamer, so I can't speak for that, but for just normal use, it is great! I also have an Acer One D250 which is one of those 10.1" Netbooks. It was my first Laptop of any kind and it was given to me by my Sister-In-Law. I used it quite a lot and in my recent Desktop Hard Drive crash I used it even more. My only real complaint about it is... the screen... it is just "one leettle bit to small". I would like to have at least a 1024 x 768 screen and what it produced was a 1024 x 600 screen. Just 'that much'... to short.

Now IF you had talked to me before I got the first Laptop you would have heard a different story. As stated in my Acer One write-up, I had thought about getting a Laptop for some time -but- could not justify the cost. Why?? Cause I have a mighty fine Desktop machine... an HP m7480n Pavilion Computer. I felt that the Laptop would be sitting around to much and it would be a waste of money. Well, in less than a year (Got the little Acer in April of 2011) I have been given 3 different Laptops!! (Friends and Relatives that got new ones.) Analysis and use of these has shown me what I can use them for -and- that a Laptop would be of a benefit to my business endeavors. This latest purchase is the result of my experiences with the others. They helped me decide on what I wanted... size and Power... besides that fact... that I wanted it to be an HP.

The following two paragraphs were borrowed from: Cheap Netbook Deals. You might drop by there for the full story.
Features: The HP dm4-2165dx is equipped with a selection of excellent features given the price tag. On the right of the laptop you'll find a power connector, two USB 2.0 ports, and a DVD±RW burner. On the left you'll find another USB 2.0 port, jacks for headphones and a microphone, and VGA and HDMI outputs. If you want to enjoy HD content without the hassle of an HDMI cable, the dm4-2165dx is also equipped with WiDi 2.0, a wireless solution that lets you stream HD video to any external display through a Netgear Push2TV adapter (a $99 dollar extra). The dm4-2165dx is equipped with 802.11n Wi-Fi and Gigabit Ethernet. You can physically secure the laptop thanks to a built-in case-lock slot, and you can biometrically secure your data thanks to a fingerprint scanner built into the palm rest.

A 640GB 5,400rpm hard drive provides the dm4-2165dx with more storage space than you'll find on the Toshiba Satellite L745D-S4220RD and Gateway ID47H02u (both have 500GB drives), but you'll find that the Asus U46E-BAL5 ($699.99 direct, 4.5 stars) offers a more spacious 750GB drive. On that hard drive, you'll find several programs pre-installed, most notably Adobe Photoshop Elements 9 and Adobe Premiere Elements 9. These may not be as fully-featured as their complete versions, but the combination provides a lot of out-of-the-box utility. There's also some bloatware-including some that you'll want to scrub off the system at the outset-like Microsoft Office Starter 2010, a 60-day trial of Norton Internet Security, several sample games from Wild Tangent, a Bing toolbar, and a dedicated link to an HP webpage touting the now defunct HP Touchpad and webOS.

Ok - So what did we get??

Guess a preliminary description of the Hardware would be in order here. One of the things we were after was Small -but- not to small -and- the 14 inch Laptops seemed to fit the bill. The dm4-2165dx measures 1.3-by-13.4-by-9 inches (HWD), and has a brushed aluminum lid and palm rest, painted a Dark Umber. In some lites it looks Black and in others you can readily see the Brown cast. It weighs 4.3 pounds, which is light. The dm4-2165dx is equipped with a full-size chiclet keyboard. The 14-inch (diagonal) widescreen display has a 1366-by-768 resolution. Now this will compare to my 19-inch Sony that is attached to my Desktop.

It also has the usual USB 2.0 connections, an RJ-45, an HDMI and a slot for your SD cards. Also has a VGA connection. And we have our headphone and mic output and input. Oh, and this one is big enough to have a CD/DVD Writer/Reader.

  Some Cares & Concerns in Operations

Windows got its name because of the little boxes of information presented on our computer screens. (And cause one of the originators looked out the Window...or so we have heard.) As things progressed over the years, some controls were added along the edges. One of them, in the upper right hand corner is an ' x '. When it is clicked on the window will close -and- the application executing inside it will terminate... hopefully. Well, this is NOT always the case. -And- IF the application is sitting there seemingly doing nothing, it would still be a good idea to use the applications 'Exit' instead of clicking on the little   ' x '. Here recently, with this new Windows 7 OS we have been getting scolding messages after havin' exited via the ' x '. Just an 'FYI'.

System(s) Synchronization(s)

The title is plural cause we have multiple Systems. Actually when we are finished setting up this latest LapTop, the HP dm4-2165DX, we will be back down to two -but- we may involve another (my wife's) later, so the verbiage fits.

 April 5, 2012/8:06am  Now then, just what are we talking about when we say "Synchronization"?? Well, in our case it is synchronizing our Web Pages. -And- as of this time and date... we are on the Laptop.

Keyboard and mouse

One of the praises for this Laptop was/is the size of theKeyBoard and possible/probable ease of use because of it. Well... it is different. The "feel" of the keyboard is different. The dm4-2165dx is equipped with a full-size chiclet keyboard. The keys are well-spaced and provide a smooth typing experience, but might be a bit mushy for some. Also the keytops. They are to flat. We like the feel of the concave type better. We purchased this blindly over the Internet and did not get to try out the Keyboard before purchase. It is not terrible -but- will take some getting used to.
Refer: PC Magazine and Testranking

Now the mouse touch pad is another story. We personally do not like any of the mouse touch pads. However, they are great IF you don't have room for -or- access to a mouse. We, however, immediately purchased an external mouse to use "most" of the time. There is a way to keep the touch pad off. Start->Control Panel->type 'mouse' in the search->click on Mouse->Others Then un-check "Enable Touchpad automatically when you log on". The "Double Tapping" of the upper left corner of the Touchpad will still turn it on and off -but- the default will be OFF... when you are logged in.

 Funtion Keys - October 9th, 2013/6:20am  Well, after over a year and a half, we finally decided to research the settings, or should say RE-settings, of this little laptop. It has the 'normal' Function keys across the top -but- they default to "System Operations". In order to use them as 'normal' Function keys you must press and hold an 'fn' key first. This is a problem when you are typing in code and need the use of a function key -- 'normal use'. So, we investigated. Found on the Net: Reconfiguring F keys on dm4.

To save you a trip the procedure is as follows:

Disable or enable fn in the BIOS

To disable, or enable, the function key (fn) in the BIOS, do the following steps.
  1. Press the power button to turn on the computer.
  2. Press the ESC key and then press f10 key to open the BIOS setup window.
  3. Press the right-arrow or left-arrow keys to navigate to the System Configuration option.
    Figure 2: BIOS setup window
    BIOS setup window with the System Configuration option and Action Keys Mode selected
  • Press the up-arrow or down-arrow keys to navigate to the Action Keys Mode option, and then press the enter key to display the Enable / Disable menu.
  • Select the desired mode:
    • Disabled : Requires pressing and holding the function key (fn) while pressing one of the f1 through f12 keys to use the action indicated on the action key.
      For example, on some computer models, if the Action Keys Mode is Disabled , pressing the f11 key will minimize and maximize a web browser if open. Alternatively, pressing and holding the fn + f11 keys will mute the sound.
      The action keys may vary depending on the model of notebook.
    • Enabled : Requires pressing only one of the f1 through f12 keys to use the action as indicated on the action key.
      For example, on some computer models, if the Action Keys Mode is Enabled , pressing f11 will mute the sound as indicated on the action key. Alternatively, pressing and holding fn + f11 will minimize and maximize a web browser if open.
      The action keys may vary depending on the model of notebook.
  • Press the f10 key to save the selection and restart the computer.
  • The function key (fn) option can be reset at any time.

    Laptop on with Lid Closed

    So how to keep Windows 7 laptop up and running when you close the lid?

    1. Click on the power icon on the right side of windows taskbar and click on More power options.
    2. Click on Change plan settings on the selected power plan. Click change advanced power settings.
    3. In the power options window, expand Power buttons and lid and Lid close action.
    4. Change it to Do nothing on both 'On battery' and/or 'Plugged in' based on your preference.
    5. Refer: How to keep Laptop On When the Lid is Closed?

    Startup Problems

    Windows 7 keeps logging on with temporary profile

    From Microsoft:
       Occasionally, Windows might not read your user profile correctly--for example, if your antivirus software is scanning your computer while you try to log on. Before you create a new user profile, try restarting your computer and logging on with your user account again.

    This is similar to what I tell my customers. Turn it on and wait 10mins for all the Anti-Crap Software to check your machine. Go get your coffee after you hit the power switch. Sometimes it is best if you login first and sometimes it is best if you don't. This is one of the cases where it is best if you don't log in right away.

    Refer: Microsoft Windows


      Windows 7 Setup

    Well, here it is the Next Day and we still do not have our New Laptop in operation. What's the hold up?? Well, would you believe that it was getting the preliminaries of this WebPage setup and ready?? We are trying to document most of the stuff that we are doing. Ya don't just sit down and do that... leastwise, not us. Besides, we want to record everything from the start... to the end. Preliminarily, we peeked at the initial Windows 7 install/setup and thought that it would be nice to get some screen captures. -But- oh wait!! The machine is not setup yet, so how can we capture some screens??? After some intense thinking we got it!! Our new Smartphone has a fabulous Camera. We'll use it to take some pics of the operations. (Sorry they are not the greatest... I'm still learning to use the Camera... but you get the idea.)

    Remember -- THIS IS A 64-BIT MACHINE!! And we have Windows 7 64-bit installed on it.

    So what's first?? You setup the machine by placing it on your desk and plugging it in. The battery does NOT come charged. After pluggin' it in, you then must open the Lid and turn it on. We are not going to repeat their excellent instructions. It is presumed you can read English. However, we are going to mention the Power Button. Seems that it has the same problem -or- feature that our, also new, HTC Rezound Smartphone has. It is somewhat recessed. Like the phone we have to sometimes 'hit' it twice in order to get power.

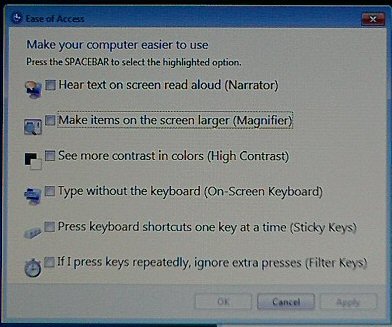
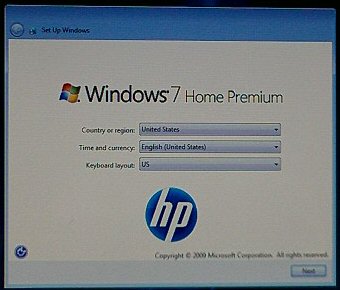
    • After PowerOn you are presented with a Setup Window. This allows you to select the Country, Time and Currency and the Keyboard Layout. That's normal. However, there is a little 'orb' in the Bottom Left Corner of this window that has some surprises IF clicked upon. I didn't see this mentioned anywhere -but- I just clicked on it to see. You get another window titled 'Ease of Access' and a Narator. Don't know if this is from HP or Microsoft... but whoever, it is kinda neat.

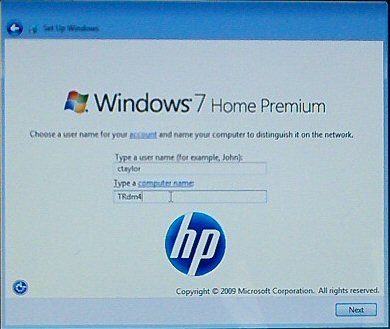
    • Our next screen is for entering our Username and Naming our Computer... the Hostname. I usually use ctaylor for a username. Done it for years and it makes it easier to copy over the old stuff to the new. However, we do have to have a New Computer name. What to call this one?? Hmmmmm... how about TRdm4. Short and sweet.


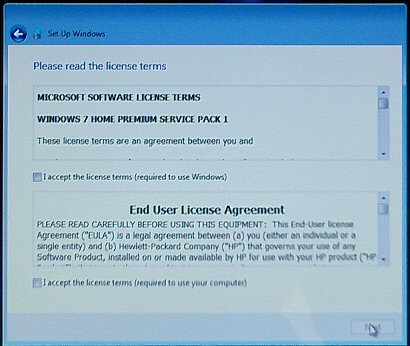
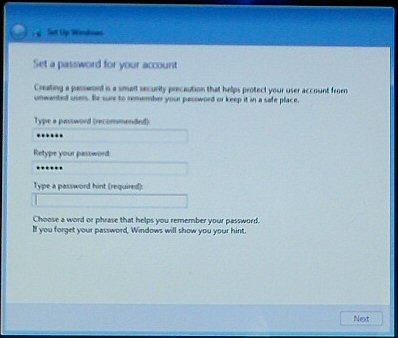
    • Next we have our password entry and creation. After that we have the License Agreements. These are always kind of silly. IF you don't accept them you don't get to use the computer.


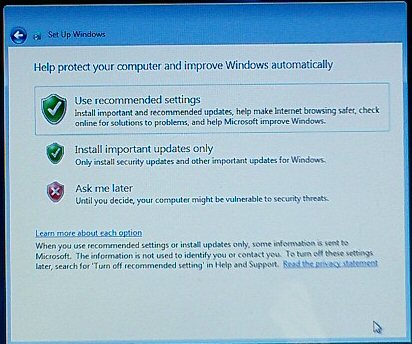
    • Next we have our Proposed Protection settings. Personally, I like to use my own stuff so I always say "Ask me later".


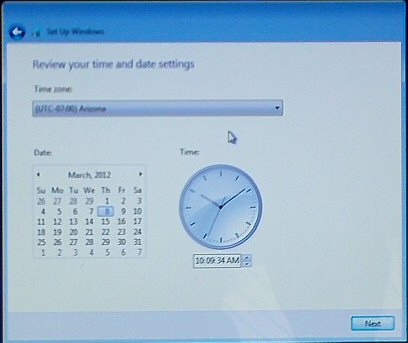
    • Next is the Time and Date.


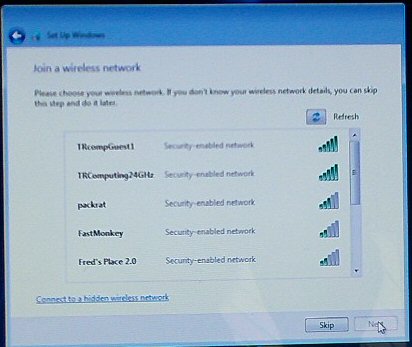
    • The next operation is "Join a wireless network". Interesting and the first time we have gotten this on our setups. Two of the Networks offered are ours and we will accept the TRcompGuest1 at this time. The other one will come later.
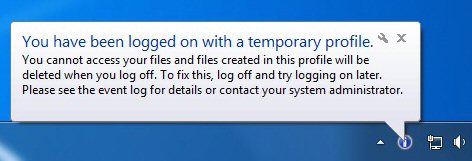
 (Oh duhhh!! This is a Laptop with a WiFi setup!!)


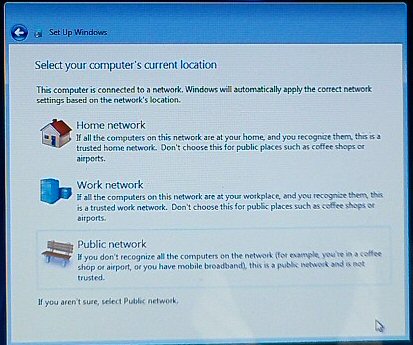
    • In conjunction with the above we are Next asked to Select our Computer's location. Now you have to be careful here IF all of your systems are NOT Windows 7 oriented. IF you have Linux, Windows 98, Windows 2000 or Windows XP, do NOT select Home network. You need to select Work network. UNLESS they have changed it, IF you select Home network, they expect ALL the computers to be Windows 7 powered.

    • After you select your Network you get a quick flash of a Windows 7 screen and the a background screen that just has it working. -And- you wait.....

    • Well now, the final Signed On screen is kinda cute. Don't know how long we'll keep it -but- it is interesting.

      -And- we finally have our New Laptop Operational. This initial setup is getting simpler, and easier, and easier as the years go by.

    • The screen just blanked. We do believe that it took around 10 minutes for this to happen, which is usually the default setting for a screen saver. We did notice, however, during the initial setup the screen would 'Dim' if we took to long - not blank. But, here after getting Signed On, we never saw it Dim. There must be a setting that we will have to encorporate -or- it was just a feature of the initial setup.

    • It does, however, come back to life at the slightest touch. That's good... maybe??

    • For lack of a bette place to put this, it goes here. Want it pretty close to up front operations anyway. What?? Secret Admin Logon. It becomes a dual logon -but- that is ok. Have one, why not two. Still gota click on a selection. This Admin Logon is like the root Logon in Linux. Highest you can get. Strangely enough there is NOT a password. So.... AFTER you get access to this 'Secret Admin' and place it as a Logon, it would be very advisable for you to set a password for it.
         Now then in order to gain access to this you'll need to open a command prompt in administrator mode by right-clicking on it and choosing "Run as administrator". Now type the following command:
            net user administrator /active:yes
      You should see a message that the command completed successfully. Log out, and you'll now see the Administrator account as a choice.
         To Disable Built-in Administrator Account
      Make sure you are logged on as your regular user account, and then open an administrator mode command prompt as above. Type the following command:
            net user administrator /active:no


      Install Own Software - Remove some of the "Extras"

    Now then, depending on your nature -and- what you 'plan' on doing with this, or any Laptop -or- Computer, you 'might' like the Free (for 60 days) and already installed Norton Internet Security 2010 that pops up after a short time period of power on. Personally, we don't. We think that avast! is just as good (if not better) and it is FREE for Home use.

    So, we will be dumping Norton Internet Security 2010 and installing avast! and Ad-Aware. (And yes, we are NOT strickly a Home User -but- we don't think one or two calls every month, or two, makes us much of a thriving business.) Both are excellent utilities for security and they are both free for Home use. Now IF you are a Business, -and- you have some worthwhile clients and money producing activities going, it would behoove you to purchase one of the Upscale products from both of these companies. IF we ever get to where we have two or three calls a week... we plan on purchasing the Business versions.

    We will also be removing Microsoft Office 2010 Home and Student. It is another Sixty day wonder. It will be replaced with OpenOffice.

     The Removals  

    • Start
    • Control Panel
    • Programs
    • Programs and Features
    • Scroll down to Microsoft Office 2010. Right click on it. Click on Uninstall... then Yes.
    • When the above is finished, scroll down to Norton Internet Security. Right click on it. Click on Unistall/Change. Make your choice on the question/answer. Click it. Select Restart Now -or- Restart Later. We chose now.
    • Examine the machine for anymore "Bloatware" and remove it... if you so desire.
    • Now we will install avast! and Ad-aware.

     The Installations   One important thing we gota -remember- here, from now on...     THIS IS A 64-BIT MACHINE!! It can, and does, make a difference.

    • avast! - Got the latest and it claims to be for 32-bit -or- 64-bit. ARRRGGG!! We let them do their "Express Install" with "default" settings. Well, those "default" setting included Google Chrome. Now we don't have anything against Google Chrome -but- we DO NOT like things being placed on our machine that we didn' ask for. DO NOT USE THE EXPRESS INSTALL. Unless you want Google Chrome. It was removed from ours. Ok. Uncle! It was our fault. We didn't read the whole window. Went back and looked and there are check boxes for the installation -or not- of Google Chrome. They are checked by default and you will have to uncheck them yourself.
      This install went into the "Program Files " dir. Which means that it is a 64-bit program.
    • Ad-Aware - This one too, wanted to put Google Chrome in charge. They all must have some kind of a deal going on. Gona have to check out that Google Chrome -but- for now, we are still Firefox fans.
      This install went into the "Program Files (x86)" dir. Which means that it is a 32-bit program.
    • Firefox - This has been our favorite Browser since... well forever. Back in the day, it was called Netscape. A team of individuals got together and revamped it. 'Most' of the time it is safer than Internet Explorer.
      This install went into the "Program Files (x86)" dir. Which means that it is a 32-bit program.
    • TweakUAC - Had another that we used in Previous 32-bit versions of Vista and Windows 7 -but- it would not work for 64-bit. So until they get one we will use this one, TweakUAC.
      There is yet another: UAC Trust Shortcut 1.0
      UAC Trust Shortcut 1.0 allows you to disable User Account Control for a specific application, by defining a trusted shortcut. -And- it has 32-bit and 64-bit versions. It requires Microsoft .NET Framework 4.5, which it downloaded and installed.
    • WinZip160 - Well, we finally had to move up. WinZip80 will not work on this new Windows 7 64-bit machine. Had to get WinZip16. Now watch this... watch closely when you are installing -or- you will get stuff that you possibly don't want. Personally, we don't want the "extra" toolbars in our Browsers -and- we don't want the Kaspersky Security Stuff. avast! has been fine and if we are going to pay they, avast!, will be the ones that get our money.
      This install went into the "Program Files " dir. Which means that it is a 64-bit program.
    • IZArc - Added June 10th, 2012/7:46am We don't remember why we got this other than the latest WinZip ticked us off about something. Probably a high price -or- an anual fee or extra stuff that we didn't want. -Or- it could have been something about the 64-bit mode. Whatever, we now have this new 'zipper'/'unzipper' program that we are using on Windows 7. Still using Winzip on our Win2k and Gzip on Linux.
      - From the Author: -
      IZArc is the best freeware archive utility supporting many archive formats like: 7-ZIP, A, ACE, ARC, ARJ, B64, BH, BIN, BZ2, BZA, C2D, CAB, CDI, CPIO, DEB, ENC, GCA, GZ, GZA, HA, IMG, ISO, JAR, LHA, LIB, LZH, MDF, MBF, MIM, NRG, PAK, PDI, PK3, RAR, RPM, TAR, TAZ, TBZ, TGZ, TZ, UUE, WAR, XXE, YZ1, Z, ZIP, ZOO. With a modern easy-to-use interface, IZArc provides support for most compressed and encoded files, as well as access to many powerful features and tools. It allows you to drag and drop files from and to Windows Explorer, create and extract archives directly in Windows Explorer, create multiple archives spanning disks, creating self-extracting archives, repair damaged zip archives, converting from one archive type to another, view and write comments and many more. IZArc has also built-in multilanguage support.

    • XAMPP - Please see below.

    • Homesite - This install was/is documented over in our ToolsPage. Rather than repeat it please jump over there. We installed this "even though we purchased a copy of Top Style". Why??? Comfort Zone... our comfort zone. We are going to try to switch over to TopStyle -but- hopefully not abruptly. We would like to 'ease' into it.
      This install went into the "Program Files (x86)" dir. Which means that it is a 32-bit program.
    • TopStyle4 - This one shouldn't be a problem of any kind. It is supposed to be "Up-to-Date". Ok. It wasn't a problem. It just installed right up.
      However, it did go in the "Program Files (x86)" dir. Which means that it is a 32-bit program.
    • CSE HTML Validator ver 11.01 - Readily installed with no problems. It will be used in conjunction with Homesite and TopStyle4 to verify and validate our HTML/XHTML code.
      This install went into the "Program Files (x86)" dir. Which means that it is a 32-bit program.
    • GWD Text Editor - This is a little Text editor that we found years ago and have been dragging it along on all our Windows exploits. Nothing really fancy -but- then it is in some things. Anyway, the problem we experienced was in closing. 
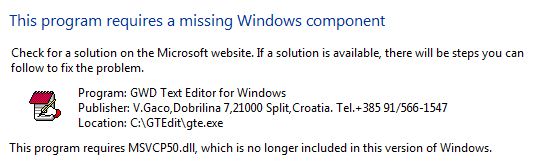
Try dropping the dll into the program folder where the program executable is. Some programs are coded to check there before moving to the system folder to look for it. - Moab Feb 28 '11 at 18:16
      Well in order to get it to properly work in Windows 7 we had to copy MSVCP50.dll from our Win2K into the dir that was for the editor. C:\GTEdit.
    • CodeStuff Starter - Starter is yet another startup manager, that allows you to view and manage all the programs that are starting automatically whenever Windows boots.
      Starter will list all the hidden registry entries, as well as the common Startup Folder entries. You can choose to safely disable selected entries, edit them or delete them altogether (if you know what you are doing). Expert users can even add their own entries.
      Another utility that we have used over the years. We are testing it on our own Win7 64-bit machine.
       17.05.2009 - Starter v5.6.2.9
      Some spare hours.... and voila :)
      • Enhanced Windows Vista compatibility.
      • Fixed too aggressive settings saving while swithing between main tabs (Startups, Processes, Services).
      • System memory graph was limited to 2 GB. Fixed.
      • Made large annoing tooltips for startup and service items to appear only at first column of the list.
      • Psapi.dll-related changes.
      • Updated supplied web links (Help\Useful links and context search menu items)
      • Updated NSIS-based installer to the latest version.
      • Other miscellaneous changes.
    • Java - Java is a programming language and computing platform first released by Sun Microsystems in 1995. There are lots of applications and websites that won't work unless you have Java installed. So, we have it... now.
    • Plugins - Installed Flash, Shockwave, Quicktimes and Silverlight. For some reason the Flash 'exe' install disappeared AFTER it installed.
    • Virtual CloneDrive - works and behaves just like a physical CD/DVD drive, however it exists only virtually. Image files generated with CloneDVD or CloneCD can be mounted onto a virtual drive from your hard-disk or from a network drive and used in the same manner as inserting them into a normal CD/DVD drive.
      Supports all common image formats such as ISO, BIN, CCD
      Supports up to 8 virtual drives at the same time
      Easy to use - just double-click an image file to mount as a drive
      Virtual CloneDrive is freeware, you may use it at no cost.
    •        A Full Recovery Re-Install !!! - April 8th, 2012   
      Yep. You read it right. Out of shear Frustration with the way things were going, we did the Full Wipeout Restore... already. As it turns out, it was probably the best thing that we did. Part of our frustrations were with Homesite and the UAC... and UAC Trust Shortcut 1.0. Now Homesite itself is NOT, or was NOT, the problem. Well, I guess that depends on how you look at it. The "problem" is that Homesite is an older program and it does not have the correct qualifications, attributes and code for these Newer Versions of Windows. Therefore, you get that annoying;
      "do you want to allow this" prompt.

        The UAC  - Well, we learned something here in our "Re-Load"...   
      1. IF we DO NOT set "Run this program in compatibility mode for:
        Windows XP (Service Pack 3)"
      2. -and- We DO NOT set "Run this program as an administrator"
      then we DO NOT get prompted. Setting either one of the mentioned Compatibilities and wham... we will get the annoying prompt.
      So... why did we have to set them in the first place??
      Rut Roh... Looks like we have 'thrown a monkey wrench in the works'. When we set up this System we made ourselves an "Administrator!!" Sooooo... possibly the program is "already" elevated when we start it cause of our status. -But- then why do we get the prompt IF we have the compatability settings as mentioned above????
      SevenForums and Windows 7 Limited User Account


      Networking - Mainly Local

    Wow!! ... Wow! ... and Wow again. We did an "ipconfig" and got a whole list of Ethernet, Wireless and Tunneling adapters. This will require some extensive research.

    Vista and Windows 7 moved a lot of "common" things around and renamed them a little. Anyway, we had a little difficulty in finding some of the items that had to be changed or edited in order to make this little HP LapTop part of our Network. For instance, we couldn't find the Workgroup setting in order to change it. The normal default is WORKGROUP and we want TRCOMPUTING. The answer was/is; Click on the Start Orb, type "work" into the searchbox and then in the presented choices click on "Change workgroup name". Then in the System Properties dialog box presented, click on "Change" and then change the Workgroup name.
    -Or- you can: Click on Control Panel -> System and Security -> System
    and then under computer name, domain and workgroup settings Click Change settings.

    Now then, with the above change in the Workgroup we were able to see some of the rest of our WorkGroup in Windows Explorer. -But- we could not see our Main Linux box. We believe that we have to share something from the Linux box in order to get seen by a Microsoft box.
    Refer: Vista-Win-7-Info

     March 20th, 2012/6:16am  Allllrighty now!! We can see the HP LapTop from the Main Linux machine -but- we can not see the Main Linux machine from the HP LapTop. However, from the HP LapTop we can see the Router -and- dusty3 which is Win2K inside VMware inside Linux!!   Hmmmmmm.... let's see now:

    • TRdm4 - self
    • Router - external hardware
    • dusty3 - Win2K inside VMware
    • dusty-tr2 - Main Linux Machine

    Ok. We were having trouble ... again ... with our local Network. After some struggling we once again found the "nmb" NOT running. We'll have to keep an eye on this. Anywho, we can see the Linux machine from the New Laptop and we can see the New Laptop from the Linux machine. Now we can copy stuff out to the New Laptop via the LAN.

    We do, however, have a strange setup. In all the hosts files we have the TRdm4 Laptop listed with an IP of 192.168.0.44 and when we use the ipconfig command on this Laptop we get varying IP addresses in the 4th position. It keeps incrementing. Yet we are now seeing it from the others... that have it listed as 192.168.0.44 in their hosts files.

    Create a Shortcut to Your Network - See the Neighborhood

    1. Right-Click on the Windows Orb (The Start)
    2. Click Properties
    3. Click Start Menu tab (IF not already selected)
    4. Click the Customize button
    5. Scroll down and click the Network box
    6. Click OK
    7. Click Apply
    8. Click OK

    A network shortcut will now appear on the Right-Side of your start menu. You can drag this icon onto your desktop if you care to have a Network icon on your desktop as well.

       TRDM4 to Dusty-tr2    Oh Darn!! Put something on the Linux Desktop last time that we could click on to see the Laptop from the Desktop. Can't remember what it was.?.? Something from 'James'?? Nope! Something right in the commands.
        Gecko Launcher -> Computer -> Network -> Samba Share -> TRComputing
    OK! We can see 'both' from 'both'.

     November 15th, 2018  All the Win10 UpDates, and a couple of the openSuSE updates, have screwed up my Networking. Had to fix it. This is going to involve 4 of my files:

    1.  My HP Envy 700-530  
    2.  My HP Pavilion 500-277c  
    3.  My HP DM4 Laptop   This file.
    4.  Networking II  
    5.  My Windows 10  


      XAMPP and Apache 2

    Well now, this section follows the Networking Section cause we feel that they are related. -But- we wanted a separate section for this installation of Apache on Windows 7. We placed XAMPP on our little Acer LappyTop and that means it "should be" a piece of cake. Arrrggghh... can't believe we said that. Anyway, with this Apache installed we will be able execute our Web Site on the LapTop the same as we do on our Main Linux Desktop.
    Refer: * XAMPP for Windows

    We've downloaded and installed the new version of XAMPP 1.7.7 (02 Apr 2012), which includes:

    • Apache 2.2.21
    • MySQL 5.5.16
    • PHP 5.3.8
    • phpMyAdmin 3.4.5
    • FileZilla FTP Server 0.9.39
    • Tomcat 7.0.21 (with mod_proxy_ajp as connector)

    Now in the verbiage over in our LappyTop we talk about installing MySQL in 3 Steps, or at least refer to it, and a lot of other stuff. Well, as you can see XAMPP already has MySQL and a lot of other stuff. So, we will just install XAMPP and go from there. We are not gona be heroes, or gurus, we are just going to take the easiest way of installation. Which is the first selection in the following.

    XAMPP for Windows 1.7.7, 20.9.2011

    Version

    Size

    Content
    XAMPP Windows 1.7.7 Apache 2.2.21, MySQL 5.5.16, PHP 5.3.8, OpenSSL 1.0.0e, phpMyAdmin 3.4.5, XAMPP Control Panel 2.5, Webalizer 2.23-04, Mercury Mail Transport System v4.72, FileZilla FTP Server 0.9.39, Tomcat 7.0.21 (with mod_proxy_ajp as connector)
    For Windows 2000, XP, Vista, 7.
    Installer 81 MB Installer
    MD5 checksum: 4500884a3bd21343fc69fcef2f4577be
    ZIP 149 MB ZIP archive
    MD5 checksum: 19c858c350f79a19f049d85128367f0c
    7zip 69 MB 7zip archive
    MD5 checksum: f8c3ce82a34a408115de552c4686a098

    Now then, some may think that the amount of info that we have "copied" and placed above is to much -but- we like to have all the info as handy as possible. Besides IF the Web Site disappears then we still have it. Course IF and WHEN that ever happens we probably won't be interested -or- in need of the info anyway. -And- over in our LappyTop we have info on where all the xampp files and directories are located.

     Finally, the Install  After downloading your file of choice, we need to move to the dir that contains it -and- execute the file.
        xampp-win32-1.7.7-VC9-installer.exe
    Oooooooppss... 'win32'. We are on a 64-bit machine with a 64-bit OS. Is there a 64-bit available???


    Getting XAMPP to work on Windows 7 (64-bit)

    XAMPP will work on Windows 7 (64-bit), because that's what I use. Here are the steps to install it:

    1. Download the ZIP file instead of the the EXE file, and save it to your "Downloads" folder.

    2. Using 7-zip, or WinRAR, or WinZip, or whatever compression tool you prefer, right-click on the xampp-win32-1.7.x.zip file and select "Extract here" it doesn't matter where you downloaded the ZIP file to, it will create a new folder called "xampp" and extract all contents within it.

    3. After extracting the ZIP file, move the newly created "xampp" folder from "Downloads" to "C:\"
    Note: It MUST be in a top-level directory such as "C:\", NOT within another folder such as "C:\Program Files (x86)."

    4. Next, go to "Start > Control Panel > User Accounts," and turn off the User Account Control (UAC). This will cause problems if left turned on. If you aren't familiar with how to do this, there are plenty of tutorials on the web to show you how.
    Don't know that this is absolutely necessary. You can use TeakUAC and you can also Un-Check the little box that says "Ask me again?".

    5. Now, navigate to "C:\xampp" and right-click "xampp-control.exe" and in the dialog pop up select: "Send to > Desktop (create shortcut)"

    6. Double-click on the new XAMPP Control Desktop shortcut which opens up the XAMPP Control Panel Application. There you will see a column of "Start" buttons, select the one for MySQL and the one for Apache... you should now see a green "Running" indicator.

    7. Open up your Web Browser, and type in http://localhost in which you should be presented with the XAMPP splash screen... Success!!!

    Refer: Drupal


     Now Pay Attention!!   After clicking on XAMPP to start it and then starting Apache or MySQL - DO NOT - dismiss the dialog box by clicking on the 'X' in the upper rigth corner. IF you do this you will not be able to get back into the Xampp controler UNTIL you restart. When leaving the XAMPP Control Panel -ALWAYS- use the "Exit" button.

    We did not try the "Install" version cause of the above blurb we found on the Net when we decided to investigate things first. Now that we have performed the steps, we think that the "Install" method would probably work. I mean both ways will install the Software -and then- and then afterwards you need to do some things manually.

    The "Local Address" is:    http://localhost/public_html/


      Accessories

     Carrying Case - Sumdex Metrobrief Lite 

    • Made of Microtex Nylon
    • Compact size with organizer pockets on front and back
    • Padded computer compartment can fit laptop screens up to 13.3
    • Adjustable / detachable shoulder strap
    • Convenient front AC adapter or other pocket for necessity

     Cooling - Belkin Laptop Cooling Pad 
    The Laptop Cooling Pad's unique patented wave design prevents your laptop from overheating. It uses natural convection to enhance fan cooling, and ensures low power consumption via your laptop's USB port. It requires no bulky power adapters.

    • Gentle slope improves typing comfort and reduces wrist strain
    • Raises screen height to help reduce neck strain
    • Fits conveniently within laptop bag
    • Patented wave design enhances cooling capabilities
    • Convenient storage compartment for USB cable when not in use
    • Grips pads to prevent laptop from slipping


      The Battery

    We were concerned over our usage of the System. Ninety percent of the time -or- more, we have the Laptop plugged in to an AC outlet. What worried us was the effect this had on the Battery. Upon searching the Net we found this:

    Should I remove the battery when A/C is plugged in?

    Many laptop users have this question and we will answer it right now:
    The answer is: YES and NO, it depends on the situation.

    Having a battery fully charged and the laptop plugged in is not harmful, because as soon as the charge level reaches 100% the battery stops receiving charging energy and this energy is bypassed directly to the power supply system of the laptop.

    However there's a disadvantage in keeping the battery in its socket when the laptop is plugged in, but only if it's currently suffering from excessive heating caused by the laptop hardware.

    So:

    - In a normal usage, if the laptop doesn't get too hot (CPU and Hard Disk around 40ºC to 50ºC) the battery should remain in the laptop socket;

    - In an intensive usage which leads to a large amount of heat produced (i.e. Games, temperatures above 60ºC) the battery should be removed from the socket in order to prevent unwanted heating.

    The heat, among the fact that it has 100% of charge, is the great enemy of the lithium battery and not the plug, as many might think so.

    The above was Borrowed/Copied/Stolen from: Battery Care


      Old Laptop vs New Laptop

    Well, I just had to put this in here. Just for some eye-openers.

     June 24th, 2003  This was a review by CNET
    HP's mainstream Compaq Presario 2100 series is one of the most chameleonlike notebooks around. It goes from a frugal $899 mainstream system (a mail-in rebate good through December 1, 2003 cuts the price by $100), with basic specs such as an Intel Celeron or an AMD Athlon processor and a 14.1-inch display, to a packed $2,266 desktop replacement, with an Intel Pentium 4-M CPU and a 15-inch screen. Things only get better from there, with the ability to add more cutting-edge options such as a DVD/CD-RW combo drive and integrated wireless. Be aware that the Presario 2100's lack of a cutting-edge graphics chip prohibits peak performance; still, it provides enough speed and battery life for the average tasks of a home user.

    Compaq Presario 2199US Notebook PC Product Specs

    Hardware
    Product Name Compaq 2100
    US Product Number 2199US
    Microprocessor Mobile AMD Athlon XP-M processor 2800+ (2.133GHz)
    Microprocessor Cache 512KB L2 Cache
    Memory 512MB DDR SDRAM (2 x 256MB) at 266MHz;
    Memory Max Maximum Memory 1024MB DDR SDRAM (2 x 512MB)
    Video Graphics ATI MOBILITY RADEON 4X AGP
    Video Memory 3D architecture with 64MB DDR (shared)*
    Hard Drive 40GB enhanced-IDE hard disk drive (4200rpm)
    Diskette Drive External USB Floppy Drive available for customers via hpshopping.com or local retailers.
    Multimedia Drive DVD-ROM/CD-RW combo
    Display 15.0 inch XGA TFT (1024 x 768) display
    Network Card Integrated 10/100BASE-T Ethernet LAN (RJ-45 connector)
    Modem Integrated v.90/v.92 56KB modem (RJ-11 connector)
    Sound Internal speakers; AC audio link; volume control button and mute button
    Keyboard 101-key compatible
    Pointing Device Touch Pad with On/Off button and dedicated vertical Scroll Up/Down pad
    PC Card Slots One Type I/II/III32-bit card bus (also supports 16-bit)
    External Ports
    • Two Universal Serial Bus (USB) 1.1
    • One Parallel SPP/ECP standard interface
    • One Serial; One PS/2 keyboard/mouse
    • One headphone-out
    • One microphone-in; one VGA (15-pin)
    • One TV-Out (S-video)
    • One RJ-11 (modem)
    • One RJ -45 (LAN)
    Dimensions 12.96 inches (L) x 10.72 inches (W) x 1.62 inches (H)
    Weight 7.3 lbs
    Security
    • Kensington MicroSaver lock slot
    • Power-on password
    • Accepts third party security lock devices
    Power 90W AC adapter (3 wire)
    Battery 8-Cell Lithium-Ion battery
    Software
    Operating System:
    Microsoft Windows XP Home Edition
    Refer: Compaq 2100 and The Specs and HP Specs

      My HP Laptop - NEW

     March 7th, 2012  This was verbiage from a Wal-Mart Add. Please note that, even though this says it was refurbished, it was like a new machine. I think it was one of their Display Models. Anyway, the original price was $649.99 and I got it for $489.96. Lots more power for lots less money.
    HP 14.0 Pavilion DM4 2165DX Laptop PC, Refurbished Key Features and Benefits Intel Core i3 2330M Processor 2.2GHz 6GB DDR3 SDRAM system memory expandable to 8GB Gives you the power to handle most power hungry applications and tons of multimedia work 640GB SATA hard drive Store 426,000 photos, 182,000 songs or 336 hours of HD video and more SuperMulti DVD Burner Watch movies, and read and write CDs and DVDs in multiple formats 10 100 1000 Gigabit Ethernet, 802.11b g n Wireless LAN Connect to a broadband modem with wired Ethernet or wirelessly connect to a Wi Fi signal or hotspot with the 802.11b g n connection built into your PC 14.0 HD BrightView LED backlit display Intel HD Graphics 3000 with up to 1696MB total graphics memory Additional Features HP TrueVision HD webcam 5 in 1 memory card reader 3 x USB 2.0 ports, 1 x headphone out, 1 x microphone in, 1 x RJ 45 Ethernet port, 1 x VGA port, 1 x HDMI port...

    Hardware
    Product Name HP dm4-2165dx
    Product Number QE375UA#ABA
    Microprocessor 2.20 GHz 2nd generation Intel Core i3-2330M Processor
    Microprocessor Cache 3MB L3 Cache
    Memory 6GB DDR3 SDRAM (2 DIMM)
    Memory Max Maximum supported = 8GB
    Video Graphics Intel HD Graphics 3000
    Video Memory Up to 1696MB
    Hard Drive 640GB (5400RPM)
    Multimedia Drive SuperMulti DVD burner
    Display 14.0-inch diagonal HD BrightView LED-backlit Display (1366 x 768)
    Network Card 10/100/1000 Gigabit Ethernet LAN
    Wireless Connectivity
    • 802.11b/g/n WLAN with WiDi (36)
    Sound
    • Dolby Home Theater with Altec Lansing Speakers
    Keyboard Full-size island-style keyboard
    Pointing Device Touchpad with multitouch gesture support and on/off button
    External Ports
    • Digital Media Card Reader for Secure Digital and Multimedia cards
    • 3 Universal Serial Bus (USB) 2.0
    • 1 HDMI
    • 1 VGA (15-pin)
    • 1 RJ -45 (LAN)
    • 1 Headphone-out
    • 1 Microphone-in
    Dimensions 13.42" (L) x 8.98" (W) x .098" (min H)/ 1.27" (max H)
    Weight 4.41 lbs
    Security
    • Kensington MicroSaver lock slot
    • Power-on password
    • Accepts 3rd party security lock devices
    Power
    • 65W AC adapter
    • 6-cell 55WHr lithium-ion battery
    What's In The Box HP TrueVision HD Webcam with integrated digital microphone
    HP SimplePass with integrated fingerprint reader
    Software
    Operating System:
    Genuine Windows 7 Home Premium (64-bit)


      ???

    An H3 Followed by a Blockquote:

    “Donec leo, vivamus nibh in augue at urna congue rutrum. Quisque dictum integer nisl risus, sagittis convallis, rutrum id, congue, and nibh.”

    Bulleted List:

    • Lorem ipsum dolor sit amet, consectetuer adipiscing elit.
    • Phasellus nec erat sit amet nibh pellentesque congue.
    • Cras vitae metus aliquam risus pellentesque pharetra.

    Numbered List:

    1. Lorem ipsum dolor sit amet, consectetuer adipiscing elit.
    2. Phasellus nec erat sit amet nibh pellentesque congue.
    3. Cras vitae metus aliquam risus pellentesque pharetra.

      ???

    Consectetuer adipiscing elit. Nam pede erat, porta eu, lobortis eget, tempus et, tellus. Etiam neque. Vivamus consequat lorem at nisl. Nullam non wisi a sem semper eleifend. Donec mattis libero eget urna. Duis pretium velit ac mauris. Proin eu wisi suscipit nulla suscipit interdum. Aenean lectus lorem, imperdiet at, ultrices eget, ornare et, wisi. Pellentesque adipiscing purus ac magna. Pellentesque habitant morbi tristique senectus et netus et malesuada fames ac turpis egestas.