| Time: |
|
Released: 11.3 PR Jul 15, 2010 |
These Web Pages change monthly, weekly, daily, hourly, minutely ... in seconds. All depends on what I have discovered... and how fast I have discovered it... and when I see my mistakes.
KDE3 on 11.3An interesting perspective: Linux vs Windows As Forrest Gump stated: "Stupid is as stupid does."
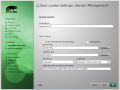
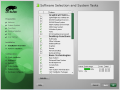
Yast2
Color Coding in Yast2:
- blue: there is a newer version of your installed package available on the FTP server
- red: the package that you have installed is newer than the version on the FTP server
- black: this is the same version as on the server
System Environment
I think it only fair to inform all readers of the System Environment this Operating System is being placed on / worked with / worked on. Different strokes for different folks. You may not experience the same successes, or failures, as I do because of different hardware.
| Harware Description | ||||
|---|---|---|---|---|
| Item Specifics - HP Pavilion Media Center TV m7480n Desktop PC | ||||
| Brand: | Hewlett Packard | Memory(RAM): | 4 GB (Got a smokin' deal on 2GB) | |
| Model: | Pavilion m7480n | Hard Drive Capacity: | (2) 300GB Drives | |
| Processor Type: | Intel PentiumD 940 (P) | Operating System(s): | Windows XP Media Center / SuSE 11.3 | |
| Processor Speed: | 3.2 GHz | Optical Drive: | Lightscribe DVD + DVD ROM | |
| Video Card: | GeForce 7300LE | Sound/Audio: | Realtek ALC 882 chipset | |
| Wireless Keyboard & Mouse with USB receiver/transmitter, Modem, Memory card reader, Network Integrated 10/100 Base-T, Wireless LAN 802.11 b/g, TV tuner card with FM tuner, Remote Control - USB infrared remote and receiver | ||||
| Even though it is not included in the name, the processor is Dual-Core. An "older" technology but still a Multi-Core. Does make it faster. (...yes I am proud of it.) | ||||
| Printer: | HP cp1700 | Router: | NetGear RT311 WNDR3700 | |
| Printer Server: | NetGear PS110 | Switch: | NetGear FS108 | |
At this time I'll be honest, I don't have a valid reason for showing the following PCI display other than I wanted to show what my system has ... mainly to myself.
ctaylor@dusty-tr2:~
> /sbin/lspci
Slot   | Class        |  Vendor          |  Device      | SDevice subsystem |PhySlot  | Rev
00:00.0  Host bridge:  Intel Corporation  82945G/GZ/P/PL  Memory Controller    Hub     (rev 81)
00:01.0 PCI bridge: Intel Corporation 82945G/GZ/P/PL PCI Express Root Port (rev 81)
00:1b.0 Audio device: Intel Corporation N10/ICH 7 Family High Definition Audio Controller (rev 01)
00:1d.0 USB Controller: Intel Corporation N10/ICH 7 Family USB UHCI Controller #1 (rev 01)
00:1d.1 USB Controller: Intel Corporation N10/ICH 7 Family USB UHCI Controller #2 (rev 01)
00:1d.2 USB Controller: Intel Corporation N10/ICH 7 Family USB UHCI Controller #3 (rev 01)
00:1d.3 USB Controller: Intel Corporation N10/ICH 7 Family USB UHCI Controller #4 (rev 01)
00:1d.7 USB Controller: Intel Corporation N10/ICH 7 Family USB2 EHCI Controller (rev 01)
00:1e.0 PCI bridge: Intel Corporation 82801 PCI Bridge (rev e1)
00:1f.0 ISA bridge: Intel Corporation 82801GH (ICH7DH) LPC Interface Bridge (rev 01)
00:1f.1 IDE interface: Intel Corporation 82801G (ICH7 Family) IDE Controller (rev 01)
00:1f.2 RAID bus controller: Intel Corporation 82801GR/GH (ICH7 Family) SATA RAID Controller (rev 01)
00:1f.3 SMBus: Intel Corporation N10/ICH 7 Family SMBus Controller (rev 01)
01:00.0 VGA compatible controller: nVidia Corporation G72 [GeForce 7300 LE] (rev a1)
02:01.0 FireWire (IEEE 1394): VIA Technologies, Inc. VT6306/7/8 [Fire II(M)] IEEE 1394 OHCI Controller (rev 80)
02:03.0 Ethernet controller: Atheros Communications Inc. AR5413 802.11abg NIC (rev 01)
02:04.0 Multimedia video controller: Internext Compression Inc iTVC16 (CX23416) MPEG-2 Encoder (rev 01)
02:05.0 Communication controller: Conexant Systems, Inc. HSF 56k Data/Fax Modem
02:08.0 Ethernet controller: Intel Corporation N10/ICH 7 Family LAN Controller (rev 01)
The Usual -or not- Intro
Another one of my fabulous write-ups on installing SuSE, now known as openSuSE. In these notes, I change between 'openSuSE' and 'SuSE'. Two reasons: SuSE is less typing and I like the sound of it. (Like Chuck instead of Charles.) I started these writeups primarily for myself and I see that others have at least looked at them. The main reason for them was so that I would have references of things done -and- have something to put on my Web Pages. In the beginnings there were lots of troubles installing VMware. Now it, as this version of Linux, has matured and they are relatively easy to install. (that has become a lie!!)
Of course the ease of installation can be, and many times is, subjective. Depends on:
Number one, the equipment you have.
Number two, what you want to do. (Those two sometimes fight for first.)
Annndd number three, your experience.
The DVD version of this OS contains a lot of Software. In addition, you can download and install software from various Web Sites. Now then, IF all you want to do is run this OS and possibly search the Web, then the default install will probably suit you. However, IF you want to develope some software and/or install some drivers and/or install VMware ... then you will need to install ... at a minimum, the 'C' and 'C++' compilers, the tool 'make', and the kernel source code. This act is mentioned in the verbiage that follows. I try to add/change each version of my rapport somewhat to make things easier. -But- since I haven't gotten any feedback, I just have to wing it. Hopefully something in this mess will help at least one other person. If it does then my mission has been accomplished.
Welcome:
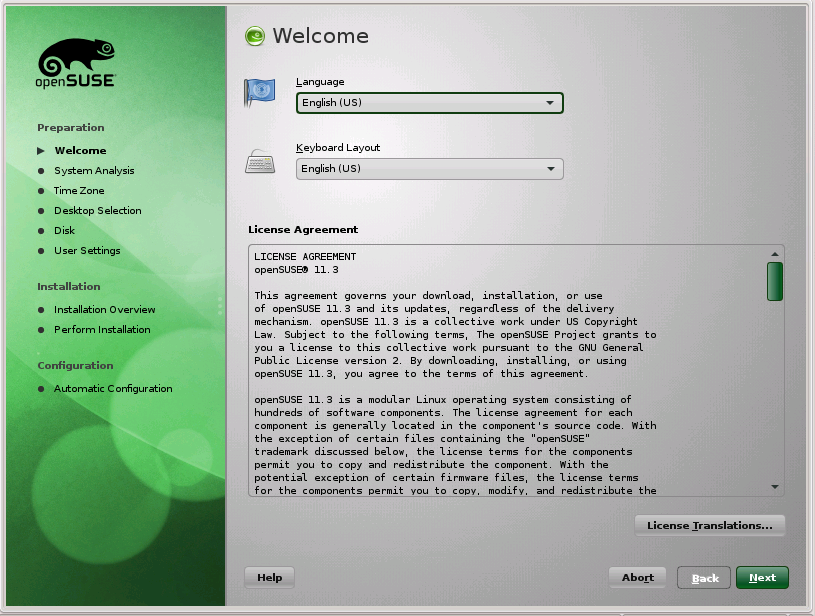 Click-on for larger view |
July 15, 2010 Once again, on time. (I have moved this one to the top cause...
after all, it is what we are interested in. The rest are just notations for reading.) I brought down the code shortly
after it was available. However, I am delaying on installing it. Need to check out IF there is anything that needs back-up
before I ruin my current SuSE. It takes time to re-do a set-up and it seems that just about the time I get everything the way
I want it ... they come up with a newer, greater version!! Think this time I am gona stay put. |
As always there are differences
of opinion as to whether or not to Update or Full Install. I, myself am for the later -but- I really don't want to have to
re-install everything. But ... then again ... this is to be my last time.?.?
Oh well. Mute point now. My cable connection is busted. Yes, I know I can install without the cable connection -but- at the
tail-end of the install there is a requirement for an Internet connection. Yes... it is minor ... but I'll wait.
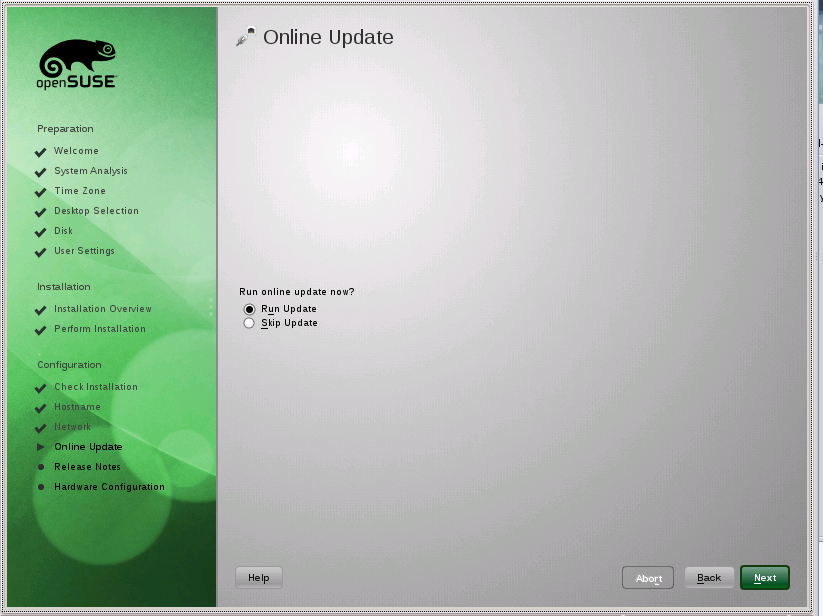
Think I am gona do the Update. IF there are problems ... then I will do a Full Install. The Update needs testing anyway.
Create New User: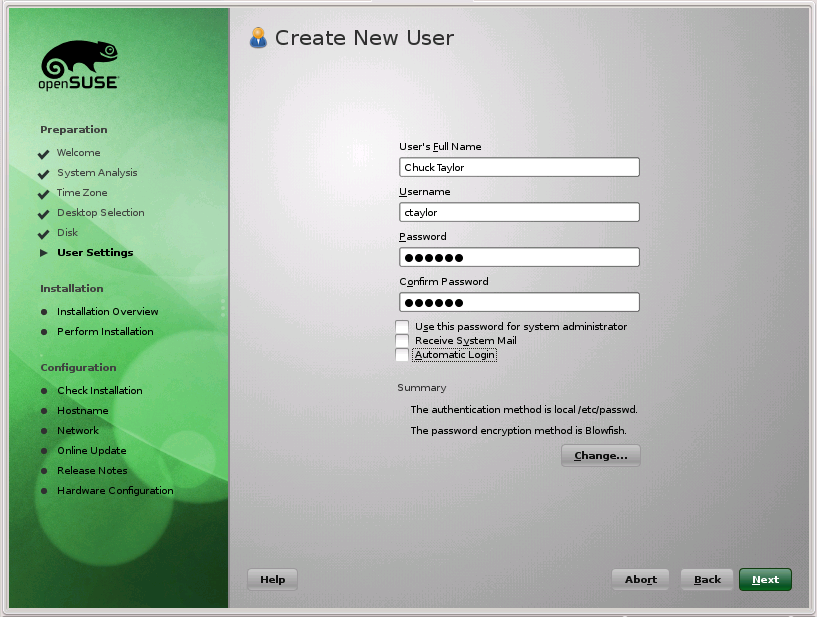 Click-on for larger view |
I want to put this up front so, hopefully, all will see it before they start...and it will cause some thought... and possibly some criticism. There are some defaults to the install that I personally do not agree with and will cause heartaches and problems later. One of them is Automatic Configuration and the other is Auto Login. I strongly suggest that you set the Auto Login to NO... On the Create New User frame, uncheck the box that says Automatic Login. IF we get to free with our systems then we are going the way of Windows and will loose the great security that we (the Linux Community) are famous for. |
| Auto Login: Now then, my reason for this... you get choices at the Login Prompt. IF
you want to change a parameter or sign on as root, or a different user, you have that option/choice. Auto login
takes you to .. you. To really play with Linux you need the OS selections and the User selections with all their
optional parameters available.
(Just my humble opion...)
And this is possibly needed when you are setting up your graphics card... see below. Auto Configuration: Uncheck this. More cause of past problems than anything else. I just prefer to set up the system myself and have not had as many problems IF I do it that way. Besides, then I get to see what it can find, and has found. |
|
Well, here it is, Feb 10th, 2010 and I still haven't
gotten the latest version of openSuSE downloaded.
I see that it was released, or announced on the 1st but I was to busy working on other's computers. So we will go over to
the SuSE page and read up on the new one whilst downloading it.
...now up to Apr 19th, 2010 ... and I am trying to get back to it.
I would really like to get back to the stage where my Linux was better than Windows. Right now that is not the case.
They have made many changes which I don't understand and some I think are rather silly. -But- that is mainly cause I
have been ... out of the loop ... for a while.
Other things became more important ... God, Family, Holidays and of course ... work. Had a rash of service calls
and some of them were pretty interesting ... and frustrating. You know, some of those Windows Viruses can get really
hairy!! -But- ... that is another story. Back to this.
- This mess will cover all the Milestone Releases.
- Going to use sda8, sda9 and sda10 for SuSE 11.3 (Partitioning note...mainly to myself)
- They started getting late on the releases at Milestone 4 and now at M6 it is going to be a week late.
- My greatest disappointment so far is my inability to get VMware installed. Not sure who is at fault, openSuSE, VMware or just my stupidity. June 29, 2010
The download, M4, took a long, long time. Hope it is worth it.
Apr 30, 2010: Well, it was released yesterday but I didn't get it until
today. The front page still says Milestone 5 but the download page says Milestone 6. Then from the forum it looks
like some are not happy with the Network connections. Primarily the wireless ones. I don't use those so maybe this
one will be better. I couldn't get a stable enough one to try my VMware in M5. Hopefully, M6 will be ok.
The other thing is the sound. IF I have Netscape in the Host going and I use a Flash routine that
has sound, it disconnects the sound in VMware. I have only mentioned it in the Forums. IF it is still a problem
here in M6 I will report it as a bug. This has happened before and Petr Vandrovec had some fixes.
Nope!! M6 was so bad that I didn't even get a chance to install VMware on it. Could not get a stable operation.
May 22nd, 2010 ... Brought down and installed M7. At first grins it is much better than M6!!
June 17th, 2010 On time with this one. Both them and me. openSuSE 11.3 RC1
I brought it down and I just burned it to a DVD. Now to re-boot into it and do a Full, Fresh Install in my third
boot Partition.
Hurrah!! It installed ok and looks good. I like the new graphics. Now for the acid test ... after some yard work.
Well maybe not ... it is over 100 degrees. (I live in Arizona)
Initially RC1 looks good. Once again my display is centered and looking good with the initial default settings. Not gona worry about the nVidia drivers unless I really need them. I really like the looks of my display with this nouveau driver. (nVidia 7300LE)
Bug 615446 Submitted It, RC1, did not recognize my Optical Drives. So, I could not install VMware.
Possible Fix: In theForums.
hal - Daemon for Collecting Hardware Information
HAL is a hardware abstraction layer and aims to provide a live list of devices present in the system at any point in time. HAL tries to understand both, physical devices (such as PCI and USB) and the device classes (such as input, net, and block) physical devices have. Besides it allows merging of information from device info files specific to a device. HAL provides a API through D-BUS for querying devices and notifying when things change. Finally, HAL provides some monitoring (in an unintrusive way) of devices. For further information, please refer to the HAL specification.
gimp-module-hal - The GNU Image Manipulation Program - module to detect input devices with HAL
The GIMP (GNU Image Manipulation Program) is a powerful image composition and editing program, which can be extremely useful for creating logos and other graphics for Web pages. The GIMP offers many of the tools and filters you would expect to find in similar commercial offerings and contains some interesting extras as well. The GIMP provides alarge image manipulation toolbox, including channel operations and layers, effects, subpixel imaging and antialiasing, and conversions- all including multilevel undo. The GIMP offers a scripting facility, but many of the included scripts rely on fonts that we cannot distribute. This package provides a module to detect input devices with HAL.
July 01, 2010 On time again!! RC2. Got it down on my machine and now we need to
install it. I am doing a FULL install and not an update.(this is out
on my third partion ... not my main one)
HoooRah!! HooRay!!! VMware will install and work!!!
First Boot
Well, at first boot I was disappointed in both this "new" release and myself.
It looked like I was booting up the old 11.2 version. No bells, no whistles... nada. Just a boot up to the same
old boring default desktop. Then I forgot to add/change the system specifics that I like. Don't know where my
head was, but it certainly was on vacation when I did this first, initial install. Needless to say, I am gona
do it again... with head attached!!
Ok. The M6 was a disaster, -but- M7 started out looking good. Better display and font. But, alas, there are problems.
The USB icon is missing and it is difficult to use the CD/DVD drives. Must go into root to get it mounted.
One of the messages I got at this initial boot was ... (this was in M1??):

... and I don't even know what it is! I've seen it talked about before, but I never really investigated anything
about it. Guess that I need to goto that Web Site and find out what it is. Might even be something that I could
find useful!!
Ok. In M7 I didn't get it. Got another message box when I signed on as my user:
KResource Migration Tool
Trying to migrate'DefaultAddress Book'...
Migration of 'DefaultAddress Book' succeeded.
and got the Akonadi when I signed on as root.
Don't know why I get this Migration everytime I boot into this new 11.3 ??? Should only be a one time thing ...
shouldn't it??
Once again the items missing for Quanta. No File manager on task bar. The NTFS worked right from the start. Could see my Windows parts with no trouble. Other things missing on task bar.
ARRGGG!! Can't leave it unattended. Goes into Hyper Drive!!! What is that?? you ask? I've mentioned this elsewhere but I'll mention it here again. When my processor gets to working hard... used more than, I believe 92%... the fan really kicks in. Part of the design. You can really hear it. Glad it doesn't run that loud all the time.
TopBoot Up and Install -or- Update??
We have both -but- almost everyone seems to prefer a "clean" installation, myself included, or at least for the most part in the past. Now then, because of the "extras" in my current installation of SuSE 11.2, I really don't want to wipe my system and perform a Clean Install. I really should be able to just do an Update -and- if not ... then it shouldn't be offered.
These pics are from an Update of SuSE 11.2 in VMware -and- a New Installation of SuSE 11.3 in VMware. (For those who don't know, VMware is a Virtual Machine.)
The Begining Click-on for larger view |
This is the same for both - Update -or- Install. Just a Welcome to openSuSE. |
Installer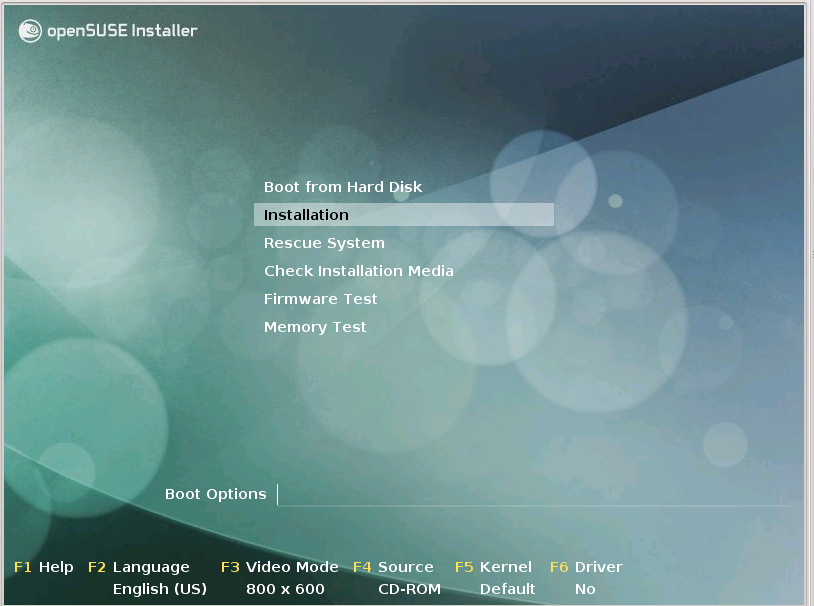 Click-on for larger view |
Now is where you chose to Install
(-or- Boot from the Hard Disc cause you forgot to remove the DVD.)
|
Loading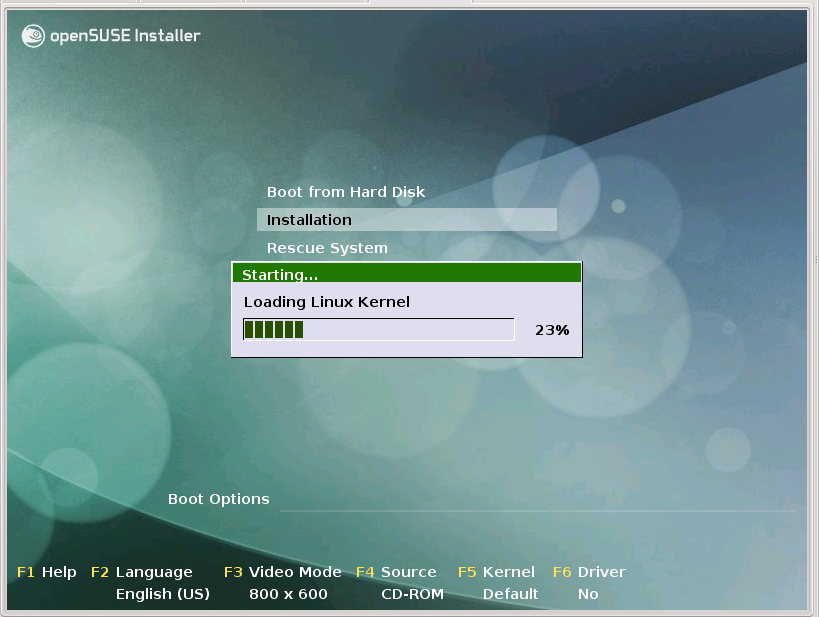 Click-on for larger view |
Same for both ... Need some directing software to do all this. Linux is loaded to Install or Update itself. |
Initializing Click-on for larger view |
Initializing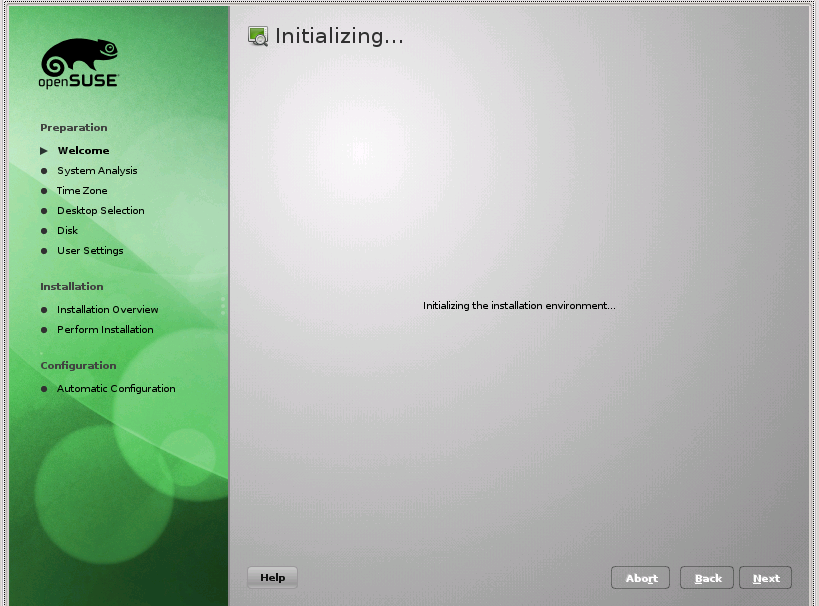 Click-on for larger view |
This can take some time. Be patient. |
| License Click-on for larger view |
Same for both ... the license is presented. I don't see a problem with this at all. Just read it ... or not ... and then move on by clicking Next. |
Analyzing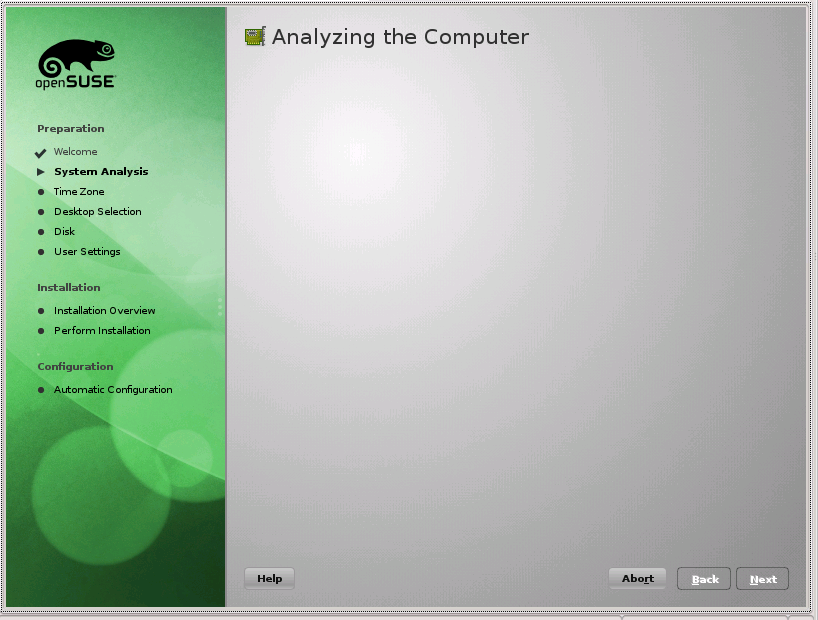 Click-on for larger view |
Probing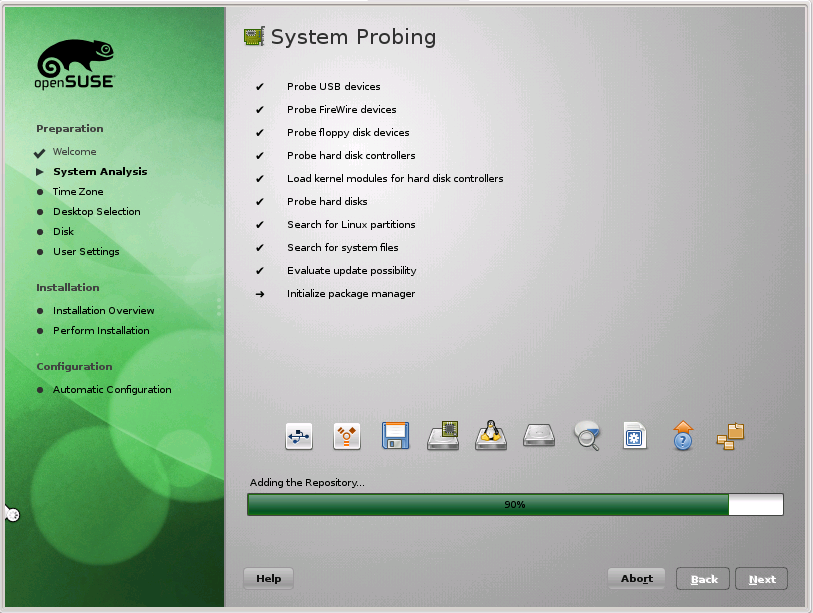 Click-on for larger view |
Here we analyze the system and probe the hardware. |
Mode...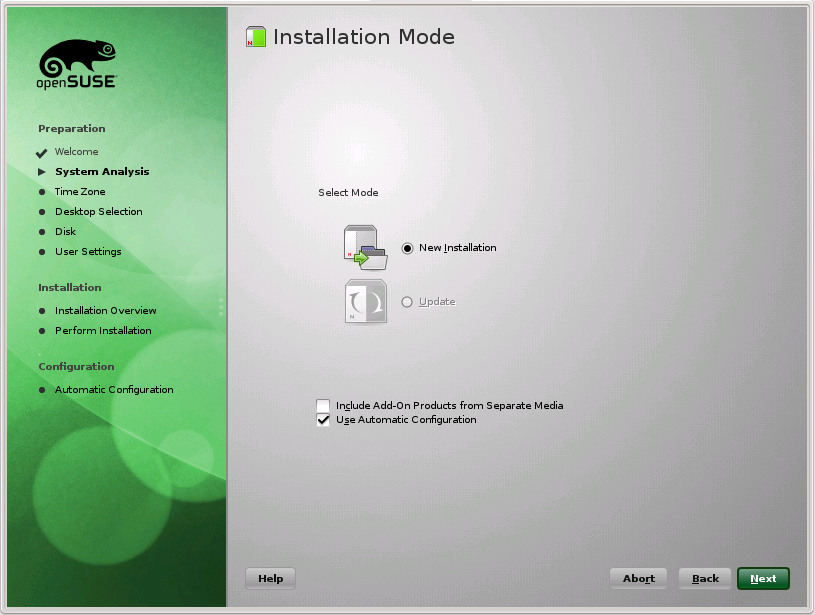 Click-on for larger view |
...Install Click-on for larger view |
The first one shows the default setup. Now I have UN-checked the Automatic Configuration. Like to do it myself...thank you. After you finish with this screen it does some more Initializing. |
...Update Click-on for larger view |
This is very similar to the Install. Here I also UN-check the Auto-Configuration. |
Install Mode Click-on for larger view |
In Install mode it does some initializing. |
Update Mode Click-on for larger view |
Update Mode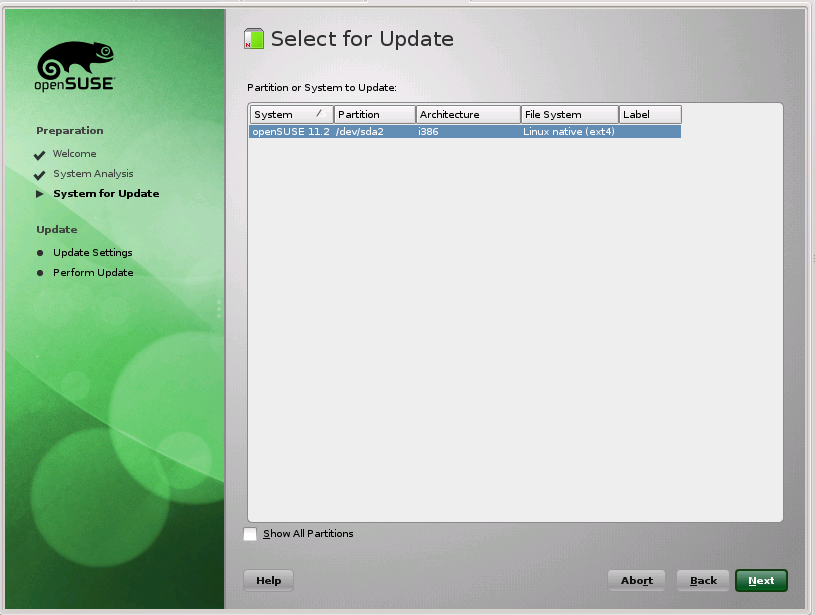 Click-on for larger view |
Update Mode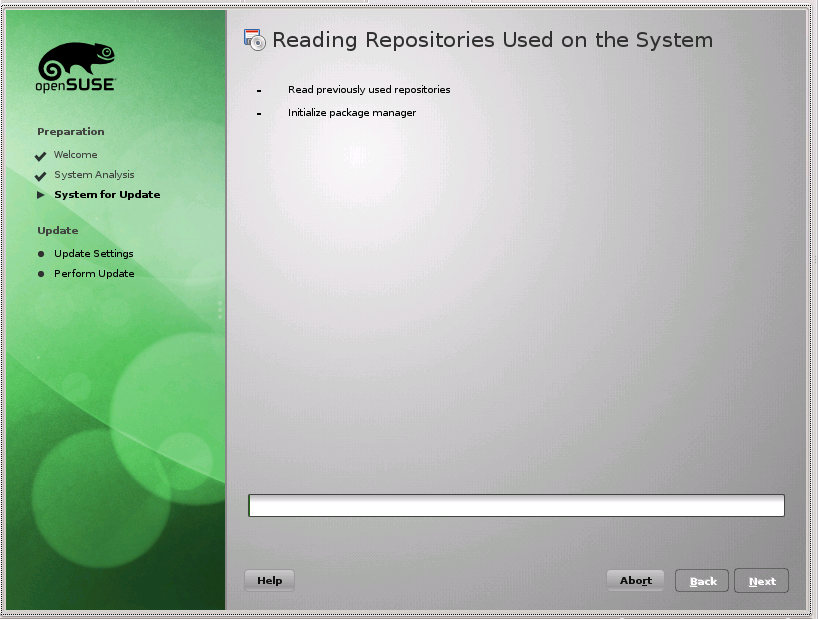 Click-on for larger view |
In Update checks Online. Then you get a selection of the system to update. In this case it is only one, but can be more. After your selection it checks out the Repositories. Since this is an Update, they will change. |
Update Mode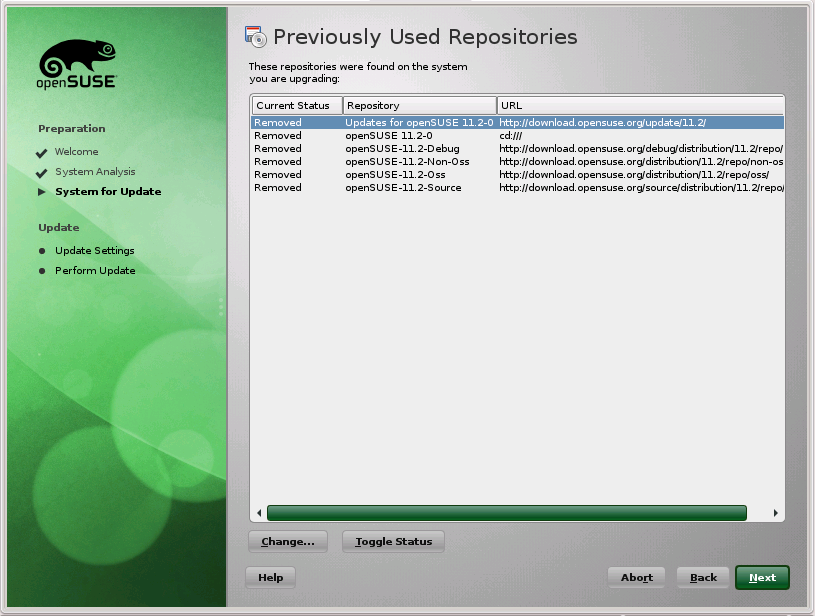 Click-on for larger view |
Because we are Updating the system, the old Repos are removed. New ones will be installed. |
Clock Set Click-on for larger view |
Clock Set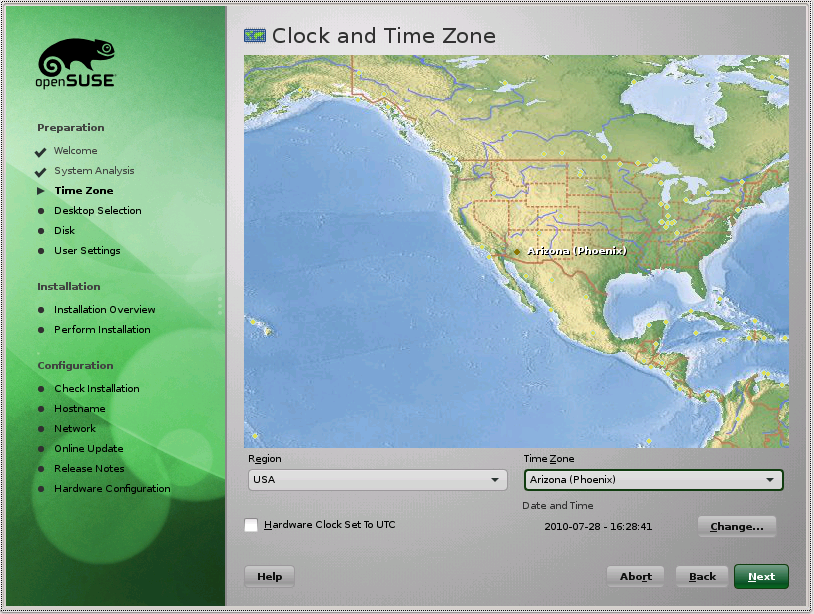 Click-on for larger view |
Here you set you clock time and time zone. Not needed for Update. |
Desktop Select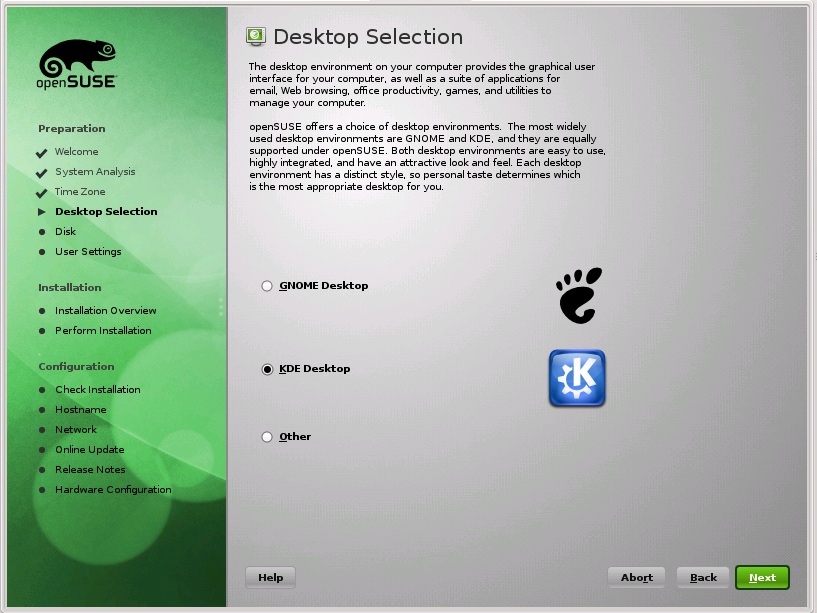 Click-on for larger view |
Desktop Software Selections. KDE is the default. Not needed for Update. |
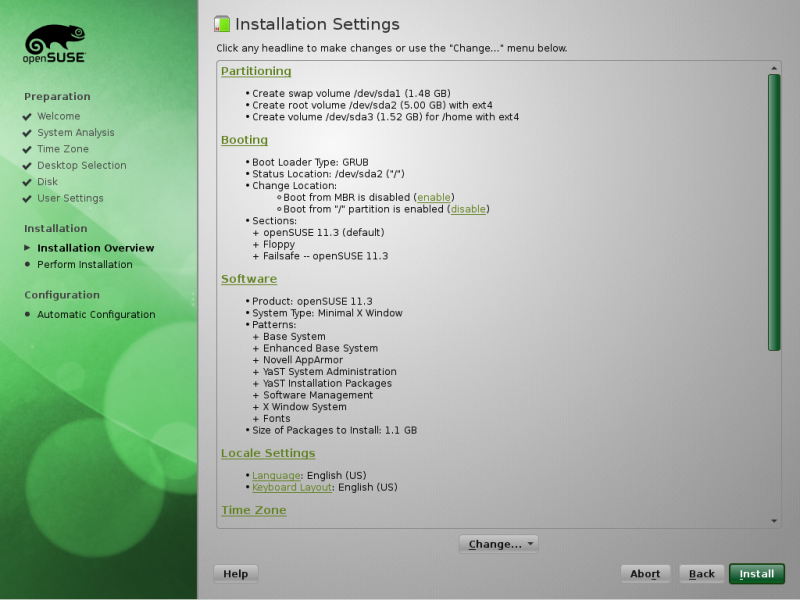
Suggested Partitioning Click-on for larger view |
Partition Editing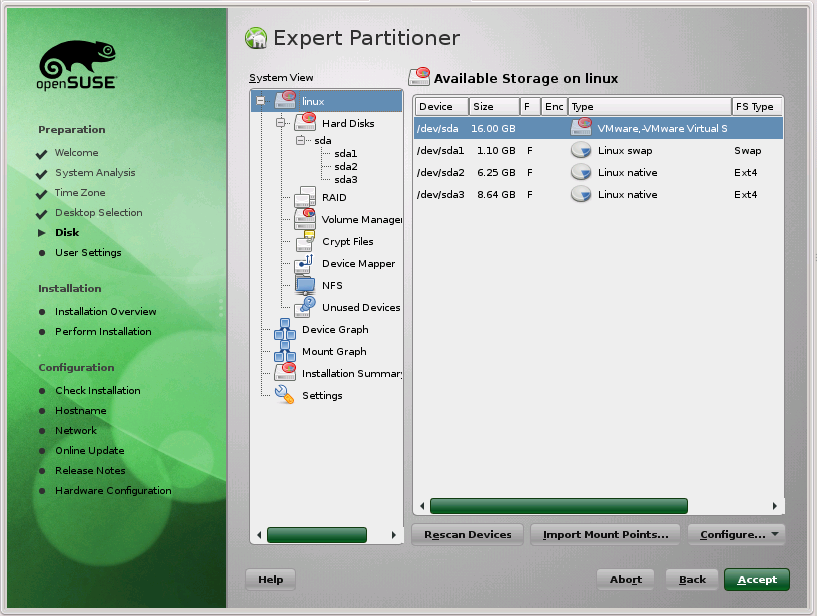 Click-on for larger view |
Here we have the suggested Partitioning. These may, or may not, fit your needs. Usually, for the Install, I must
change them cause of my multiple System Layout.
The example here is from my Virtual Machine install. My main machine is a lot different. Notice that there
are two buttons, one for creating and one for editing the Partions. Use Caution here. Normally, changes are not needed for Update. |
The following fdisk command will give info about your system. That's
a -(dash) L NOT a dash one.
This shows a two disk system. The first one is the Main Disk which contains all of the Operating
Systems. The Second Disk is the Data Disk and that is all it has. The Second Disk has a FAT32
Partition so that I can read it from Linux till I get the NTFS code loaded. Don't think that is
much of a problem with the newer Linux's but it was a bear in the past. Couldn't read or write
an NTFS Partition, then could read but not write, now finally can do both. The FAT32 on the
Main Disk is the Recovery Partition. It is a special Partition, in a special FAT32 format that is
only used for Windows System Recovery.
# fdisk -l Disk /dev/sda: 300.1 GB, 300069052416 bytes 255 heads, 63 sectors/track, 36481 cylinders Units = cylinders of 16065 * 512 = 8225280 bytes Sector size (logical/physical): 512 bytes / 512 bytes I/O size (minimum/optimal): 512 bytes / 512 bytes Disk identifier: 0x70987098 Device Boot Start End Blocks Id System /dev/sda1 1 10199 81923436 7 HPFS/NTFS Windows C: /dev/sda2 35529 36481 7654941 c W95 FAT32 (LBA) Windows E: /dev/sda3 * 10200 35528 203455192+ f W95 Ext'd (LBA) /dev/sda5 10200 10461 2104483+ 82 Linux swap / Solaris SuSE 11.3 /dev/sda6 10462 15934 43961841 83 Linux /dev/sda7 15935 29260 107041063+ 83 Linux /dev/sda8 29261 29526 2136613+ 82 Linux swap / Solaris SuSE 11.4 /dev/sda9 29527 32251 21888531 83 Linux /dev/sda10 32252 35528 26322471 83 Linux Partition table entries are not in disk order Disk /dev/sdb: 300.1 GB, 300069052416 bytes 255 heads, 63 sectors/track, 36481 cylinders Units = cylinders of 16065 * 512 = 8225280 bytes Sector size (logical/physical): 512 bytes / 512 bytes I/O size (minimum/optimal): 512 bytes / 512 bytes Disk identifier: 0x03ce34a8 Device Boot Start End Blocks Id System /dev/sdb1 1 34443 276663366 7 HPFS/NTFS Windows D: /dev/sdb2 34444 36481 16370235 f W95 Ext'd (LBA) /dev/sdb5 34444 36481 16370203+ b W95 FAT32 Windows L: |
||
Install Mode.. Click-on for larger view |
..Create New User Click-on for larger view |
Maintaining my differences ... I UN-check the 'Use same Paasword for root' and the 'Automatic Login'.
I mean we want security ... not open the doors wide. This will only be in the Install. It won't change when you Update. So you will not be required to create a new User. Not needed for Update. |
root Password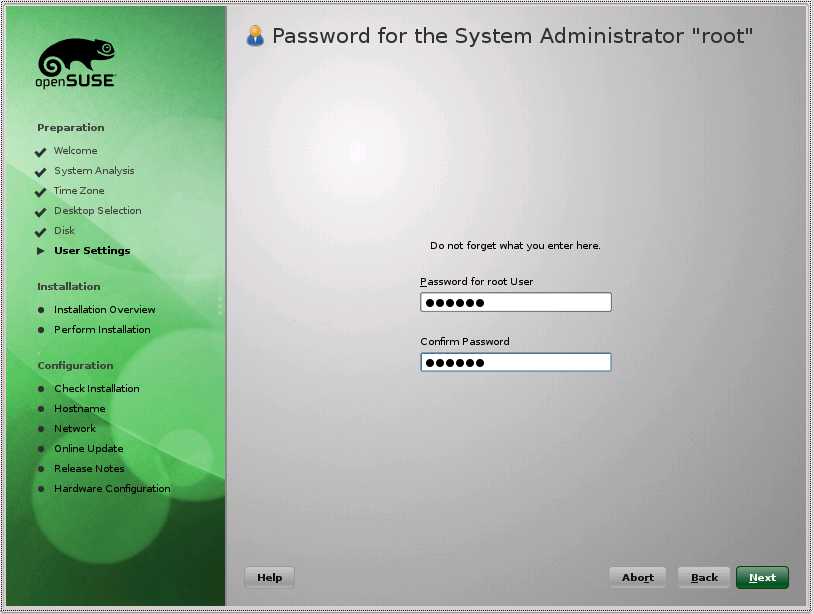 Click-on for larger view |
Now then, you will only get this screen if you canceled using your User Password as the root Password
in the previous Create User screen. This will only be in the Install. It won't change when you Update. |
Install Mode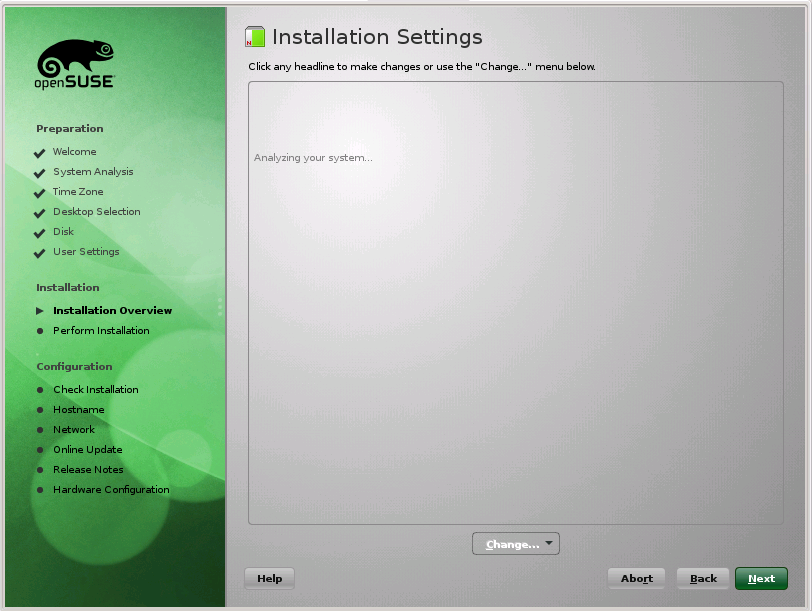 Click-on for larger view |
Initial Software screens for Install. |
Install Mode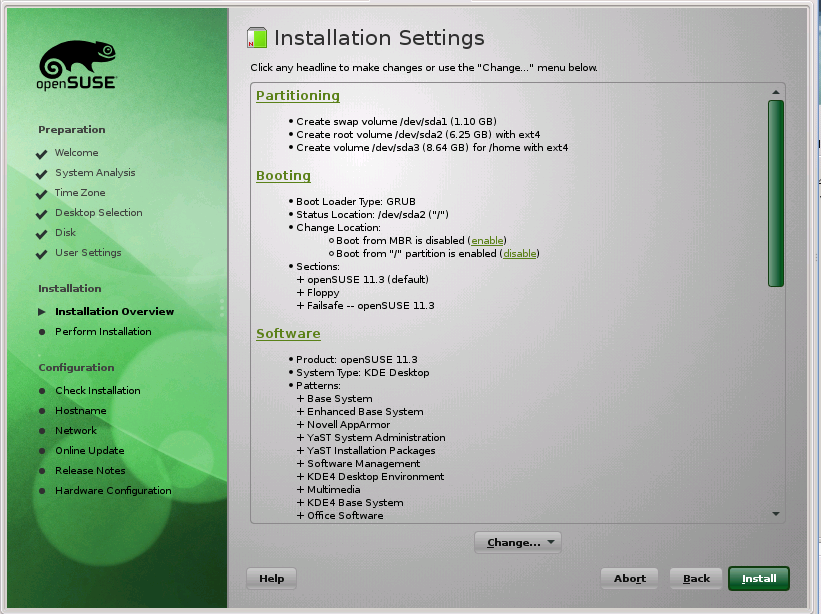 Click-on for larger view |
Install Mode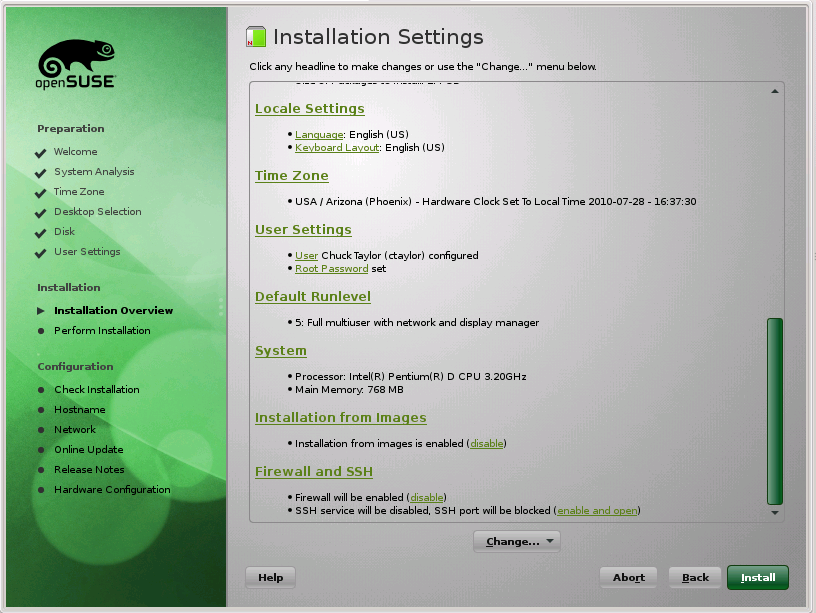 Click-on for larger view |
Here in the Installation Settings you can make all kinds of changes... in Install. |
| Update Mode Click-on for larger view |
... and fewer in Update |
Booting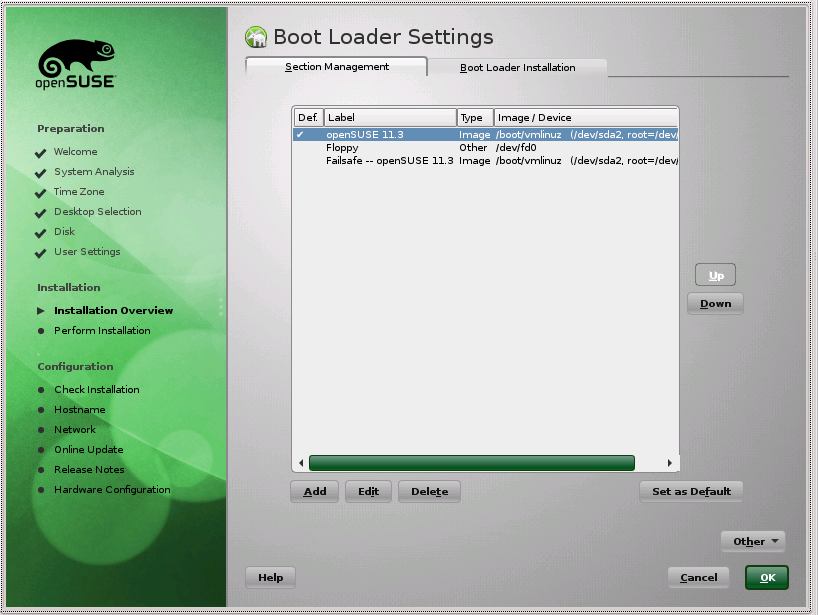 Click-on for larger view |
 Click-on for larger view |
Click on Booting in Installation Settings to change some boot parameters. First screen shows the Boot Loader settings with openSuSE selected by default. Click on Edit and you will get the next screen where you can add some parameters. I have added 'nomodeset' with a lot of spaces so it stands out and you can more easily see it. Don't add all those spaces when/if you add this parameter. |
Software Click-on for larger view |
 Click-on for larger view |
 Click-on for larger view |
 Click-on for larger view |
| These are Software selections made using the Detailed operations. | |||
Software Accept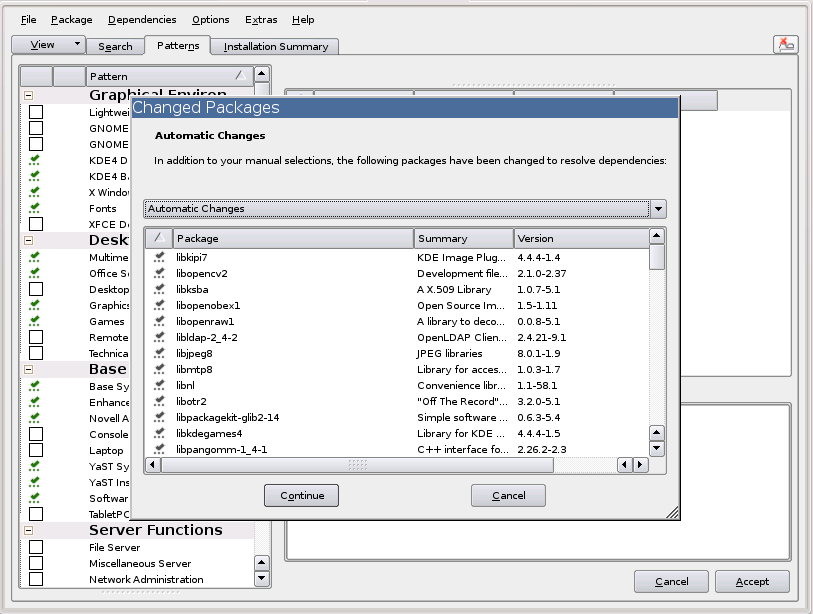 Click-on for larger view |
Changes made Click-on for larger view |
Upon clicking on Accept after making all your selections you will probably gt a bunch of extras. Just Accept them also. You will then see the changes being made. |
Start it..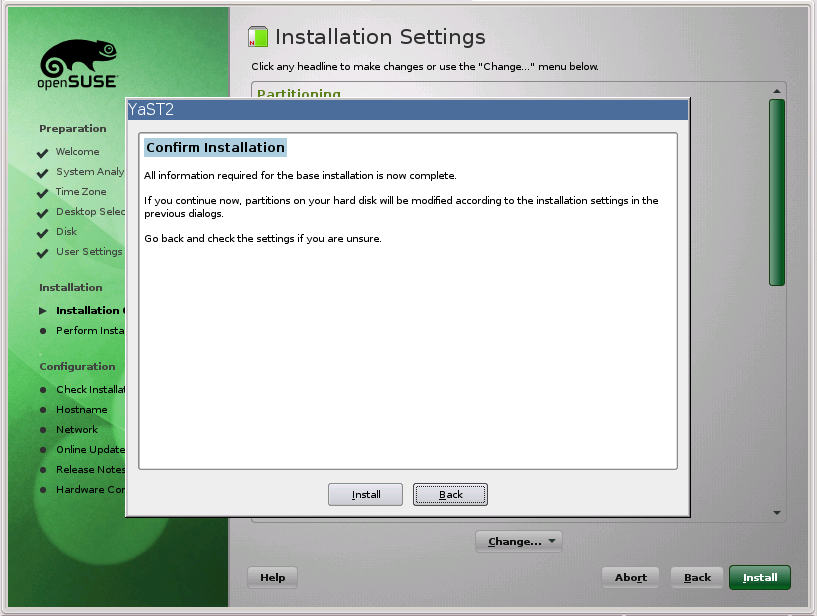 Click-on for larger view |
Click on Install ... twice. Once in the Main Screen and second in the Dialog that asks if you are sure. |
Both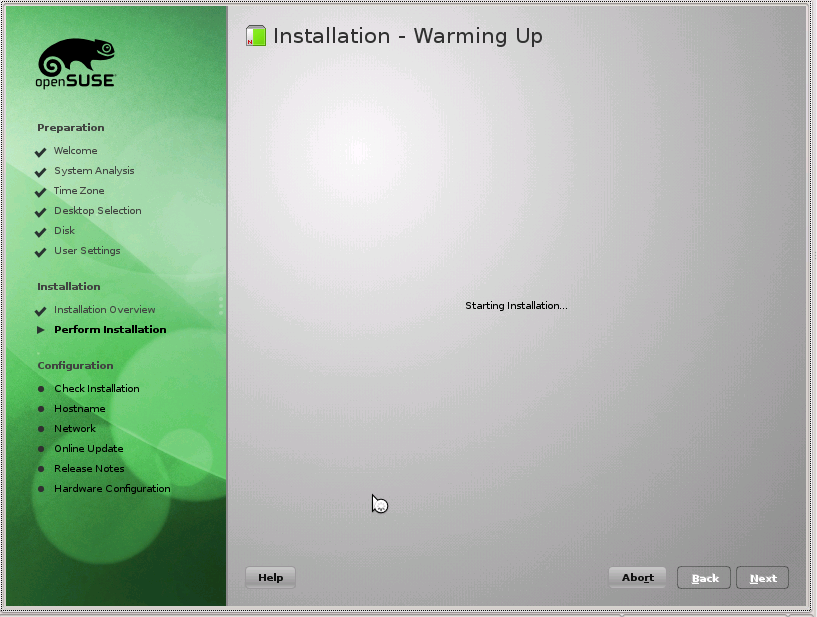 Click-on for larger view |
Cute screen ... just had to include it. Get it for both. |
Entertain Click-on for larger view |
Details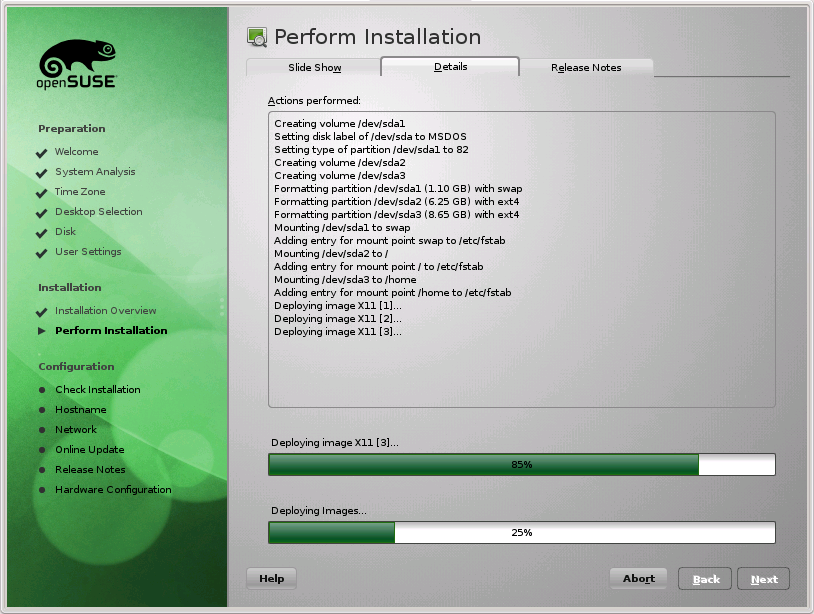 Click-on for larger view |
Installation starts, and you get entertained unless you click the 'Details' Tab. Also some differences between Install and Update. In the details section you may see some deletions during the Update. |
Install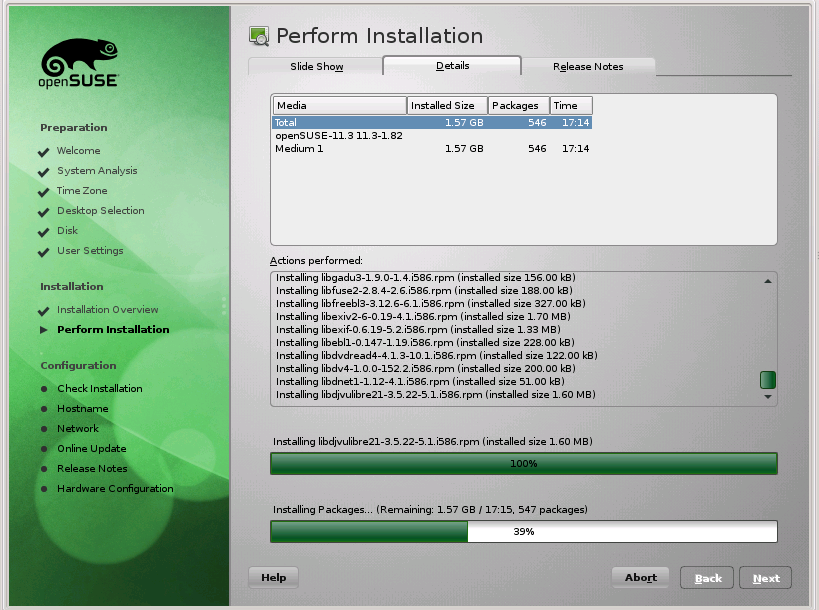 Click-on for larger view |
System Re-Boots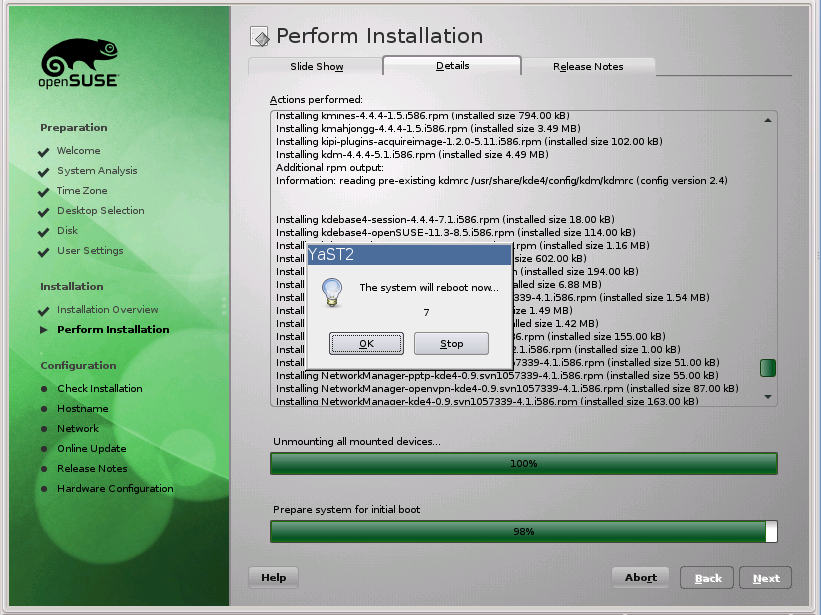 Click-on for larger view |
Finish installation and do the initial re-boot... |
Update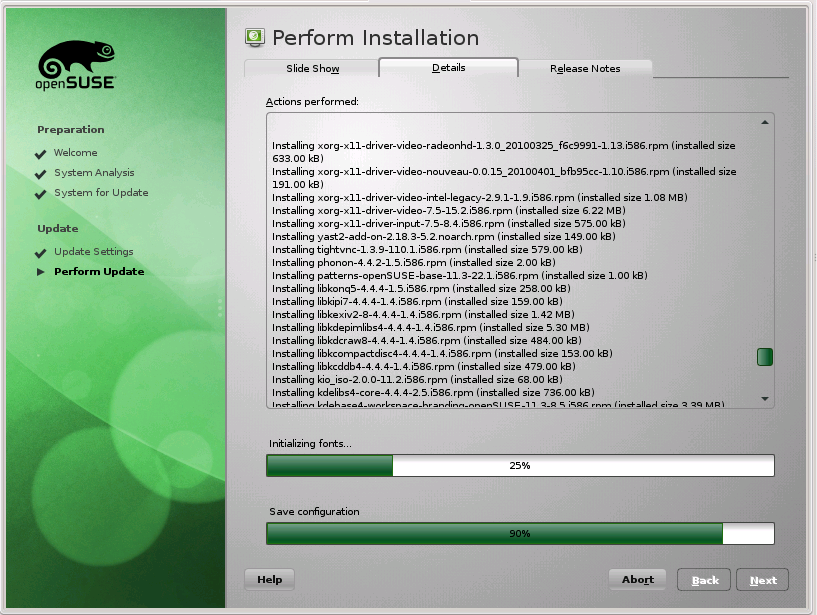 Click-on for larger view |
System Re-Boots Click-on for larger view |
Finish installation and do the initial re-boot... |
Install Click-on for larger view |
 Click-on for larger view |
The system re-booting process ... |
Install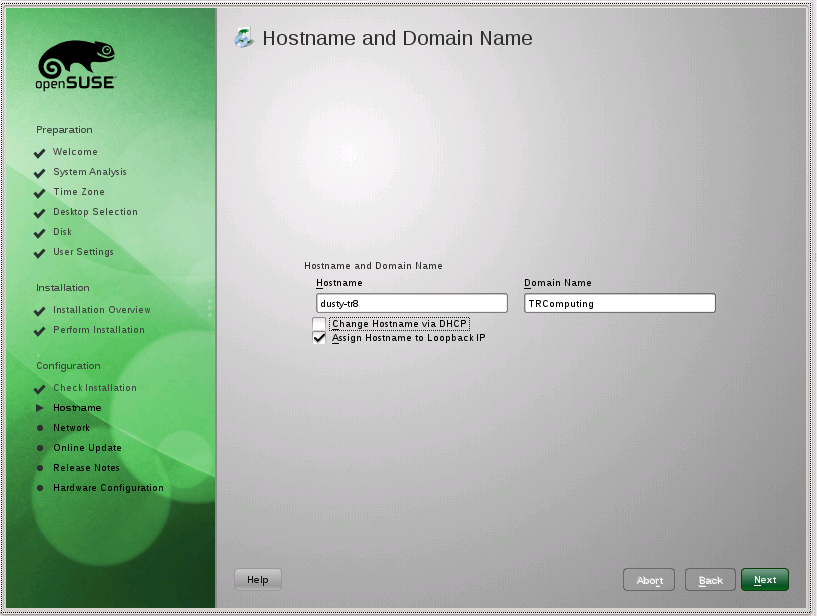 Click-on for larger view |
 Click-on for larger view |
 Click-on for larger view |
 Click-on for larger view |
|
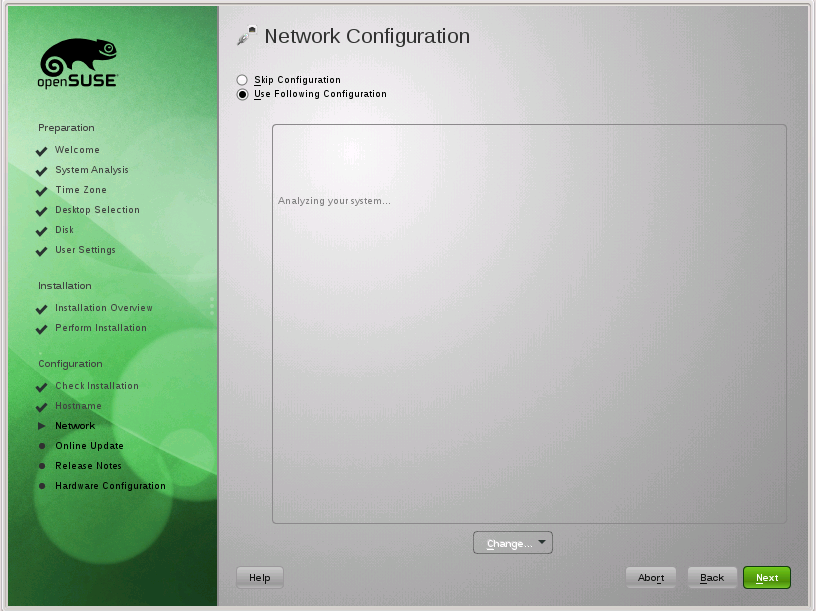
More Network ops from the Install...first we must set the Host Name and Domain Name (for our Local Area Network) This is only for Install. Update should keep the same values. |
|||
Install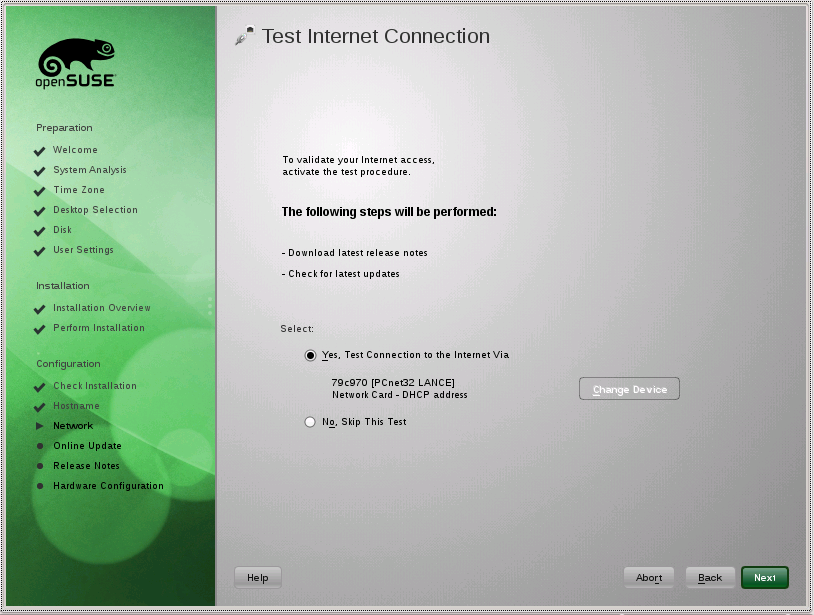 Click-on for larger view |
 Click-on for larger view |
 Click-on for larger view |
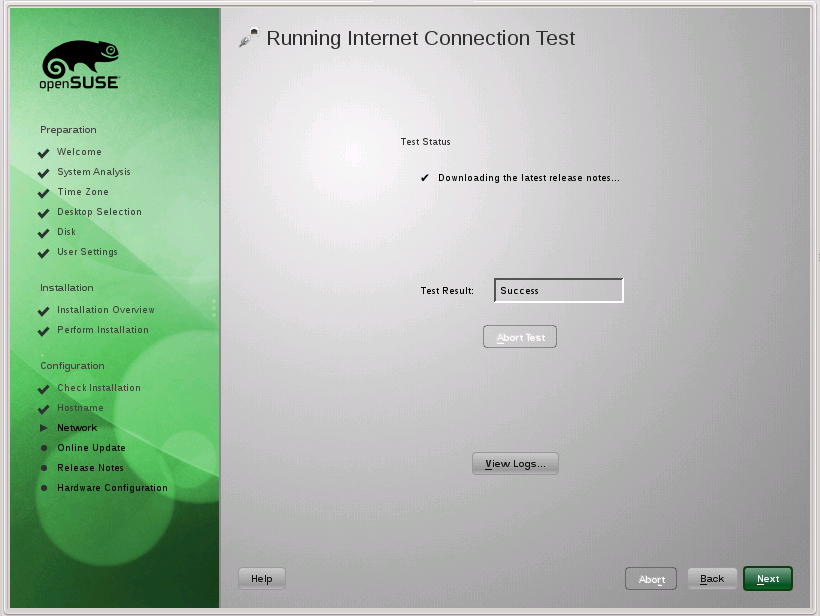
Here we test the Internet Connection and get the latest Release Notes. Wait for the Success. |
Install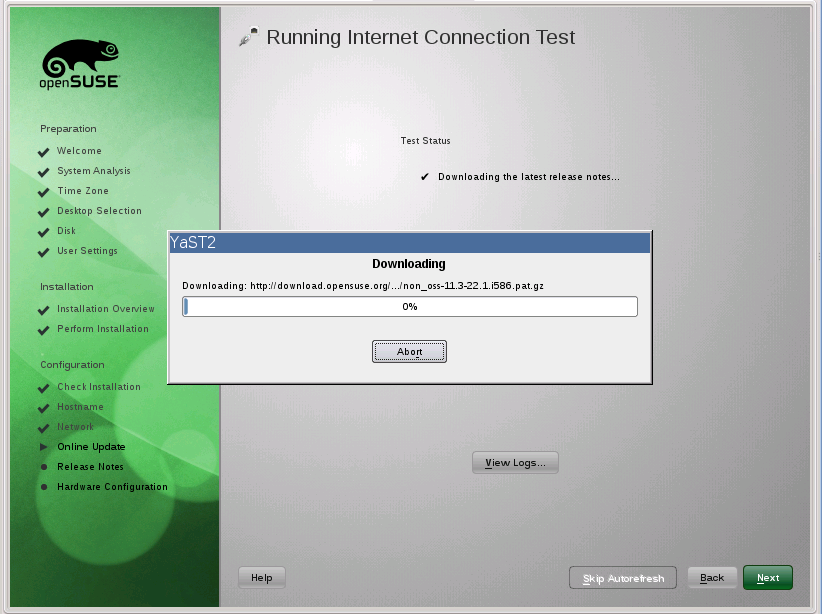 Click-on for larger view |
 Click-on for larger view |
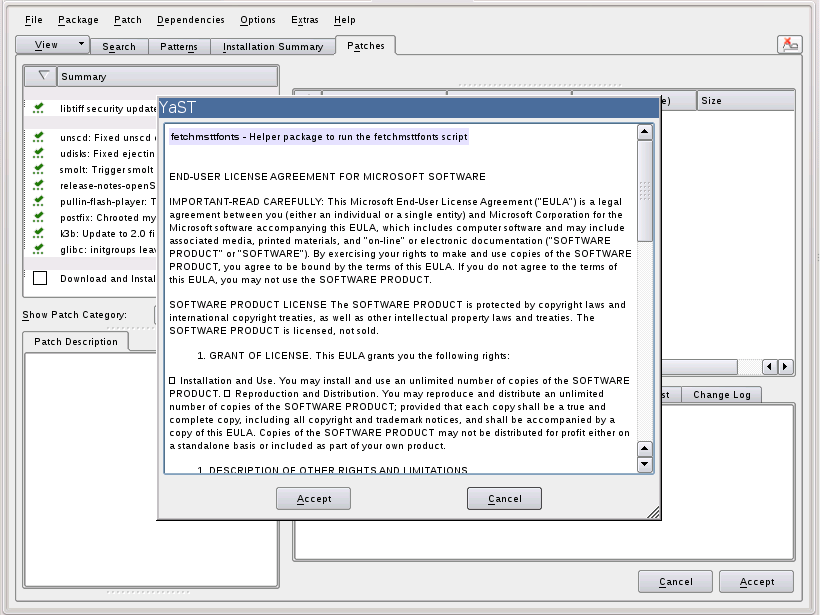
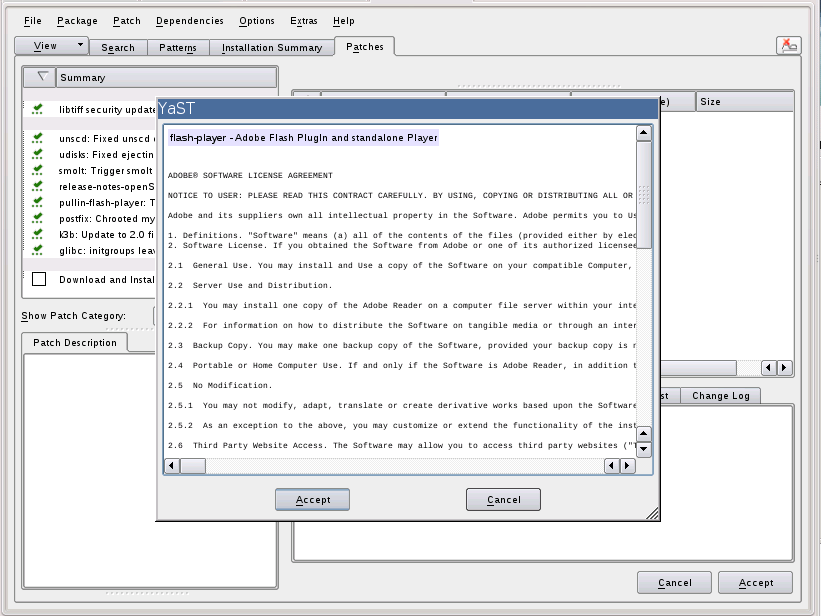
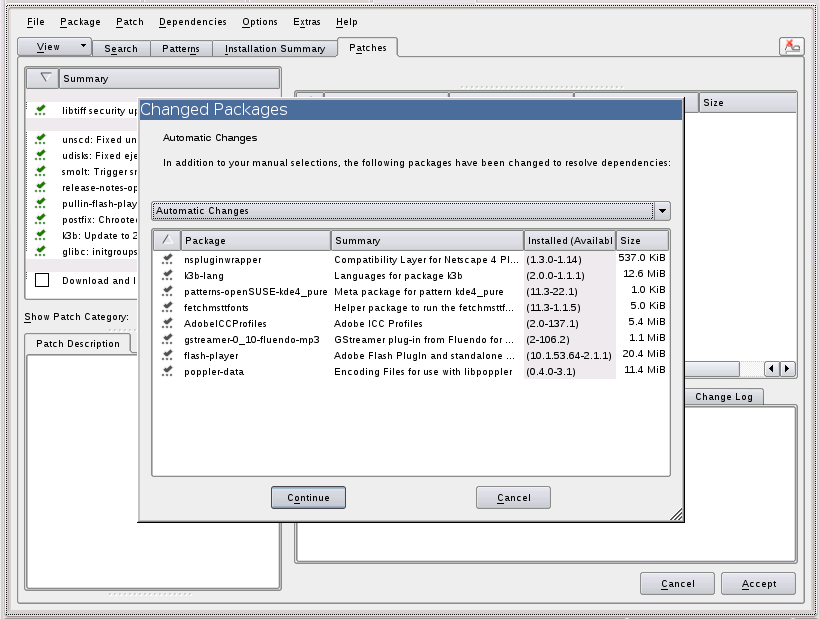
I missed the first screen which said it was getting the Repositories. Then it asks if you want to Update? Which may sound strange in a New Install -but- we are getting some items that couldn't be included in the first place. Things like Flash and Microsoft Fonts. |
Install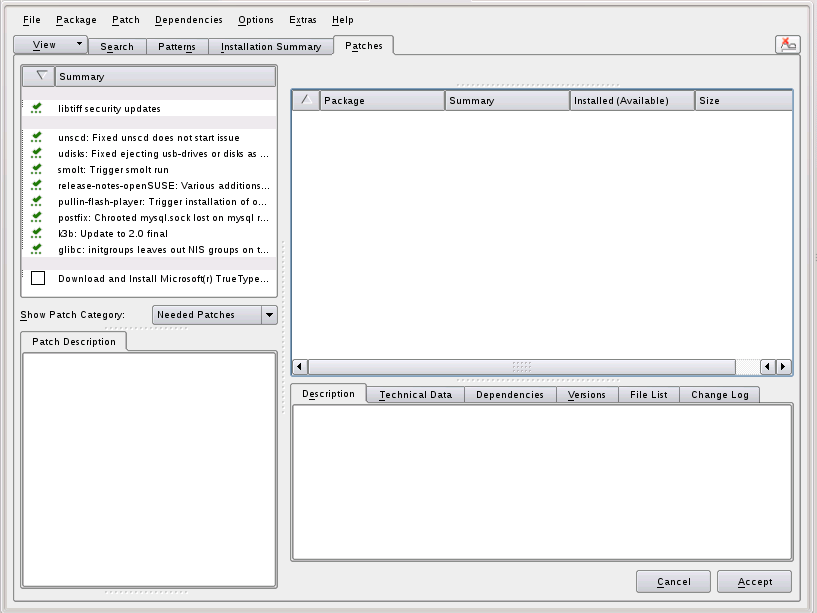 Click-on for larger view |
 Click-on for larger view |
 Click-on for larger view |
 Click-on for larger view |
| These are the acceptance screens ... for the Updates that you just said yes to. | |||
Receiving...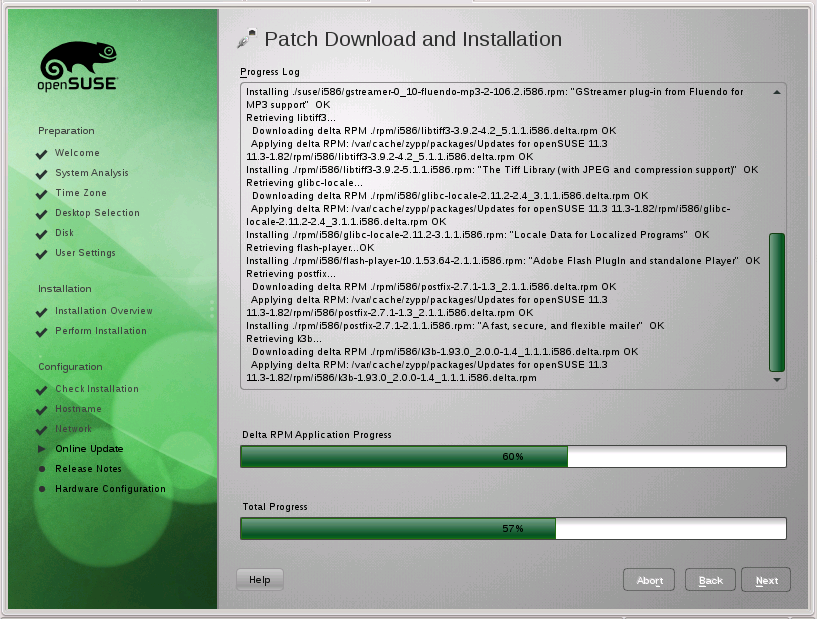 Click-on for larger view |
Receiving...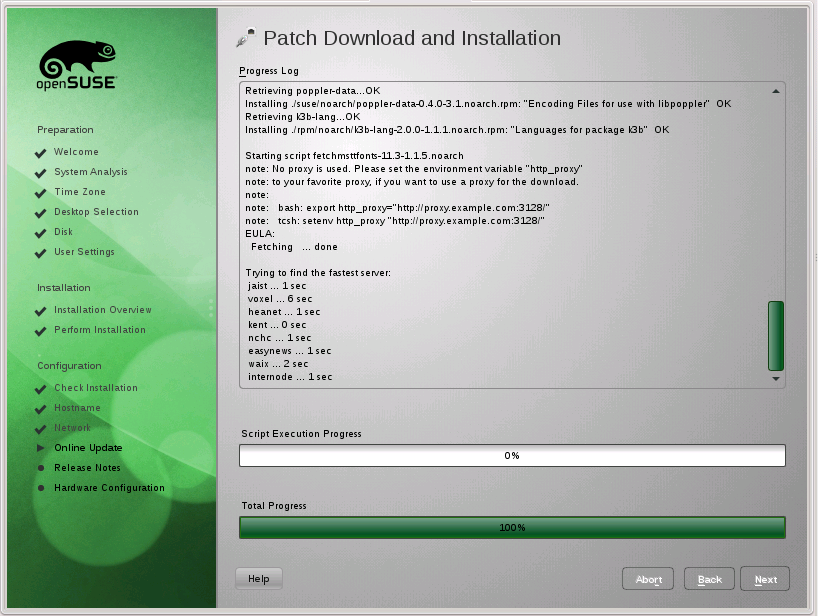 Click-on for larger view |
..Finish Patches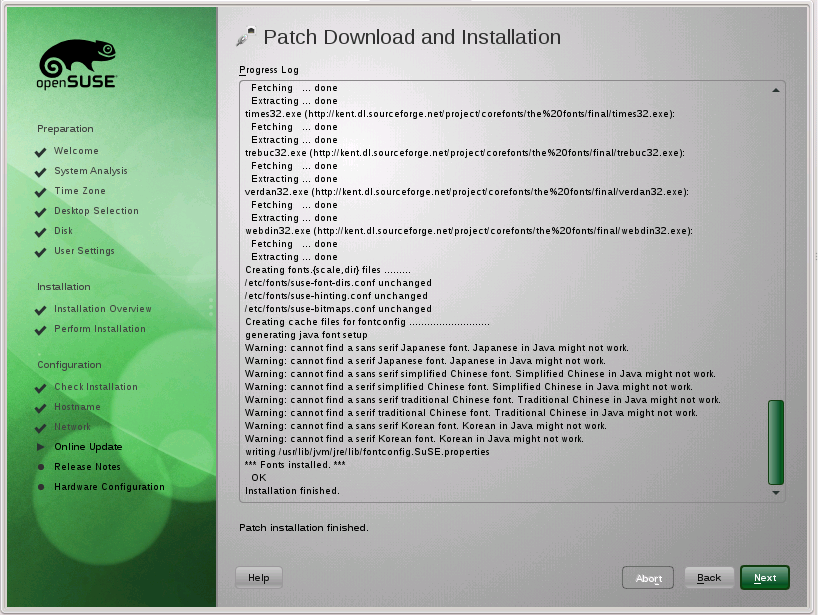 Click-on for larger view |
| Here we are getting the Updates and Patches to apply to our new system. | ||
Install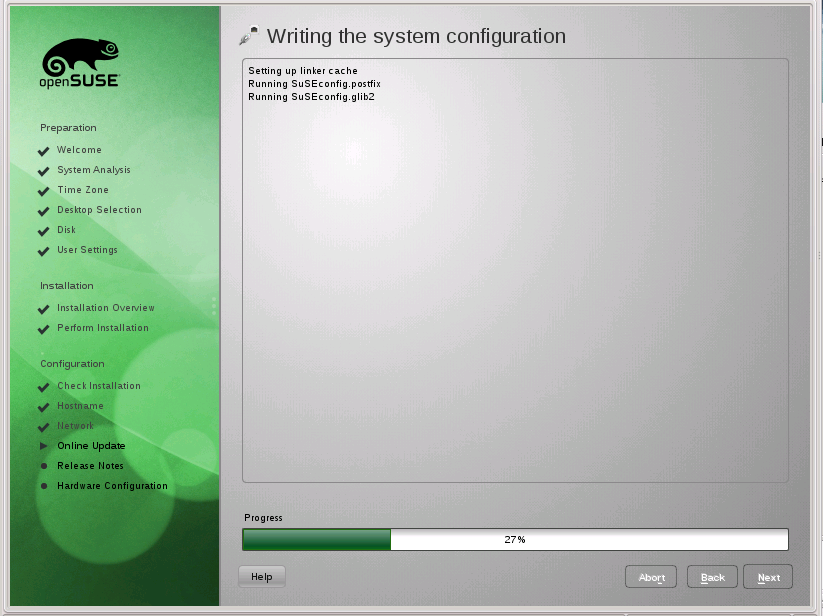 Click-on for larger view |
 Click-on for larger view |
Write out the System Configuration and then display the Release Notes. |
Install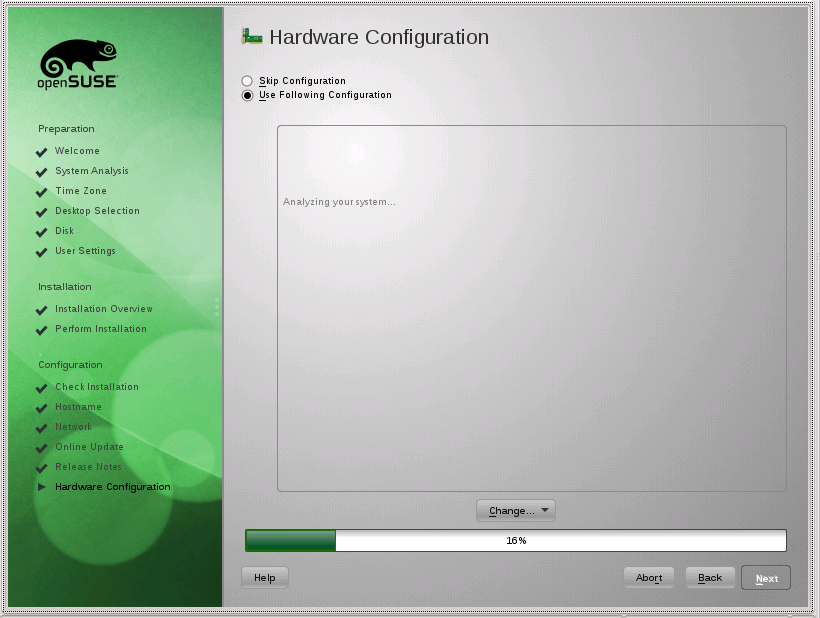 Click-on for larger view |
 Click-on for larger view |
 Click-on for larger view |
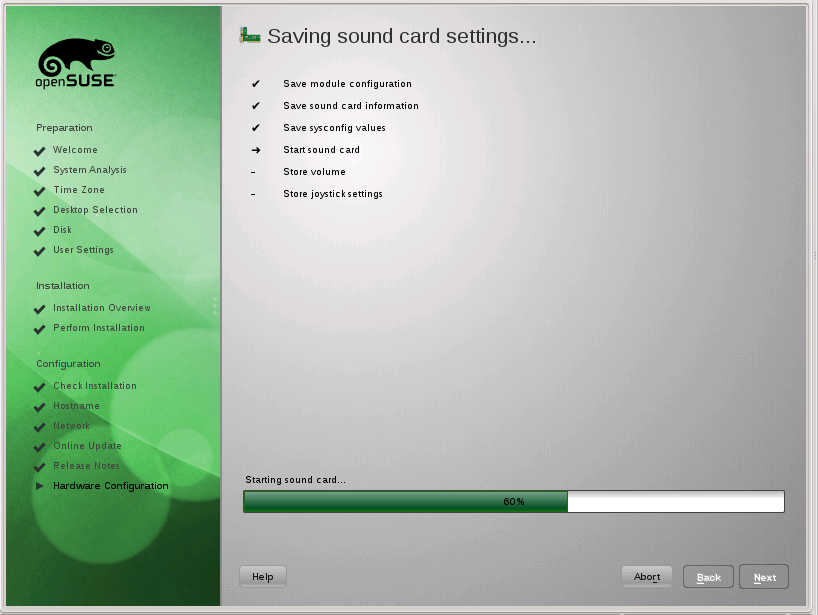
Here we take care of the Hardware ... which will probably be different on most machines ... only the same
on identical ones. Not needed for Update. |
Finished Click-on for larger view |
We are fini... all done ... finished. Now we can re-start and sign on to our account. |
Re-booting...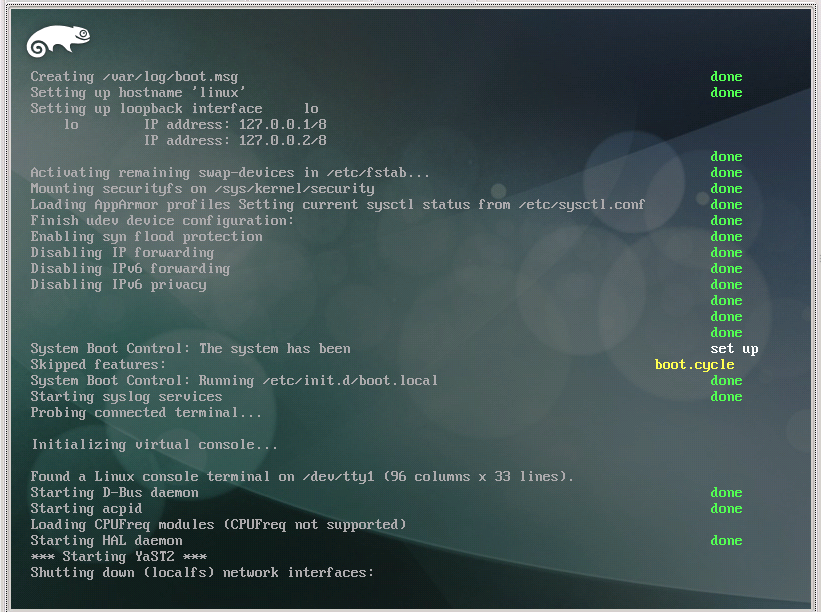 Click-on for larger view |
...Sign On ...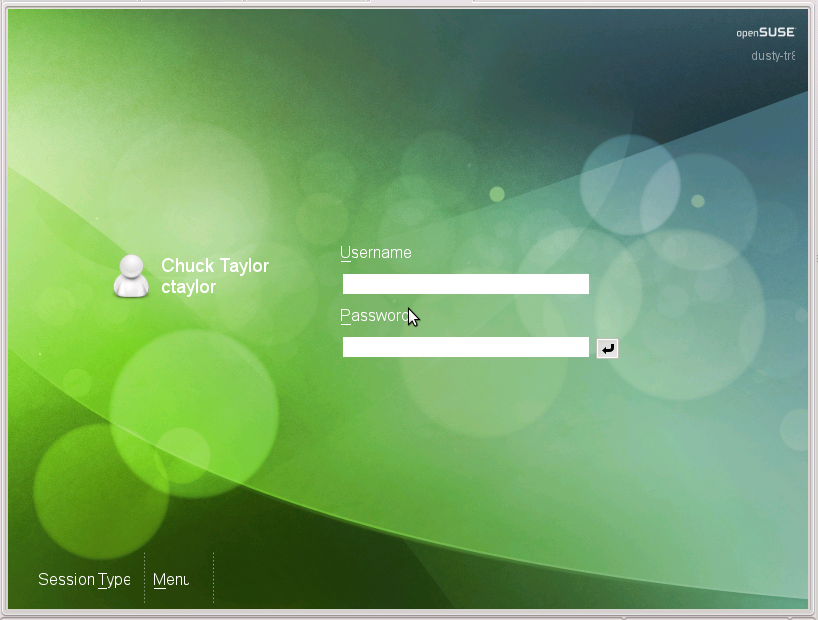 Click-on for larger view |
...Loading Click-on for larger view |
Re-Boot ... Sign On ... Load Up ... |
Welcome Click-on for larger view |
Desktop Click-on for larger view |
Get an Informative Welcome and then the Plasma Desktop. |
My plans were to have some screen shots of the Update -but- I couldn't get them ... yet.
However, as the previous sentence implies ... I Updated to 11.3 ... on my main system. Matter of fact I am signed on
to Win2K inside VMware inside the New openSuSE 11.3. I didn't have to install anything ... yet.
However, because I have an nVidia card and already had the nVidia driver installed, uhmm, for
openSuSE 11.2, I decided to NOT set the nomodeset and just see what an update would do. It goes to the nouveau driver.
No surprise really. Matter of fact it all looks ok and the system works ... except ... no 3D. And how do I know that??
Cause when I fired up VMware and booted up the system that was waiting... it complained. Evidently Vista was the last
system I had used in VMware -and- because I wasn't paying attention it was the default. It came up ok, just had a
VMware message that there was no 3d.
Good thing that Vista and Win7 were the first things I tried (both by accident). Cause Win2K did not put out the
3D message warning. Anyway, the definite reason for loading/installing the nVidia driver. After that I
got my 3D ops.
Speaking of which ... I noticed, while the update was going on that I got radeon and intel drivers loaded. Why??? I have an nVidia Card!! (have to investigate this further)
Well, these are the two drivers that got installed...plus the nVidia driver. Wonder how
much else got installed that didn't catch my eye??
- xorg-x11-driver-video-intel-legacy - Legacy Version of the Intel X.Org Driver
This package contains the legacy version of the Intel X.Org driver which does not require KMS.
- xorg-x11-driver-video-radeonhd - Driver for AMD GPG (ATI) r5xx/r6xx Chipsets
radeonhd is the X.org X11 driver for AMD GPG (ATI) r5xx/r6xx chipsets. Main development is driven by Novell, in close relationship to AMD which provides free documentation for the chipsets.
- xorg-x11-driver-video-nouveau - Accelerated Open Source driver for nVidia cards
The nouveau project aims to build high-quality, open source drivers for nVidia cards. (Nouveau [nuvo] is the French word for new.)
MySQL Installation and Configuration Ops
You should run the server using the mysql login account. This is normally done from root.
 # alias startmysql
alias startmysql='mysqld_safe --user=mysql &'

Initial sign-on shows version and some other trivia:
Welcome to the MySQL monitor.  Commands end with ; or \g.
Your MySQL connection id is 171
Server version: 5.1.46-log SUSE MySQL RPM

Copyright (c) 2000, 2010, Oracle and/or its affiliates. All rights reserved.
This software comes with ABSOLUTELY NO WARRANTY. This is free software,
and you are welcome to modify and redistribute it under the GPL v2 license
Refer: MySQL 5.1 Reference Manual
I really need to get my Customer DB working again. It works up on my WebPage
but doesn't work here on my system. This has been the case for quite a while. I keep getting interrupted or
sidetracked and it never gets fixed. I don't really have that much business -but- it is at times and it is
picking up a bit. Besides, when I had this working it was a help ... soooo... we will get it going again.
Reference: MySQL Databases
One of the reasons I picked and use
HostRocket is:
they have all the neat tools that I can use and need. There MySQL and phpMyAdmin helped me
immensly in this recovery of my Customer DB.
PERMISSIONS!!!!
Sometimes make me want to cry!!! This is at the top so I
(hopefully), or anyone that might be reading
and using this, don't repeat the mistakes, or whatever. The configuration file is discussed below and it
appears that it is needed in two places.
/etc/phpMyAdmin -and-
/srv/www/htdocs/phpMyAdmin
This shouldn't be the case -and- it may only be cause of my learning curve -but- it is for the moment.
In addition, I had to put FULL read permisions on it... rrr. The 'O' perm was missing and I couldn't read it.
- Main DB file(s) can be found in: /var/lib/mysql/
- My DB is: TRcustomers/
- I have this: alias startmysql='mysqld_safe --user=mysql &' but it was not starting. For some reason the log file was not created.
- Manually Created: /var/log/mysql/mysqld.log and then I could start mysql.
dusty-tr2:/home/ctaylor # mysqladmin versionmysqladmin Ver 8.42 Distrib 5.1.46, for suse-linux-gnu on i686 Copyright 2000-2008 MySQL AB, 2008 Sun Microsystems, Inc. This software comes with ABSOLUTELY NO WARRANTY. This is free software, and you are welcome to modify and redistribute it under the GPL license Server version 5.1.46-log Protocol version 10 Connection Localhost via UNIX socket UNIX socket /var/run/mysql/mysql.sock Uptime: 47 sec Threads: 1 Questions: 1 Slow queries: 0 Opens: 15 Flush tables: 1 Open tables: 8 Queries per second avg: 0.21
dusty-tr2:/home/ctaylor # - Ok. MySQL is running. Now to access my DB.
- Allllrighty Now. I can access my DB -but- I can not list out my customers. Can get them individually
but can not list them. This was where I was before. Need to see what changed between vesions.
- Oh my!!! Finally took the time to find out why it didn't work. You designate php from html by using:
"<?php" and "?>" to surround the php code.
I forgot the 'php' in the line of concern -but- it worked up on my WebPage..?! Turns out there is a 'short form' flag that lets you use just the '<?'. Guess in my previous loads they had the short form enabled and they have it enabled up on my WebPages. I put in the missing php. - DB is now working properly again.
- LIES!! LIES!! Somehow in all this, over all this time ... the DB tables got changed!! I have absolutely
no idea how this happened. Fields of 20 chars are now 6 and fields of 3 numbers are now 1.
- IF --create-home wasn't specified in the useradd command, your 'mysql user' won't have a home directory.
To give them a home directory, run these commands (as root):
cp -R /etc/skel /home/mysql
chown -R mysql:mysql /home/mysql
/bin/false is used as the default shell for non-users on a system. Which means they can't log in. IF your mysql user is set to /bin/false then you will not be able to log in -or- su to mysql.
To change or set the shell command:
usermod -s /bin/bash mysql
Since /bin/false, on most systems, is either a shell command or executable binary that immediately exits with a false return code (usually a value of "1," but also "255" on some systems), giving the user such a shell prohibits them from logging in to the system -- although the user still exists, and can run programs and own files.
- MySQL Workbench ... couldn't get enough info to use it. Need to look into it more... later.
-
phpMyAdmin
Now I have used this before and I even have a bookmark for its execution on "my" system. Due to my failing memory I don't remember what I did -or- how I did it.
From: SuSE Linux - Thailand
-and- Unixmen - Linux tutorials
Now then, to anyone who reads this ... yes, I set it, phpMyAdmin, up the first time (way back when) by just untarring the file and then using it. This time it didn't work right off. I went thru a menagerie of items and errors before I could get this to work.
- Check & Install packages:
Via Software Manager install: php5-bz2 php5-zlib php5-iconv pwgen php5-gd php5-mcrypt php5-mbstring
and patterns-openSUSE-lamp_server - Meta package for pattern lamp_server - $ rcapache2 restart
- Test with:
http://localhost/
The above is thru a Browser and all it will say... well let's leave that a surprize. - Check your php with:
Create a file phpinf.php and in it place:
<?php
phpinfo();
?>
Using your Browser enter: http://localhost/phpinf.php into the address bar. You should see a PHP Banner and a table of operations. - Installing phpMyAdmin 3.2.3:
rpm -or- tar -or- yast ???? Use whatever you are familiar with but place the code in
/srv/www/htdocs/
Then rename the dir, that it created, from the looonnngg name to phpMyAdmin - Configuration:
First, you are gona change to the dir that you placed phpMyAdmin in, then you are going to copy the sample config into a real one. Then a couple of minor edits:
Refer: Firefox 3.6 Settings$ cd /srv/www/htdocs/phpMyAdmin/ $ cp config.sample.inc.php config.inc.php $ vi config.inc.php /** * The 'cookie' auth_type uses blowfish algorithm to encrypt the password. If * at least one server configuration uses 'cookie' auth_type, enter here a * passphrase that will be used by blowfish. */ $cfg['blowfish_secret'] = 'QmQFXoui9BQaWAfjsL8nTXmnA8YepJoVUVjyy5wZ3lJGeV'; /*************************************************************************** * Now then, I kept getting the 'Cookies must be enabled past this point.' message * UNTIL I put in the above garbage secret. I copied this from an openSuSE One Click * install that didn't work for other reasons. After putting in the above and changing * the auth_type to 'http' I no longer got the cookie warning. * *** Well, I changed the blowfish_secret to 'mysqladmin' and it still worked!!! **** */ $cfg['blowfish_secret'] = 'cookie'; /* YOU MUST FILL IN THIS FOR COOKIE AUTH! */ ????????????????? pop-up (Authentication Required) /* Authentication type */ $cfg['Servers'][$i]['auth_type'] = 'cookie'; Change to: $cfg['Servers'][$i]['auth_type'] = 'http'; --- exit vi
- Wellll... I get: "Cookies must be enabled past this point."
Appears that a lot of others get this... I tried both the default config and the edited one, as above. Still searching. - ARRRGGG!!!!! Sometimes...sometimes I hate computers!! It really shouldn't be this hard to figure things out -nor- should it be this hard to find the info in the first place! Also... possibly dependant on where you put the configuration file. The 'One Click Install' put it in /etc/phpMyAdmin. I did the same... I don't get the Cookies message anymore -and- I am not really sure on what fixed it!!
- Check & Install packages:
- Now then, I added these three items to the configuration file. Without the first two I would consistantly
get "#2002 Cannot log in to the MySQL server". BUT even though I didn't get that message with them
in the config file, I still didn't get signed in. Think I need to do something with the session.
// MySQL user
$cfg['Servers'][$i]['user']                = 'root';

// MySQL password (only needed with 'config' auth_type)
$cfg['Servers'][$i]['password']            = 'xxx';

// Session to use for 'signon' authentication method
$cfg['Servers'][$i]['SignonSession']       = '';
- Well, as a test, I replaced the config file that came with the phpMyAdmin tar file with the one from the
One Click Install. No errors, but no sign-on either.
- ARRGG!! Just Hate It When This Happens!! I'm not really sure what I did -but- it is now working. One of the
most recent changes/doins was to set the MySQL password as follows:
mysqladmin -h localhost -u root password "rootpass"
Then you sign on as 'root' with 'rootpass' and you are in. Now I got this idea from: The SuSE Geek forum and comments from: L. That's all he/she left for a name. Until I tried the password as above I was never getting to the second page in phpMyAdmin. - Now then, 'IF' you want to remove the password, perform the following:
(of course you must know the original password)dusty-tr2:/etc/phpMyAdmin # mysqladmin -h localhost -u root -p password "" Enter password: dusty-tr2:/etc/phpMyAdmin #
Please note that the Linux / UNIX login root account for your operating system and MySQL root are different. They are separate and nothing to do with each other.
- But alas, I have two new messages at the bottom of the second page.

- Next day: Hmmmmm, now in order to sign on to phpAdmin, I enter root and the password -but- it doesn't
go to the second page UNTIL I click on Re-Load of the page.?!?...the First Time.? Thereafter, it will
go right to the second page. Why??? Ok, first we'll take care of those two messages.
- The first one:
 When you click on the 'click here' you get the following table. Clicking on the word Documentation
in each item will actually work. I copied over the HTML Documentation file. If it is worth knowing
it is worth repeating.
When you click on the 'click here' you get the following table. Clicking on the word Documentation
in each item will actually work. I copied over the HTML Documentation file. If it is worth knowing
it is worth repeating.
$cfg['Servers'][$i]['pmadb'] ... not OK [ Documentation ]
$cfg['Servers'][$i]['relation'] ... not OK [ Documentation ]
General relation features: Disabled
$cfg['Servers'][$i]['table_info'] ... not OK [ Documentation ]
Display Features: Disabled
$cfg['Servers'][$i]['table_coords'] ... not OK [ Documentation ]
$cfg['Servers'][$i]['pdf_pages'] ... not OK [ Documentation ]
Creation of PDFs: Disabled
$cfg['Servers'][$i]['column_info'] ... not OK [ Documentation ]
Displaying Column Comments: Disabled
Browser transformation: Disabled
$cfg['Servers'][$i]['bookmarktable'] ... not OK [ Documentation ]
Bookmarked SQL query: Disabled
$cfg['Servers'][$i]['history'] ... not OK [ Documentation ]
SQL history: Disabled
$cfg['Servers'][$i]['designer_coords'] ... not OK [ Documentation ]
Designer: Disabled
$cfg['Servers'][$i]['tracking'] ... not OK [ Documentation ]
Tracking: Disabled
I enabled everything except the tracking. - The Second one:
 disappeared when I copied the configuration file to /srv/www/htdocs/phpMyAdmin... with the
strange text in the 'secret' area.
disappeared when I copied the configuration file to /srv/www/htdocs/phpMyAdmin... with the
strange text in the 'secret' area. - Now at this point... I don't get the 'Cookies' complaint anymore, with or without, the config file(s).
I don't know why. Still getting the usage complaint but I do believe that I must create a 'phpmyadmin DB'
for all those tables mentioned above. This will be done using the create_tables.sql script.
It creates the DB IF it doesn't exist and then creates the neccessary tables.
cd /srv/www/htdocs/phpMyAdmin/scripts
mysql -p
mysql> \. create_tables.sql
- The items used in this table are commented out in the config file. Uncomment them. I am using the config
file that came with the 'tar' file modified. Using pieces of the config file that was with the 'One Click'
install. A copy of the 'working' config file will be made available.
I have setup the one in: /srv/www/htdocs/phpMyAdmin/
The one in /etc/phpMyAdmin/ is effectively 'not there'.
Hmmmm... the sign-on page is NOT as fancy with this config. Just a dialog box with two entries, the 'User Name' and 'Password'. However, it does work and I can sign in.
- JFYI: /* Swekey authentication */ I didn't enable this... cause I don't have a key.
The Swekey is a low cost authentication USB key that can be used in web applications.
When Swekey authentication is activated, phpMyAdmin requires the users's Swekey to be plugged before entering the login page (currently supported for cookie authentication mode only). Swekey Authentication is disabled by default.
-
mysql: x: 60:  108:MySQL database admin:/var/lib/mysql: /bin/false
wwwrun:x: 30:  8:  WWW daemon apache:   /var/lib/wwwrun:/bin/false
ctaylor:x:1000:100:Chuck Taylor:        /home/ctaylor:  /bin/bash
Refer: Suse User Administration
KDE4 Notes
I call these KDE4 Notes cause there are numerous write-ups out there on the Web describing all kinds of things and wonders concerning this interface. I was impressed by the way they demo'd some of the screens with the 3D effect on the windows. They had them slanted and squared as a box and other things. That was the main reason I kept updating. Well, so far I haven't gotten those displays. Now I am gona search and find a way to use the 3D power of my system. I had to load the nVidia drivers for WinVista and Win7. So, they are loaded.
Now then, I found a site that discusses this: How to Customize Your Linux Desktop. I won't repeat all that he/she said -but- I probably will have some. This section will be for myself as much, if not more, than for others.
- First thing to do is get Compiz and the Settings Manager (CCSM) installed ... IF you haven't already. CCSM gives you the full scope of effects that the Compiz Fusion engine is capable of.
KDE 4 is a shift toward engines
Plasma for desktops
Phonon for multi-media
Akonadi for personal information management.
Top
Quanta
Guess somebody can't get this right. I have all the required items loaded and still get these warnings!!
- KFileReplace [http://kfilereplace.kdewebdev.org] - search and replace in files will not be available;
- KXSLDbg [http://xsldbg.sourceforge.net/] - XSLT debugging will not be available;
- KImageMapEditor [http://www.nongnu.org/kimagemap/] - editing HTML image maps will not be available;
- KLinkStatus [http://kde-apps.org/content/show.php?content=12318] - link validity checking will not be available;
- Cervisia [http://www.kde.org/apps/cervisia] - CVS management plugin will not be available.
You may download the applications from the specified locations.
However, it is interesting to note that my settings from SuSE 11.2 are still in effect with the Quanta loaded here in SuSE 11.3.
TopFirefox Update(s)
23 Jul 2010 Well... I had 3.6.4 in SuSE 11.2, which got upped to 3.6.6 in the SuSE 11.3 Update and now on first use, after the Update, it says I should get the latest which is 3.6.8! My, my ... the changes are rapid.
Bug 625340 Submitted KDE Screen Locker (kscreenlocker), signal: Segmentation fault
I am putting this here cause I had Firefox going along with VMware and ... well ... just because.
Update: Appears to be a problem when using the nouveau driver. I have since installed the nVidia Driver and NOT
had the crash again.
Now then, I downloaded the Linux version, firefox-3.6.8.tar.bz2. It is a tar'd bzip2'd file. There are some requirements of your System before you install Firefox. These can be found at: Firefox System Requiremens.
Installing it can be pretty easy. However, depending on your skills, wants, desires, etc; it can be done in different ways. The first, and probably the easiest, is to use Yast2. However, you will not necessarily get the latest bleeding edge. IF you want the latest, latest; then you must do as I did and bring down a copy. Just make sure you get the one for your system. Versions are available for Windows, Mac OSX and Linux. Normally, the Mozilla Web Pages detect what type of system you are on and offer the correct version. However, if you have obtained it from somewhere else, just make sure that it is a Linux version.
I have Firefox version 3.6.6 which was installed by the openSuSE update. The executable, the part that is important to you, can be found in /usr/bin. However, some of the rest of it is found in /usr/lib/firefox... but not all. This is where it gets tuff. I extracted Firefox to a tmp dir in my home dir so I could examine the contents. There was a lot more in the bzip2 file than was in /usr/lib/firefox. So, why and where, do you put the "extra" items??
IF you have Firefox already installed, you can use Yast2 to find out where the Firefox files
are placed. Annddd... they are in:
- /usr/bin/
- /usr/lib/firefox/
- /usr/share/applications/
- /usr/share/icons/hicolor/
- /usr/share/man/man1/
- /usr/share/mime/packages/
- /usr/share/pixmaps/
For a claim of 92 files. There were more sub-dirs in the above dirs, but those were the mains. Now then, I was gona talk about installing this manually... -but- that will wait till another day. I have played around to long. They have made the newest version available via Yast2. In Yast2 you just click on the installed version (if it is blue) and it will show the update Arrow/Checkmark. This means it will update your current version to the latest available and put everything in what openSuSE considers the "correct" dirs.
Top
nVidia - Graphics and Display
Alllllrighty! In the M7 version my display came up properly and I did not have to install the nVidia driver. ... yet. Same for RC1 and RC2. I have since learned that this is the nouveau driver.Preliminary Info
July 15,2010 Ok, we got the Public Release and want to install it. Comments in the Forums over the past weeks seem to indicate that you must include nomodeset (see explanation further down) in the boot parameters IF you want to install the nVidia native driver. Someone else mentioned that you needed to blacklist the nouveau driver. Weellll, let me say this about that. I did not have any trouble with the nouveau driver. In fact it appeared to work great. I am only loading/installing the nVidia driver ... well, because. (hmmmm...ok I later had trouble with 3D in VMware)To Blacklist the nouveau module...
Insert "blacklist nouveau" without the quotes at the end of "/etc/modprobe.d/50-blacklist.conf".
This Mode Set has to do with changes in the kernel to help with the graphics cards... but it is not finished and can cause problems on its own. KMS (Kernel Mode Setting)
Hopefully, this isn't to mumble jumbled and you can get something out of it. Tried to cover the during and after intall procedures.
A list of actions that could be used to install the nVidia drivers as openSUSE 11.3 is installed:
- Before installing openSUSE, download the latest nVidia Video driver to your system.
(you can still do it after, if necessary) - Installation Settings:
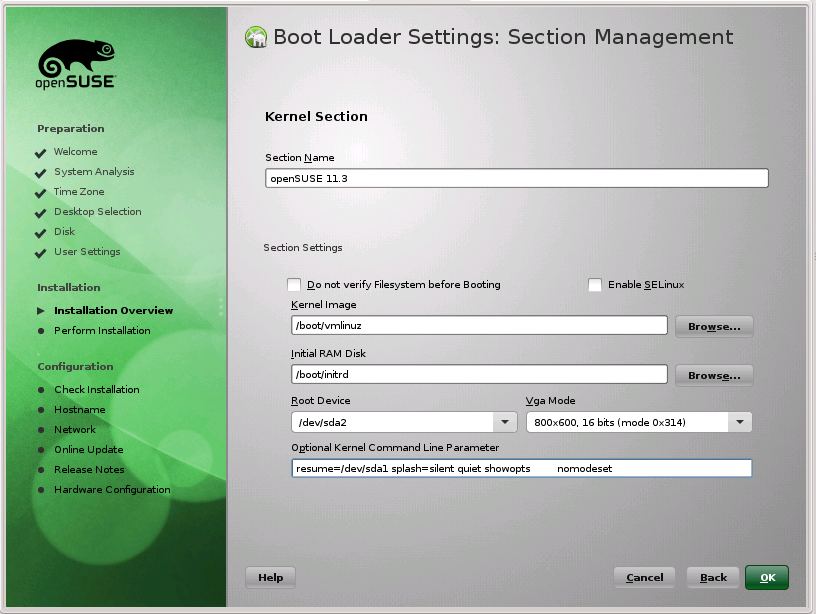
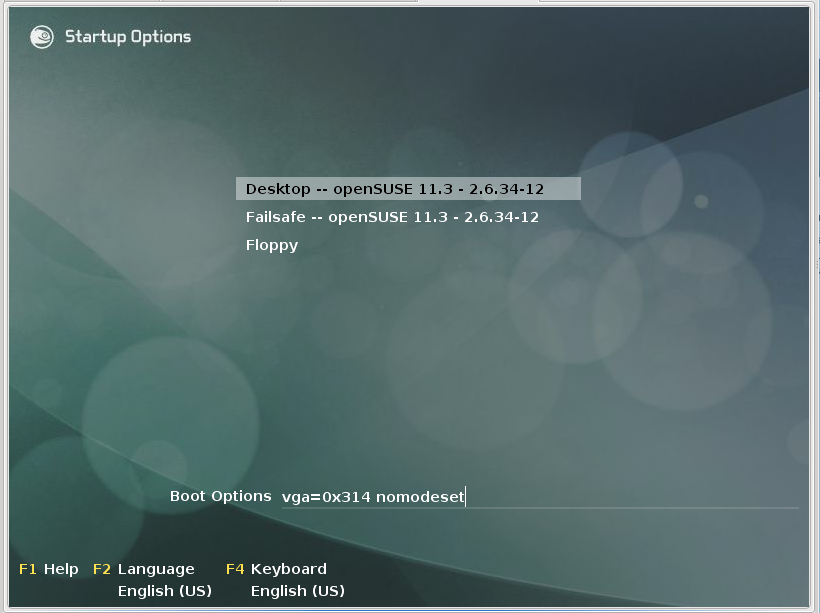
Click-on for larger viewDuring the install, when you have the option to change your booting setup, add nomodeset to the kernel load command for the normal load/start of openSUSE. This kernel startup option is already present for the Failsafe selection for openSUSE.
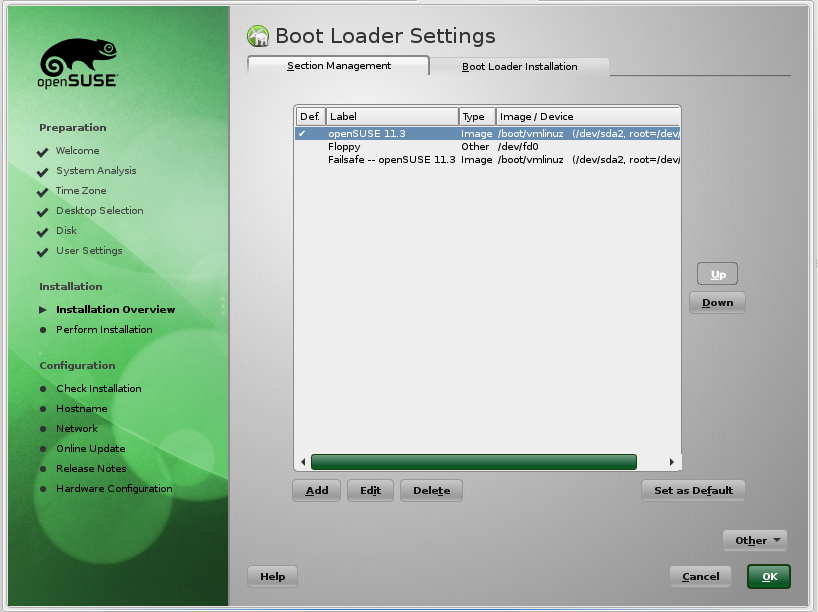
- Boot Loader Settings:

Click-on for larger view
Click-on for larger viewClick on Booting in the Installation Settings (in the previous step),
then Click on the check-marked line to hi-lite it IF not already,
Click on Edit at the bottom,
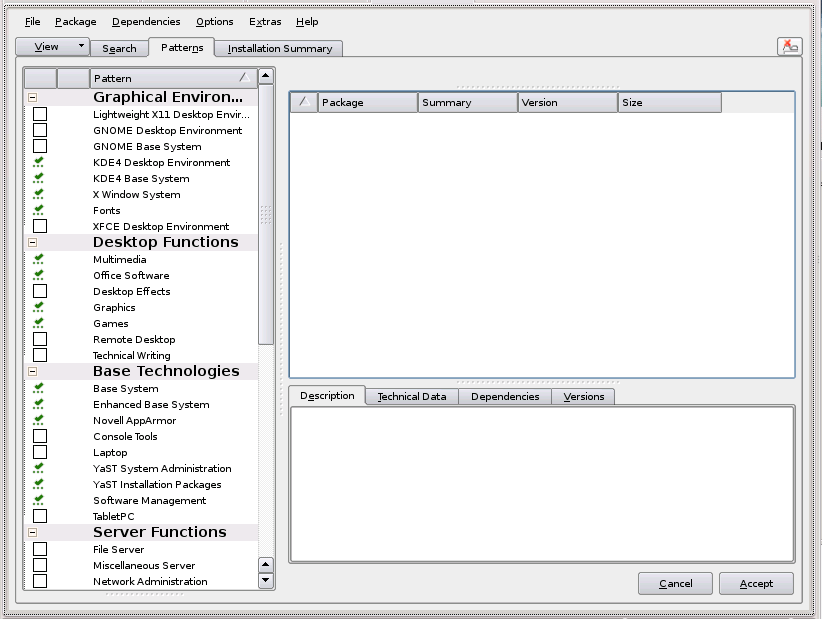
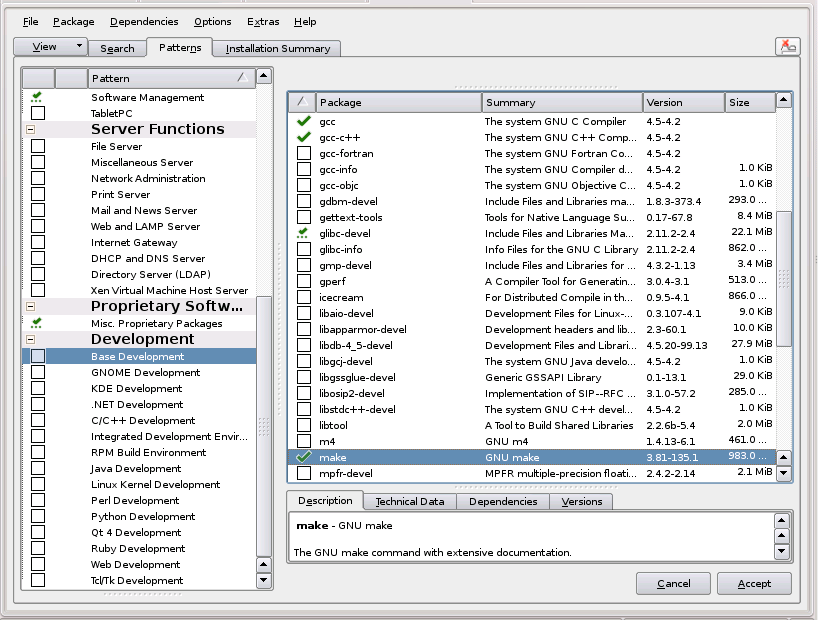
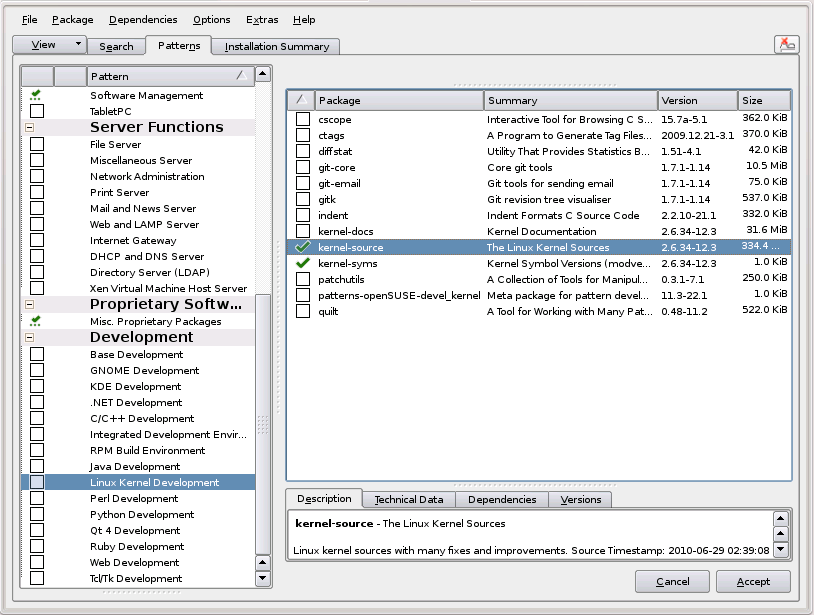
Add nomodeset to the Optional Kernel Command Line Parameters. - Software Selections:

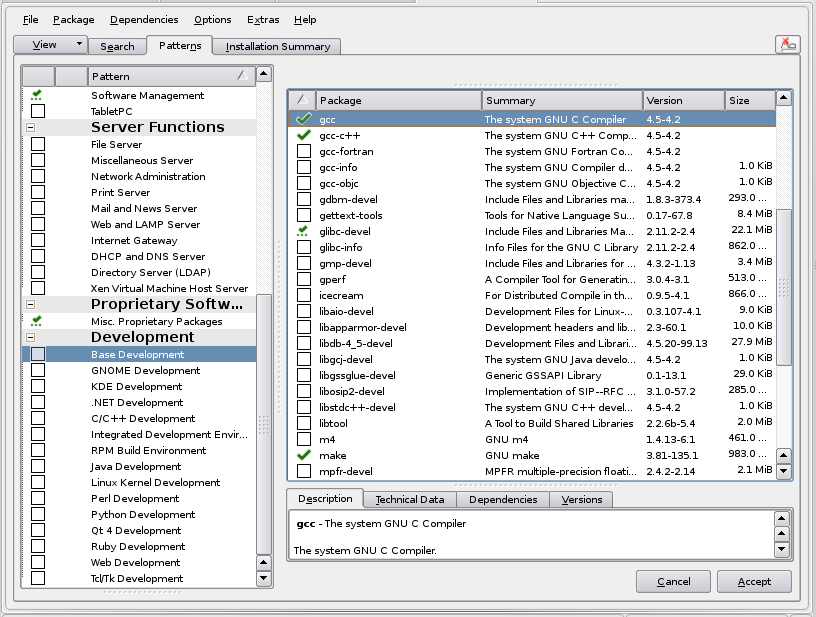
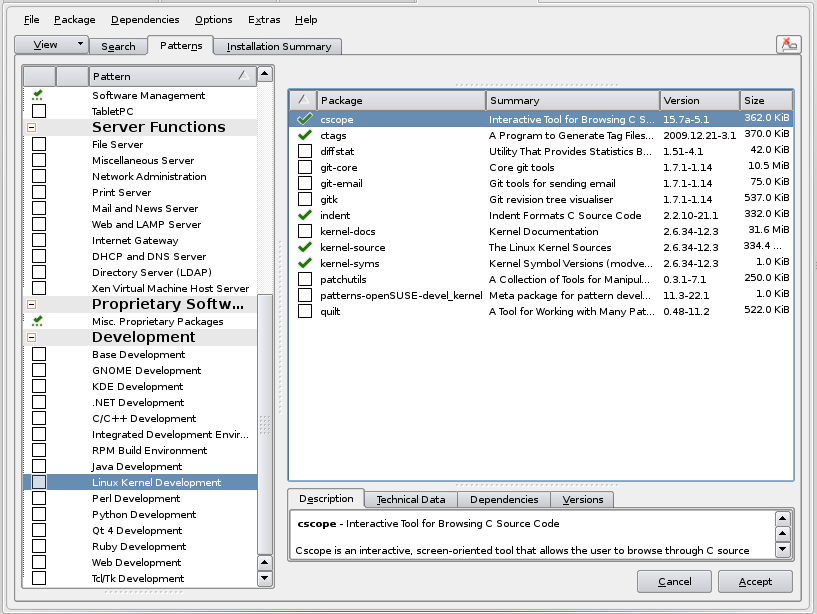
Click-on each for larger viewDuring the Install you can pick additional Software to Install and/or Remove. Now then, since the nVidia driver will require a compile -AND- the source headers, we must install the 'C' compiler and the Linux Kernel source code. This is accomplished by clicking on Software in the Installation Settings and then selecting the 'C' compiler and the Kernel Source code. You may want to click on Details for more info.
-
restart/reboot.
- Boot Page:
Click-on for larger viewIn the grub OS selection add "3" (without the quotes) to the Boot Options At the bottom of the page. This will cause you to just go to the run level three terminal prompt. Command line entries.
The above and below is assuming that you DO NOT have the AutoLogin enabled. - Command Line:
Click-on for larger viewLogin in as root and change to the /home/user/Downloads folder... or the one where you have saved the nVidia driver. - nVidia Install:

Click-on for larger viewRun/Install the NVIDIA video driver using:
"sh ./NVIDIA-Linux-x86_64-256.35.run -q"
and answer all questions as appropriate for your system.Ok now. We had a problem. /usr/lib/xorg/modules/extentions/libglx.so is not a symbolic link. The nVidia Install aborted and unistalled itself. However, upon looking in the dirs that were specified, I found that a link had been created. Possibly the timing was not correct. Since it is now there, we will try the nVidia Install again.
Ok. Running it again did not get the above error -but- it is not running either. Must be some more to do. In KDE in Kickoff (kmenu) in Search, nvidia was typed and Enter key hit. Got the following:
You do not appear to be using the NVIDIA X driver.
Please edit your X configuration file (just run `nvidia-xconfig` as root),
and restart the X server.
Reference: Lots of info - (http://www.sabi.co.uk/Notes/linuxNVIDIA.html) Unfortunately, it is XFree86.
Ooooopss... I missed one by one of our own:
(http://forums.opensuse.org/english/information-new-users/unreviewed-how-faq/441889-nvidia-newbies-part-1-a.html)
- Generate a default xorg.conf with nvidia-xconfig
Ok. nvidia-xconfig executed as root:
dusty-tr2:/home/ctaylor # nvidia-xconfig
Using X configuration file: "/etc/X11/xorg.conf".
Backed up file '/etc/X11/xorg.conf' as '/etc/X11/xorg.conf.backup'
New X configuration file written to '/etc/X11/xorg.conf'
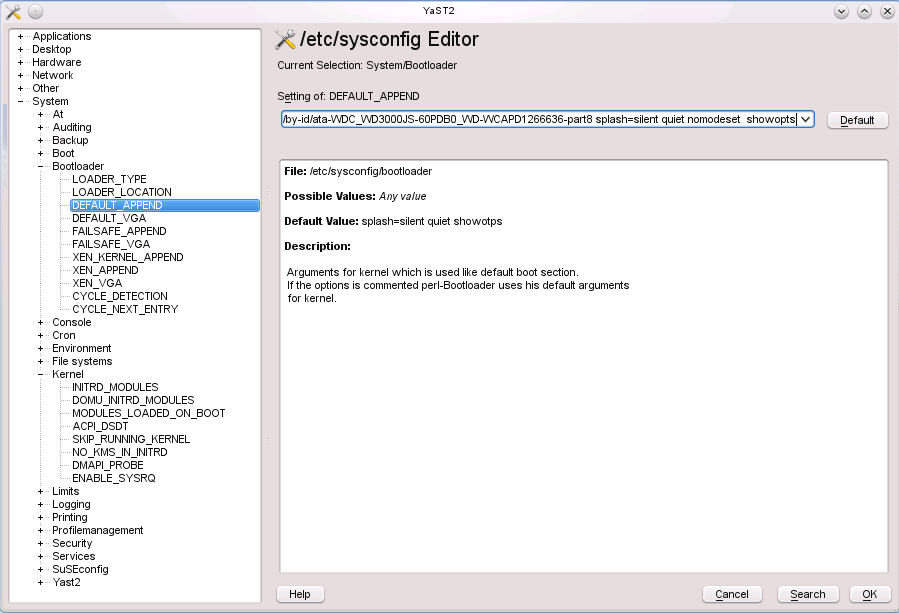
- Open /etc/sysconfig, select System, select kernel
and set NO_KMS_IN_INITRD to yes.
Now select Bootloader, select DEFAULT_APPEND, and enter nomodeset in the parameters on the line. See above if you missed or forgot to "Blacklist nouveau" in 50-blacklist.conf. - IF you made the above changes inside Yast2, then it ran SuSEconfig for you. If you made them outside of Yast2 then you will have to Run SuSEconfig.
- Type in reboot at terminal prompt to restart the system with the new video driver.


Top
After OS Installed
The following little blurb is not finished...yet. It involves installing the driver
AFTER the OS is installed.
Well, it is finished.
- ctl-alt-F1 (get in terminal mode)
Weellll... this didn't work. On the Ctl-Alt-F1 I got an unreadable, scrambled, mushed screen. Ctl-Atl-F7 got me back to a readable GUI where I am now using Quanta to make this note. Guess we will reboot and go into command line mode from the Boot Page as described above.
-But- first I think that I need to set 'nomodeset' and 'NO_KMS_IN_INITRD' to 'yes'. - ReBoot the System.
- At the Boot Page enter 3 on the 'Boot Options' command line nad hit Enter. This will start you at the commandline in run level 3.
- sign on to root
- cd to the dir that you have the nVidia driver in.
- sh NV*.rub -q (execute the nVidia script)
- Now then, you can try running nvidia-xconfig now -but- I suspect you may have to re-start the system first and then stop at the Boot Page again and enter root at run level 3.
- Enter 'nvidia-xconfig' to create an xorg.conf file.
- Reboot the system.
- In KDE in Kickoff (kmenu) in Search, type nvidia and hit the Enter key. You should get the nvidia server settings dialog. Here you can set your resolution, and view a bunch of other info.
The following, as of 23 May 2010, are for the versions prior. Left here for reference. I have included some comments from the OpenSuSE Forums concerning these drivers. They don't really have an nVidia driver for this kernel version -but- they have made BIG ... Gigantic ... improvements in the default. Before I was always getting a display that was shifted about 1/4 inch to the right in Graphics mode and then text mode was to far to the left. Right now in this version they both look OK.
A Warning that can be received:Now the following was borrowed/stolen from the OpenSuSE Forums... and the comments are from user oldcpu. They were similar to my findings so I have included them here. Plus he has some good info that I don't want to loose.
================ WARNING WARNING WARNING WARNING ================
This server has a video driver ABI version of 7.0 that this
driver does not officially support. Please check
http://www.nvidia.com/ for driver updates or downgrade to an X
server with a supported driver ABI.
A possible fix:
Was able to work around this problem by adding the following section to /etc/X11/xorg.conf:
Code:
Section "ServerFlags"
Option "IgnoreABI" "True"
EndSection
Summary
Thus far, for my newer PCs, 11.3 M7 is positive. For my older PCs, it has problems due to
- nouveau driver does NOT like my older nVidia hardware
- kernel still does NOT like my older Intel i855GM graphics
11.3 Predictions
Based on this (and with my still having one PC left to test) I predict that for 11.3 GM in July (unless there are major changes between now and then) we will see:
- ATI/radeon users with legacy hardware noting this 11.3 release is superior to 11.2 and overall a better release (albeit not perfect).
- nVidia users with old hardware may be very upset, as the nouveau driver does not work well for them, and these users will be forced to boot in safe settings/fail safe, until they can configure the "nv" or "vesa" drivers better, and until they can install the proprietary nVidia driver (where I note there is NOT yet a proprietary legacy nVidia driver yet for the 2.6.34 kernel).
- nVidia users with relatively moderate-to-new graphic hardware will be ok with the nouveau graphic driver.
- Intel drivers will be a mixed lot. Those with the newer Intel hardware (that comes with i3 and i5) will be happier, as that hardware does NOT work well on 11.2. But users of older Intel graphics (such as in my Intel i855 GM) will continue to be dissatisfied.
More from oldcpu:
Further to this, on this sandbox PC of mine (an old 32-bit AMD Athlon-1100 w/1GB (MSI KT3 Ultra motherboard) w/AGP
nVidia GeForce FX5200 graphics) I took a look in more detail at Software.openSUSE.org to see if I could get sax2
and I did not like what I saw. So I decided to stop wasting my time on the "nv" driver, and I went ahead and
installed the proprietary nVidia legacy 173.14.25 graphic driver "the hardway" (which is not hard). In doing this
I booted to run level 3 without the "nomodeset" boot code. After running the proprietary driver ".run" file, I
built the custom xorg.conf with the proprietary "nvidia-xconfig" tool. Restarted to run level-3, and then booted
with "startx -- -ignoreABI". Since the 173.14.25 graphic driver is not yet ready for the 2.6.34 kernel ( ? ) ,
experience with earlier 11.3 milestone releases taught me this was necessary.
For some reason, this proprietary graphic driver install messes permissions on audio, and hence I had to add
regular users to group audio to get sound functioning for regular users. (after which a complete log out of Linux
was necessary for settings to be applied)
But once that was complete, I had 1920x1200 graphics, with sound, functioning. I changed the /boot/grub/menu.lst
file, replacing "nomodeset" with "3".
And this from user confused:
For example, to generate a new xorg.conf:
Login to a console as ordinary user and su to root. If not already, get to runlevel 3 by entering init 3 and then pressing enter again. Enter the command
Code:
Xorg -configure
It will place the file xorg.conf.new into the directory /root. It can be edited, then moved to become the file /etc/X11/xorg.conf. Then try to achieve runlevel 5 by entering init 5.
What is NoModeSet: The newest kernels have moved the video mode setting into the kernel.
I borrowed/swiped this explanation from:Sugar Labs
It comes down to different computers having different graphics cards (or the equivalent built onto the
motherboard or into a laptop). They all can draw pretty pictures. However, except for really basic
(read as slow) drawing, how the software needs to talk to the card is different for every card. In the
Windows world, this means you need different graphics drivers for different cards. The issue here is that
some new software/drivers for Linux which do something called "kernel mode setting" for graphics cards
haven't been sufficiently tested/developed for the particular cards with which you are having problems.
Specifying 'nomodeset' when the system boots basically tells the system to use an older set of software/drivers
which does work (but may be slower or have some other issues that people would like to eliminate).
Multi-media and Restricted Format Installation Guide
Now then, we get e-mails from our friends and relatives. Annnddd... they send all these videos and sounds in these various formats. So we need to load up on the comparable creations for linux that will handle these different formats.
This info came from the
openSuSE Forums.
The Additional Repositories you will need are:
1. Packman: Index of /pub/packman/suse/11.3
2. Videolan VLC: Index of /pub/vlc/SuSE/11.3/
N.B. You will install one package from VLC: libdvdcss That's it!! Then REMOVE this repo. Install this Package FIRST.
I just copied this and then looked for info. Seems that Videolan and Packman can have some problems. So we just
disable Videolan - not remove it.
- libavcodec52
- libavdevice52
- libdvdnav4
- libdvdplay0
- libdvdread4
- libffmpeg0 ... as of 11.2 has been dropped. Replaced by first two in this list.
- ffmpeg
- libquicktime0
- libxine1
- libxine1-codecs
- libxvidcore4
- smplayer
- vlc
- w32codec-all ... may -or- may not cause troubles. I finally had to remove it.
- xine-ui
- xvidcore
- libqt4-sql-sqlite
Also see: Check your multimedia problem in ten steps
Another problem is the sound. Haven't gotten that totally straight yet but there is a
Work-A-Round. So to speak. What I am talking about is the Merriam-Webster
OnLine Dictionary. What has that to do with sound, you ask?? Well, in addition to providing the correct spelling
and definition of words, it also provides the pronunciations of them. However,
when you click on the little speaker ![]() ,
you get the following:
,
you get the following: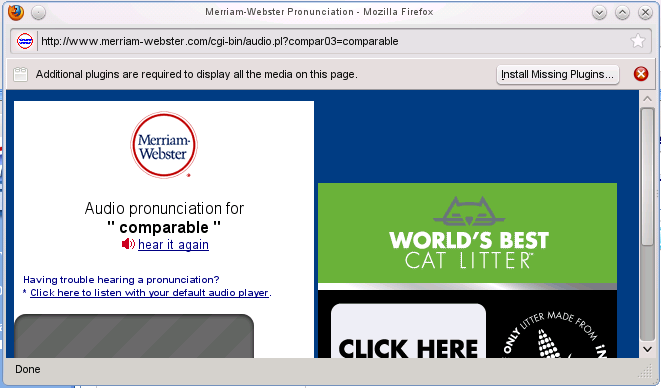
Hmmmmm... it says that additional plugins are required...UNLESS, you have previously set this up. Which I hadn't. Now then,
notice that it says, "Click here to listen with your default audio player." Because of the
default settings in our openSuSE 11.3, after clicking on the previous, it will come up in KMPlayer.
(Course I am assuming that you have installed KMPlayer.)
Anyway, that is how you get to hear the words. I think there is a more automatic way via some plugins but right
now I can't remember it. (Get back to this later.)
More on Sound:
- Timidity
- xwa3d:
# %description
# This is a library that can be used instead of the standard
# Athena-Widget-Library. It has tried to keep the standard of the libXaw
# library. There are also programs which explicitly use this library
(Timidity is one.) # (this is the reason why the library was included).
# NOTE: Do NOT replace /usr/X11R6/lib/libXaw.so.6.1. All necessary
# changes in /etc/ld.so.conf will be done in SuSEconfig by YaST.
#
# If any problems arise using or starting X Window System programs,
# remove this package and delete any remaining symbolic links in
# /usr/X11R6/lib/Xaw3d/.
- Plugger
Networking - Mainly Local
Some changes are needed for this local operation. The httpd.conf file and the
mod_userdir.conf file.
In the httpd.conf ... add the Include for mod_userdir.conf and the other changes.
I am allowing FollowSymLinks cause ... I have a SymLink to my local WebPages over on a Windows drive
so I can Edit and View in both Systems. (Dual Boot)
# added 13 Jul 09
Include /etc/apache2/mod_userdir.conf

# forbid access to the entire filesystem by default
<Directory />
    Options Indexes FollowSymLinks
    AllowOverride None
    Order deny,allow
    Deny from all
    Allow from dusty-tr2.TRComputing
</Directory>
... and the mod_userdir.conf ... un-comment the UserDir:
# the UserDir directive is actually used inside the virtual hosts, to
# have more control
UserDir public_html
In order to run a local Network, you need apache2(HTTP daemon) and
DNS(Domain Name Server) installed -AND- running. They weren't...running.
In this version, SuSE 11.3, apache2 and dnsmasq are started in System Services in YAST.
After this initial start -and- configuration of the edit levels, they start at each boot-up.
You should also have a hosts file and do not allow dhcp to change it ... IF ... you have special names that
you want to keep using. IF you are interconnecting with some Windows machines you also need Samba which
involves smb(Samba SMB/CIFS file and print server) and nmb
(Samba NetBIOS naming service over IP).
(These are not installed by default. You must
specifically install them.)
Hot Digity Dog!! The VMware Network Operations are back to being fast again. Previous versions of openSuSE 11.x were slow. Here in the Final Release of version 11.3 they are smokin' again.
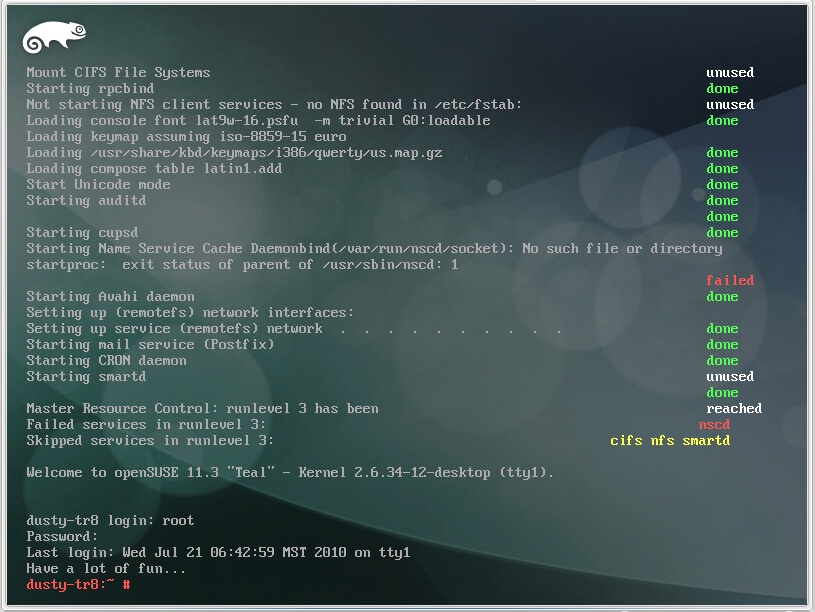
TopM7 Boot Up
Ok. At first grins it looks and acts much more stabilly. Quanta is again claiming the missing components that I did install ... at the initial installation. Also missing is the little USB icon that tells me my CD/DVD's and Mem Sticks are loaded. Other than that it looks pretty good. Haven't tried VMware yet, but that is next on my list.
June 08, 2010 I brought down a fresh copy of M7. The version I had downloaded before was from the download page that 'said' it was M6 but when you clicked on the download it was openSUSE-DVD-Build0625-i586.iso, which is 11.3 M7. The download page now has all the proper markings for M7 and I have gotten a copy from it. Hopefully this will get a matching kernel and source headers.
Well, after this new installation my sound works. However, still do not have the USB
notification in the Task Bar. And I placed the VMware disc in one of my optical drives. Opened 'MyComputer'
and saw it listed. Clicked on it and got the following message:
There is no application installed that can open the type block device (inode/blockdevice).
Do you want to try to install one?
Had three choices: Checkbox 'Do not ask again' or 'Install' or 'No'. I chose Install... It then looked for the
software to install and could not find it. I was then instructed to See http://help.opensuse.org/ksuseinstall
for details and asked if I wanted to configure my repositories. Hmmmmm... this is normally done on the initial
install. Ok let's say yes.
Allllrighty. It makes me sign on as root, then opens Yast2 to the configured Repos.
Ok, I cheated and used zypper to get the same list I was shown in Yast2 so I could list them here. They are:
# | Alias                               | Name                                | Enabled | Refresh
--+-------------------------------------+-------------------------------------+---------+--------
1 | Updates for openSUSE 11.3 11.3-1.59 | Updates for openSUSE 11.3 11.3-1.59 | Yes     | Yes
2 | openSUSE-11.3 11.3-1.59             | openSUSE-11.3 11.3-1.59             | Yes     | No
3 | repo-debug                          | openSUSE-11.3-Debug                 | No      | Yes
4 | repo-non-oss                        | openSUSE-11.3-Non-Oss               | Yes     | Yes
5 | repo-oss                            | openSUSE-11.3-Oss                   | Yes     | Yes
6 | repo-source                         | openSUSE-11.3-Source                | No      | Yes
Now according to what I know and have learned, the code needed should be in one of the above repos. Ok, let's get out of my area and into root to see if we can then read the disc ... like it was on the previous load.
Ok. Over in root and the first thing that we do is change the background. I like to know definately that I am in root when I am there. So I use a Red KDE Gear background. (I copy it from release to release.)
In root Alllrighty! Another good point. File manager is back on the task bar. And in using it I find 'nothing' in media or mnt points. Once again we click on 'My Computer' and find that there is something in the DVD drive. It is: VMware-Workstation-Full-7.0.0-20. Hovering over it shows: /dev/sr0 block device Clicking on it and once again it asks if I want to install the block device.
TopVMware
July 16, 2010 Yipee and Hooray!! Got the Public Release
-AND- VMware Installs and works under the latest and greatest openSuSE 11.3.
WMware 7 Installation: Change to directory containing VMware 7. In this
case it is on a CD in my main Optical Drive:
cd /media/VMware-Workstation-Full-7.1.1/
   then execute the install:
sh VMware-Workstation-Full-7.1.1-282343.i386.bundle
(Oh Darn! After all my ranting and raving on how
great VMware is in the latest release I find there are troubles. Seems that RC2 is the only one that VMware can find
the kernel header files on. If you 'Update' from RC2 to the new Release it will also work. -But- IF you do a FULL
clean install ... VMware can not find the headers and therefore can not get compiled. Installed but no worky. This
is as of 30 July 2010.)
August 1st, 2010: Bug 627317 Submitted
Side Note: VMware DVD Guest Update boot. I wanted to get some screen pics of the Update Process and was having a hard time getting VMware to boot from the Update DVD. Found that I must get into the Virtual Machine BIOS and change the settings. This can prove to be tricky. First you have to obtain focus of/for the Virtual Machine -and then- hit the F2 key before it passes by. It is doable and probably wouldn't be so bad if I canceled that dialog that tells me about my USB connections... but I like it and with patience, it can be done.
Update 1 Aug 10: VMware compiles can be done manually. This info is courtesy of
'silenuz' via message:
Vmware 7 doesn't install on Opensuse 11.3
on the openSuSE Forums.
cd ~ #.....change to your home dir
rm -rf vmware-modules #....precautionary removal of any previous items
mkdir vmware-modules #...make a temporary modules dir in your home dir
cd vmware-modules #.... move to it
#...find the vmware modules and extract them into your temp dir...
find /usr/lib/vmware/modules/source -name "*.tar" -exec tar xf '{}' \;
#... need root permissions for these next ones
mkdir -p /lib/modules/`uname -r`/misc
#...this one is kinda silly, since we just created it -but- it could have already been there.
rm -f /lib/modules/`uname -r`/misc/{vmblock.ko,vmci.ko,vmmon.ko,vmnet.ko,vsock.ko}
#...root permissions are need to copy the files out to /lib/modules dirs
cd vmblock-only; make; cd ..; cp -p vmblock.o /lib/modules/`uname -r`/misc/vmblock.ko
cd vmci-only; make; cd ..; cp -p vmci.o /lib/modules/`uname -r`/misc/vmci.ko
cd vmmon-only; make; cd ..; cp -p vmmon.o /lib/modules/`uname -r`/misc/vmmon.ko
cd vmnet-only; make; cd ..; cp -p vmnet.o /lib/modules/`uname -r`/misc/vmnet.ko
#cd vmppuser-only; make; cd ..; cp -p vmppuser.o /lib/modules/`uname -r`/misc/vmppuser.ko
cd vsock-only; make; cd ..; cp -p vsock.o /lib/modules/`uname -r`/misc/vsock.ko
#...this will take care of the module dependencies
depmod -a
#...Start up VMware
service vmware restart
#If a new install, remove the not_configured tag or the error will keep coming back
rm -f /etc/vmware/not_configured
18 Aug 2010: Vmware 7.1.1 build-282343 Installed
Appears to be working ok, I am using Win2K, inside VMware, to edit this file via Homesite.
17 Dec 2010 VMware 7.1.3 is apparently out with patches. I was looking for info on compiling openSuSE version 11.4 and found this:
Make vmware workstation 7.1.3 running with opensuse 11.4 (kernel 2.6.37)
Note about the 2.6.37xx
There's a solution to make the kernel modules building under openSUSE factory (11.4) and the kernel 2.6.37
Preparation
download the lastest vmware workstation 7.1.3 (the patch is only for this version)
download the patch vmware-7.1.3-2.6.37-rc5.patch
download the script to patch patch-modules_v62-opensuse.sh
Install
Proceed to the normal installation of workstation, if you have older version, it will be replaced
by running under root account
sh VMware-Workstation-Full-7.1.3-324285.x86_64.bundle
Patch
Now we have to apply the needed patch, just run as root
sh patch-modules_v62-opensuse.sh
References
vmware community post
vmware community thread
kernel update Sep 12, 2010
This is presented here cause of the "problems" it caused. As mentioned, talked about above, I could not execute an installed VMware cause it could not find the kernel headers in order to do a compile. Well, guess what??? Yep. This damn update changed the kernel and now VMware won't run cause it needs to recompile for the "new" kernel... AND it can't find the headers!!! Think that I am gona re-report this bug.
 # cd vmblock-only; make; cd ..; cp -p vmblock.o /lib/modules/`uname -r`/misc/vmblock.ko
Using standalone build system.
In file included from ./shared/autoconf/geninclude.c:20:0:
./shared/compat_autoconf.h:36:31: fatal error: linux/autoconf.h: No such file or directory
compilation terminated.
In file included from .././shared/autoconf/geninclude.c:20:0:
.././shared/compat_autoconf.h:36:31: fatal error: linux/autoconf.h: No such file or directory
compilation terminated.
# ln -s /usr/src/linux-2.6.34.4-0.1-obj/i586/desktop/include/generated/autoconf.h /usr/src/linux-2.6.34.4-0.1/include/linux/autoconf.h
The above had no affect. Still can't find autoconf.h.
The following is from: open-vm-tools-devel
and is only here cause I was investigating everything:
> > OVT_SOURCE_DIR is used when compiling the sources within the open-vm-tools tree;
> > they allow the makefiles to find all those shared header and sources you'll have
> > to copy into the module's directory when using dkms.
> >
> > Makefile.kernel is needed because some modules also support 2.4 kernels, and the
> > build instructions for those is in Makefile.normal. The top-level Makefile will
> > detect which sub-makefile it needs to use.
Ok. Removing this sucker and will re-install...
/usr/bin/vmware-installer --uninstall-product=vmware-workstation
... and I said YES to remove the configuration. Closed out everything except my three terminal windows. One of them being root in which to execute the script.
sh VMware-Workstation-Full-7.1.1-282343.i386.bundle
- Get a Welcome Message and a choice to agree or not to the License. Kinda silly. If you don't agree then you can't install the product!
- Would you like to check for product updates on startup? Yes or No?
Now this is interesting. IF you say Yes, then every startup of VMware will go out to the Net and check for updates. This will slow down your startup 'UNLESS' it is a background operation. IF you say No, then you will have to check for yourself. Think I'll say No. - Would you like to help make VMware better? Well, yes -but- this again is accessing the Internet during startup and will slow things down. Can't see that they need info everytime I startup. Will enable it IF I have problems -or- there is a request for info to help someone else.
- Path to Eclipse?? Don't have it installed.
- Do you wish to install Eclipse? No.
- We are now ready to Install.
- .... Installing ...
- Installed.
Execution for first time after install:
ctaylor@dusty-tr2:~
> /usr/bin/vmware
Logging to /tmp/vmware-ctaylor/setup-32421.log
ERROR: modinfo: could not open /lib/modules/2.6.34-12-desktop/modules.dep <-- 15 times
In the Dialog Box presented, asking where the dir was, I offered the following:
/usr/src/linux - still can not find them.
/usr/src/linux-2.6.34.4-0.1 - still can not find them.
/usr/src/linux-2.6.34.4-0.1-obj - still can not find them.
/usr/src/linux-obj - still can not find them.
/usr/src/linux/include/linux - still can not find them.
/usr/src/linux-2.6.34.4-0.1/include/linux - still can not find them.
/usr/src/linux-2.6.34.4-0.1-obj/i586/desktop/include/linux - still can not find them.
I quit here ... getting ridiculous. Now then, it seems that somebody doesn't have their paths set right. Who??
and what needs to be set??
Now then ... in order to get this sucka, VMware, to compile, AFTER the latest UPDATES, (Did I mention how much I hate UPDATES) I had to do two things:
- Had to create a build dir in /lib/modules/2.6.34-12-desktop.
Then inside it, symbolically link to /usr/src/linux/include/
o Make sure that the symbolic link
/lib/modules/`uname -r`/build exists and points to
the matching kernel source directory
This came from the messages displayed during the compile from:
/usr/include/linux/version.h
The following steps were used:dusty-tr2:/home/ctaylor # cd /lib/modules/2.6.34-12-desktop dusty-tr2:/home/ctaylor # mkdir build dusty-tr2:/home/ctaylor # cd build/ dusty-tr2:/home/ctaylor # ln -s /usr/src/linux/include/ .
- From myself in version 10.2 to myself in version 11.3!!!
Do a full compile of the kernel before trying the install so that all the dependancies are loaded and in the correct locations. Besides, if you can't compile the kernel, then you can't install VMware. The two go hand in hand.
- cd /usr/src/linux
- make cloneconfig
- make prepare
- make modules
Another script concerning the problem.
i there, i had the same problem.

maybe this script can help more people, it was made by malcolmewis @ suse forums:

===Begin Script===

#!/bin/bash
cd
cp -prn /usr/lib/vmware/modules/source /usr/lib/vmware/modules/source-backup
mkdir fixed
cd fixed
find /usr/lib/vmware/modules/source -name "*.tar" -exec tar xf '{}' \;

         1. add missing header on kernels

sed -i '/#include "compat_wait.h"/a\#include "compat_sched.h"' vmnet-only/vnetUserListener.c
sed -i '/#include "compat_page.h"/a\#include "compat_sched.h"' vmci-only/include/pgtbl.h

         1. comment out an invalid definition

sed -i 's|\(extern void poll_initwait(compat_poll_wqueues \*);\)|//\1|' *-only/include/compat_wait.h

tar cf vmblock.tar vmblock-only
tar cf vmci.tar vmci-only
tar cf vmmon.tar vmmon-only
tar cf vmnet.tar vmnet-only
tar cf vmppuser.tar vmppuser-only
tar cf vsock.tar vsock-only

cp -p *.tar /usr/lib/vmware/modules/source

cd /lib/modules/`uname -r`/build/include/linux
ln -s ../generated/autoconf.h
ln -s ../generated/utsrelease.h
cd

vmware-modconfig --console --install-all

   1. clean up

cd
rm -rf fixed
cd /lib/modules/`uname -r`/build/include/linux
rm autoconf.h utsrelease.h
cd /usr/lib/vmware/modules/
rm -rf source-backup
cd

===End Script===

hope it helps more people and btw, this will enable people to upgrade
to latest version 7.1.1 (tested on opensuse 11.3_x64 kernel 2.6.34.7-0-2)

regards

Message was edited by: nlobao
May 26, 2010: Well, it installed ... sorta. I was able to install VMware -but- I could not get it setup cause ... ta, ta, da, dahhh ... the 'C' header files did NOT match the running kernel. So, I will probably have to wait till the released version is out and everything is supposed to match. I went through all this with 11.2 and had continuous compile failures... until the released version.
June 16, 2010 Here it is the day before the release of RC1 and I just was able to get VMware loaded again. Still not clear on the DVD portion. I had to go into MyComputer, Right Click on the CD/DVD drive, select mount, then open a Terminal Window and finally execute the script. It claims to have installed. Now to see if I can run it.
Nope!! Said the headers did not match. Ok. Let's build one here:
Most, if not all of this was taken from:
Configure, Build and Install a Custom Linux Kernel By: sgt-d
 cd /usr/src
cp -a linux-2.6.34-9 linux-my
cd /usr/src/linux-my
make clean
make mrproper
make cloneconfig
Note: The 'make cloneconfig' command copies your currently running kernel configuration to:
/usr/src/linux/.config
make xconfig
This will open the configuration screen so we can begin making changes. Please note, the current options that you see checked are what you kernel is currently using... this information was supplied when we used 'make cloneconfig' (above).
I had to install some more of QT3 in order to use this. I say more cause QT3 was installed but when I tried to run this it complained about it not being installed.?. Anyway, I didn't write down what I had to install -but- what I did was make some logical guesses and then when I clicked on accept a whole boat load of items got added. Must have been correct cause now it works.
Make sure to change the "Local Version Release String"!
Changing the release string is extremely important. If you don't change it, your new kernel and modules will overwrite the '-default' kernel and modules. We do NOT want that to happen. I used '-cmt' for my release string, so when I was done building and installing, my kernel and modules had a '-cmt' suffix, not '-default'.
This is found under 'General setup'. If you've never used this before it can be tricky. Changing the data item is accomplished by first clicking on 'General setup' then double clicking on 'Local version - append to kernel release: -9-desktop'. This will present the Data item at the bottom of the 'Option' section. Change 'desktop' to your own name, in my case it is cmt, and then hit Enter. Now, make more changes and/or save the configuration.
Example:
vmlinuz-2.6.34-9-cmt
In xconfig or menuconfig:
Change all settings needed.
General setup
  Local version - append to kernel release
  - Double click on this to change it
  - Do NOT skip this step!
  - Enter a 'dash' (-) and a string value, eg: -cmt or -test
Make sure that you save the config. Before exiting xconfig.
Make a backup of your kernel configuration:
cp .config .config.bak
The only thing the next commands do is verify that a unique release string is being used. Now then, it is said that they ARE NOT NEEDED and will cause problems if used. Others say things are fine. Execute at your own risk or skip to the Build.
This first time, I am going to skip them. If it doesn't work then I repeat and include them. Well, changed my mind. I looked in the Makefile and found the kernelrelease is created by make prepare. Since we just changed it ... we then need to run the following two commands..??..
make prepare
make kernelrelease
Ok. I am at the point just before the 'Build' of the kernel. Everything should be ok. Since all the configs and sources should be correct AND the ones the current kernel is using, I therefore should be able to get the VMware modules to compile. (I didn't change the -9-desktop to -9-cmt)
dusty-tr2:/usr/src/linux-my # make kernelrelease
2.6.34-9-desktop
dusty-tr2:/usr/src/linux-my #
dusty-tr2:/usr/src/linux-my # uname -a
Linux dusty-tr2 2.6.34-9-desktop #1 SMP PREEMPT 2010-06-03 18:33:51 +0200 i686 i686 i386 GNU/Linux
dusty-tr2:/usr/src/linux-my #
- Build -
I included the 'time' command to see just how long it takes.
time make
This will build the kernel and all modules and it will take some time to complete. The build process can take anywhere from 60+ to 120+ minutes.
- Install -
Everything was built in the previous step, now we have to install it.
We are down to two final commands...
Install the modules:
make modules_install
Note: 'make modules_install' will install modules to:
/lib/modules/2.6.34-9-your_release_string
Example:
/lib/modules/2.6.34-9-cmt
Install the kernel:
make install
- Confirm and Boot -
Verify that the new /boot/grub/menu.lst looks correct, example:
Note: Do NOT use this info in your menu.lst, this is just an example...
title openSUSE 11.3 [cmt] - 2.6.34-9
root (hd0,1)
kernel /boot/vmlinuz-2.6.34-9-cmt root=/dev/hda1 vga=0x31a resume=/dev/sda1 splash=verbose showopts
initrd /boot/initrd-2.6.34-9-cmt
Take a quick look at your /boot directory/partition and make sure you see your new '-release' kernel, system map and initrd there, example:
/boot/initrd-2.6.34-9-cmt
/boot/System.map-2.6.34-9-cmt
/boot/vmlinuz-2.6.34-9-cmt
If your menu.lst file looks good, and you see your new '-release' files (shown directly above) in /boot, restart your computer and boot to your new custom kernel!
I just hate being made a fool of... especially by a computer. Don't know whether I am holding my tongue on the wrong side of my mouth, or what, but I can not get VMware to see/find the proper header files. Even though I just built a kernel with them!!!
TopExternal Boot-up
From the forums, a reply by jdmcdaniel3 to suse_tpx60s:
Setting up SuSE externally so you don't mess up your main machine.
You could always consider loading openSUSE 11.3 on an external USB hard drive,
that�s what I have done and it leaves the internal system untouched. Of course, first you need to
have such a hard drive which has 40 GB of free space to use for the install. You need to understand
that by default, openSUSE is wanting to install the grub menu into the MBR of that original boot drive.
So, to install openSUSE on an external USB hard drive, you need to do the following:
- Tell your computer BIOS to boot from your external USB (or eSATA) hard drive. (I think this might depend on your PCs capabilities...depending on its age.)
- Install openSUSE & its SWAP on primary partitions on the external hard drive.
- Install Grub onto the openSUSE partition and not the MBR.
- Install Generic MBR on external hard drive.
- Inform Grub that the external hard drive is the first boot drive (it can not guess this since you did not boot from it in the first place).
- Designate the openSUSE partition as the Active or booting partition.
- Make sure that nothing is installing on the internal hard drive.
That is it. Do this a couple of times and loading openSUSE on an external USB hard drive will be as
natural as riding a bicycle. I use this method so I can test openSUSE on any computer that I want,
including computers I have no intention on using openSUSE after the testing is done.
Thank You,
Borrowed/stolen from: Suite101
System BIOS Limitations And The Need For Master Boot Record Information
Many System BIOS Setups (older versions) in PCs do not have support for using a USB storage device
as a secondary booting option. But some/most of the latest BIOS do have this option.
When a system boots, it is the system BIOS program that runs first. After doing the preliminary checks,
it gets ready to load the Operating System; for that, it looks for Master Boot Record (MBR) information
inside the computer. This is (normally) available in the C partition of the Internal Hard drive. Just in
case the internal Hard disk has failed to run, BIOS programs will look for the next device (like a floppy
drive or a CD drive or another internal hard disk drive � depending on how the BIOS has been set up) for the MBR.
If the BIOS program can not accept a USB Storage Device (like the external had disk) or if the external
drive can not/ does not store the MBR, it can not function as the booting device. That is the simple reality.
However, booting of Linux Ubuntu (and openSuSE) operating system from external USB drives seems quite possible and the
procedure involved (described above) for this purpose is also, reportedly, easy and straightforward.
Is There an "Unofficial" Way Out?
Curious IT experts will always look for unofficial channels to circumvent such limitations to find ways
of overcoming such challenges. But from the various discussion forums and websites available in the Internet,
it looks there is no sure fire way existing currently to make the external hard disks bootable for Windows.
Windows Operating Systems Do Not Support Booting From External Hard Disk
Microsoft Win XP or Vista does not, at present, support booting from an external hard disk.This means that the user cannot install the OS Software onto the External hard disk in a straight forward manner. For booting, a Master Boot Record (MBR) is needed. This must be available on the disk drive, and this includes external disk drives.
This facility is not offered by Microsoft, for the simple reason that it has the potential to encourage piracy.
Top
System Notes
Mime Type Icons can be found at: [/usr/share/icons]
Desktop menu entry files at:     [/usr/share/applications]
application's icon:              [/usr/share/pixmaps]
directory of C header files:     [/lib/modules/2.6.22.5-31-bigsmp/build/include]
list of TV stations:             [/etc/X11/xawtvrc]
Wallpapers:                      [/usr/share/wallpapers]

/usr/bin/vmware

Emoticons at:                    [/opt/kde3/share/emoticons/Default]

Karamba & Sensors at:            [/opt/kde3/share/applnk/Utilities]
Karamba Themes at:               [/home/ctaylor/.kde/share/apps/superkaramba/themes]
=======================================================================================
In /etc/bash.bashrc:
This will make the prompt char on the next line:
	    _p="\012 #"
	else
	    _u="\u@\h"
	    _p="\012>"

In /etc/bash.bashrc set the prompt to this to get the title lines you want.
    PS1="${_u}:\w${_p} "
=======================================================================================
Top
Super Grub
Thanks to a fabulous program called SuperGrub, you can still be able to boot back into your Linux System... after a screw up -or whatever- IF you haven't wiped the Disc. I am assuming that you have "accidentally" changed the MBR and this will help you get it back in order. This doesn't fix everything. You will still have to edit your "Main Grub" menu.lst to get all the ducks in line. But, like the author(s) said, this will teach you something about the booting process. I still have a lot to learn but, by guess and by golly, I got it to dual/triple boot again... without re-loading my Linux stuff.
I have used this a number of times in my Triple boot machine and it works wonderfully... at least as of today, 30 June 2010. The way things change I can't say after this date. Just try it.
TopStuff
Copyright © 2004-2010
All rights reserved.


