I recently had the need for a Wireless hookup. Through my adventures here in these WebPages I have talked about customer's machines, which were laptops. I had to check them out and -all- of them had Wireless Internet connections built in. Fortunately, some of my neighbors have Wireless connections -and- they don't have them passworded... or at least they didn't. Now most of them have passworded their access, or they have moved. At any rate, Wireless access isn't easy anymore. On top of all that I got a Wii for Christmas. It has Wireless capabilities built in -and- my daughter is signed up with Netflix which happens to have a setup to get movies thru the Wii. Whew! Anyway, that is my main reason for the Wireless connection.
Now then, I have been Fat, Dumb and Happy (and Secure) with my hard wired setup. Now with this Wireless thingy I am gona have to setup proper security. I wouldn't mind if the neighbors "borrowed" some of my bandwidth -but- now-a-days you can't trust anybody. And I don't want anyone snooping around in my data. So I'm gona be stingy and lock it up.
|
Package Contents
|
Features
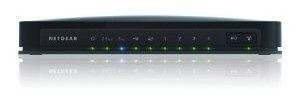
The 3700 comes in a new form factor that can sit horizontally on a desk or vertically on a supplied stand. There are also wall-mounting slots on the bottom. The internal printed circuit "metamaterial" antennas used in previous NETGEAR 11n routers are still used, however. But, contrary to what some may think, they don't negatively affect wireless performance.
The 3700 implements the standard NETGEAR router feature set with a few new tweaks:
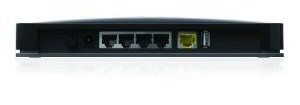
WAN Support - Types handled include Static and Dynamic IP, Other (static and dynamic IP), PPTP (static and dynamic IP) and BigPond. There is no specific PPPoE setting, so you might be better off using the Setup Wizard to set up your WAN connection. WAN MTU is set separately from the connection type (WAN Setup page) and applies to all WAN options. WAN port MAC address spoofing is supported only for Static and Dynamic connection types.
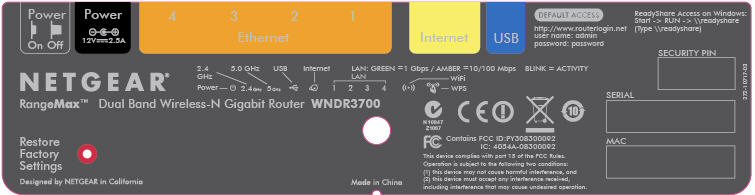
The dual-band wireless functionality of the WNDR3700 is its most impressive feature. It allows you to run both 2.4GHz 802.11n and 5GHz 802.11n wireless bands simultaneously. The speed and distance of the 5GHz band is much better than the 2.4GHz band, and there is less interference. You have to set up both networks with different names, and each network can have its own security level (up to WPA/WPA2, TKIP and AES) and a different password. Additionally, you can set up guest access for both types of networks — letting users access the Internet, but not the local area network.
Firewall - The SPI+NAT firewall is pretty basic, although you can disable SPI. Both port forwarding and triggered port forwarding are supported. You get a rather short pick list of services in the Port Forwarding add screen, but you can specify the port numbers and protocols directly for both the outbound trigger port and inbound port range.
Ports can also be opened automatically via UPnP NAT Traversal (enabled by default), but at least you can log into the admin interface and see the automatically opened ports in the UPnP Portmap table. A single DMZ IP is also supported and you can disable the SPI portion of the firewall.
The WAN Setup page holds the SPI Firewall Disable (default unchecked), DMZ, Respond to Ping on Internet Port and MTU settings. There is also a NAT Filtering option (default "Secured") that isn't explained very well in either the online help or user manual.
The Block Services (outbound port filters) can be applied to all, one or a range of IP addresses, but not MAC addresses. They also can be controlled by a single rudimentary schedule (checkboxes for days of the week and one set of start / stop times).
The Block Sites feature is keyword-based and applies to web traffic only. You get an attention-grabbing red and black "Web Site Blocked by NETGEAR Firewall" page when you trigger the block and the ability to have one "trusted" IP address that can bypass any blocking.
Dynamic DNS clients - Only Dyndns.org is supported
Logging and Reporting - Logging seems mainly focused on logging web traffic. Everything goes into one log, with no filtering provided. You can clear or email the log, but there is no syslog or SNMP trap support. Email authentication has been added, but there is still no Test email button or ability to handle SMTP servers using secure connections or to specify an alternate SMTP port.
Other features - The DHCP server can be disabled and allows IP address reservation by MAC address. RIP direction and version (1, 2B, 2M) can be controlled and static routes set.
QoS: Simple four-level priority-based QoS for upload (Internet-bound) traffic has been added. You
must specify the uplink bandwidth. QoS priority can be set by Ethernet port, client MAC address or
application port. There are 18 pre-built QoS Policies for applications or you can define your own rules.
Note that this is not Automatic Quality of Service, as NETGEAR claimis on the 3700's web
product page (Overview tab).
Setting up the Router and your Cable Modem
For the router installation, you can follow the Resource CD that came with the unit
or, if you are an expert, simply do a manual setup using router's IP
(most units have an information sticker affixed to the bottom of the router).
(Smart Wizard requires a Windows OS.)
If you have your PC set to automagically run an installation
CD, insert it into the drive, then you will see the list of tasks and info on the first page displayed.
The first task is "Setup". However, you might want to select "Documentation" first
and read over the steps involved. There is lots of good info in the Docs... even for the experts. Annnddd...
there is lots of info on that Bottom Label.
It is a "must"... that a PC/Mac connected with an Ethernet Cable... is used to setup the router
for the first time. NO exception to this!
For PC Users, use the "ipconfig" command to make sure the PC is getting a proper IP from the router.
The following was borrowed/copied/stolen from the
VPN Case Study Site Web Page. I don't want
to loose it and I would like to help and share with others. To conserve space and not steal everything,
I have not included the Mac Portions. Please visit their site.
Note Most, if not all, of the newer PCs come with Integrated Network circuitry. That means it will have an Ethernet connector on the back of the machine. IF you purchased one of the lesser expensive models that does not have an Ethernet connection, then go to your local 'puter store, purchase a NIC (Network Interface Card) and install it.
Presented is a copy of their check sheet that you need to Print out and then Fill out so you have all the information before starting. Check List
Now then, as stated on the VPN
page, you are trying to get connected to the Internet. Your ISP
will have provided you with the necessary information to get connected. One of these pieces of info is a
Public IP Address. This will be the address of your modem - from Cox, or whatever cable company you have.
Your computer will get its IP Address from the Router. That is the purpose of it, the Router. You are provided one(1) address that
can become many. All of yours will have an address of 192.168.xxx.xxx. This is the Private IP Address range.
These can not be used out on the Wide Area Network. Only on your local Network.
The WAN and LAN
DO NOT have the same address.
DO NOT CASCADE ROUTERS. HAVE ONE MODEM, ONE ROUTER, ONE COMPUTER FOR THIS SETUP. The many come after you get connected. Connecting two, or more, Routers together involves Double NATing and that is involved. More complicated than you need ... at the start. That is for later when you are in expert status.
Annnddd... in speaking of addressing. Yours will possibly change everytime you sign on to the Internet. Cable companies use Dynamic IPs. DHCP (Dynamic Host Configuration Protocol) Yes, if their systems stay up for a long time, your address may appear to be the staic. However, it is not, and can change at any sign on. So do not use static in your setup. Static is not available for Home Users. Only for Businesses. Both your WAN IP and DNS should be Dynamic.
Now then, what to do When/IF the Smart Wizard finds the connection
as a Static IP?? One way is to input an IP that is not your LAN IP.
Do not do an ipconfig and put same IP range on
LAN side and WAN side (internet).
So you can follow, use the information below:
192.168.10.100 -IP Address
255.255.255.0 -Sunbet Mask
192.168.10.1 -Gateway
4.2.2.1/4.2.2.2 - DNS Server
Save this info. Once this is saved, you will NOT get connected to the
internet, since this is fake info. Log back into the interface of the Router and go to Basic Settings
("Router Setup" page(on CD) will explain how to login
-or- you can look down below)
Change both IP and DNS to "obtain automatically".
After saving the new settings, power off both Cable Modem & Router.
Unplug the Ethernet Cable between Modem and Router.
Start your network in the correct sequence.
Failure to start or restart your network in the correct sequence could prevent you from accessing the Internet.
To access your router:
1. Connect to the wireless-N gigabit router by typing http://www.routerlogin.net in the address
field of your Browser, and then press Enter.
You can connect to the wireless-N gigabit router by typing any one of these three URLs in the address field of your browser, then pressing Enter:
• http://www.routerlogin.net
• http://www.routerlogin.com
• http://192.168.1.1
You should get a login window. The default username is admin and the default password is password. Please notice that both are in lowercase. These can be changed and for security reasons I highly suggest that you do... make them personal.
TopChanging the Built-In Password
!!.Bewares.!!
USB: Whilst investigating, AFTER I made the first one a Brick, I found an Ausie Forum discussing this router 'before and after' it was released. There were complaints of 'dropouts' that were numerous. Turned out to be the falt of the USB connection. So, beware of what you connect to the USB port on this router.
Placement: The wireless router lets you access your network from virtually anywhere within the operating range of your wireless network. However, the operating distance or range of your wireless connection can vary significantly depending on the physical placement of your router. For example, the thickness and number of walls the wireless signal must pass through may limit the range. For best results, place your router: As close to the Center of your area, High as possible and avoiding other electical devices, such as fans, cordless phone bases, microwaves ... etc.
Info
Firmware:
Tell us what firmware revision are you on please, not the
hardware version.
Enter in your Browser: http://192.168.1.1/RST_status.htm
Charts: Wireless Charts Router Charts
Installation Help: Netgear Broadband & Router setup.
Restore Factory Settings
You can restore to the factory default configuration and reset the router's user name to admin, the password to password, and the IP address to www.routerlogin.net. This procedure erases your current configuration, including your wireless security settings, and restores the factory defaults. When you log in after resetting, the Smart Wizard configuration assistant prompts you to configure these settings.
To restore the factory default configuration settings:
The Local gateway IP address will be 192.168.1.1 when reset.
The Local DHCP range = 192.168.1.2 -to- 192.168.1.254
Linux DD-WRT
DD-WRT Main Page Installation of DD-WRTDD-WRT is a third party developed firmware released under the terms of the GPL for many ieee802.11a/b/g/h/n wireless routers based on a Broadcom or Atheros chip reference design.
A usefull command that I learned about on the Forums:
/sbin/lspci -nnk
Think I have used it before, but like a lot of other things ... forgot about it. And we have:
/usr/sbin/lsusb
I'll have to check as to why one is a straight '/sbin' and the other is '/usr/sbin'.
Security Encryption (WPA-PSK + WPA2-PSK)
Main reason this is here is to help clearify the "Encryption Key". In changing my Linux Desktop from KDE4.x back to KDE3.5, I got this inquiry about my Wireless Network ( which I never gotin KDE4.x). Part of the information that it wanted was the Encryption Key. What it really wanted was my PassPhrase. Don't know why they can't use the same terminology. I had to sign out of Linux and re-boot into Windows in order to use the Router Program and get this info. The way to use it in Linux is probably right in front of me, but I haven't seen it yet.
This selection allows clients to use either WPA (with TKIP, broadcast packets also use TKIP.)
or WPA2 (with AES). If selected, encryption must be TKIP + AES. The WPA PassPhrase (Network key) must also be entered.
To reach maximum wireless performance, the 11N clients must connect to this router using WPA2-PSK(with AES) . For
clients connecting in WPA-PSK( with TKIP), the maximum wireless speed will be at 802.11g. Enter a word or group of
printable characters in the PassPhrase box. The PassPhrase must be constituted of either 8 to 63 ASCII characters or
exactly 64 hex digits. A hex digit is one of the following characters:
0, 1, 2, ..., 8, 9, A, B, C, D, E, and F.
Clearing the Passphrase
Borrowed / Swiped from: eHow
This addition came about cause of my "First" Wireless connection. Well, actually it was my second. The first was my Wii.!! Anyway, it was my first connection with a computer. My Son's Laptop, an Acer Aspire One ZG5. He had "somehow" deleted his sound and he claimed that he couldn't get on the Internet ... again. Well, I had just industriously worked on and setup my new Wireless Router. So, after the Wii, I tried to sign on with his Laptop ... and ... was successful! The first time!
Now then, the problem, and the reason for this section. My Son was going to sell this Laptop. Ok, -but- it had my Wireless Network Passphrase on it!! Hmmmmm??? So, as usual, we go to the Net and see what we can do about it. Couple of checks and the following procedure was found. Needless to say, the Passphrase was not just changed ... the whole entry was removed. Now I do believe, from what I read, that there have been, and probably still are, "options" to 'Save' or 'Not Save' the Passphrase after connecting. However, on my Son's Acer it was NOT an option. It just saved it. So, you might want to keep an eye on this as your friends and neighbors visit with their Laptops, iPods and other stuff.
There is a "Guest" account setup for "My New Router" that I will have to learn so I won't have to worry about this in the future.
Open the Control Panel via the Windows Start menu. Select Network Connections.
Right-click Wireless Network Connection .
Select View Available Wireless Networks .
Click "Advanced..."
Now then, I must expand on this. At this point you are going to be looking at the:
"Choose a wirless network"
screen -or- window. The "Advanced" selection may not be just the word Advanced. On my Son's
Acer Aspire Netbook it was under "Related Tools" and was called:
"Change advanced settings"
Open the Wireless Networks tab. Under the Preferred Networks section, highlight the network you want to Change -or- Remove. This is a list of networks your computer is configured to automatically connect to (the passwords are saved). Click "Remove" to remove your home network. Click "OK" and navigate back to the "View Available Wireless Networks" window.
Only perform this step IF you are changing the Passphrase.
Cox Cable DNS Servers
The following is a list of Cox Data Name Servers (DNS) that are available to the states listed. It seems, as someone else observed on DSL Reports, that Cox is consolidating a number of their servers. These are the ones particular to my needs. For more info, check out the site listed below.
A larger list of Cox Servers is available at: Broadband DSL Reports.
IP Address Lookup | Online User Manual
TopGlossary of terms
These are here for Quick Reference. Probably will also be in my main Glossary, -but- they will be here where needed.
Got the following off FixYa.com and it looked interesting. Actually looking for something else and found this.
Hi, you need to upgrade firmware on router the reset and reconfigure router following is the steps to upgrade firmware on router link for latest firmware http://kb.netgear.com/app/answers/detail/a_id/13091 A. Open the router page using the following way: 1. Connect a computer to the router using any one of the 4 available ports. 2. Open a web browser (Internet Explorer, Mozilla Firefox or Safari). 3. Access the router, usually by typing 'http://192.168.1.1' or 'http://www.routerlogin.com' in the address bar. 4. Login to the router with the Username as "admin" and Password as "password" (please note that the Username and Password are case sensitive). B. Visit the following link to download the latest firmware. http://kbserver.netgear.com/prod C. Please follow the steps to upload the firmware of the router: 1. Open the router page using the steps mentioned above. 2. Under Maintenance, click router Upgrade. 3. Click Browse and locate the upgrade file. 4. Click Upload. 5. Wait for the router to reboot. 6. Click on 'Logout' (at the bottom of the list) from left menu. 7. Reset and reconfigure the router. RESET THE ROUTER: 1. Make sure router is connected to power supply and is on while you perform the task below. At the rear panel of the router, near the antenna, there is a very small round pinhole that contains the reset button. 2. Using a pen/pencil/paper clip, hold the reset button for 60 sec. so that the test light starts flashing. 3. After few seconds when the test light stops flashing. Turn off the router and turn it back on after a couple of minutes. RECONFIGURE THE ROUTER: 1. Please remove all the connections from the router. Connect power to the router and then connect a cable from the computer into any of the 4 lan ports on the router. Make sure the modem should not be connected to the router or to the computer. 2. Open up the Internet Browser (Safari, Internet Explorer, Mozilla Firefox, Opera, etc.). 3. Put http://www.routerlogin.com/basicsetting.htm in address bar. 4. On the basic setting page scroll to the bottom and click on Apply. 5. Login to the router with the Username as "admin" and Password as "password" (please note that the Username and Password are case sensitive). 6. Click on lan ip setup under advanced. 7. Change the lan ip to 192.168.10.1 and under use router as a dhcp server change the starting ip as 192.168.10.2 and ending ip as 192.168.10.51, click apply and click ok for any popup message that arise. 8. Once the browser display some error message like CANNOT FIND SERVER, ACTION CANCELLED etc, Connect the dsl modem on the wan port of the router and restart the computer. 9. Power off the dsl modem and the router after making the connections. 10. Power on the dsl modem and wait till the dsl light comes on, then power on the router. 11. Open a web browser (Internet Explorer, Mozilla Firefox or Safari). 12. Access the router (http://192.168.10.1). 13. Login to the router (Username = admin Password = Password). 14. Click on Setup Wizard and then select "Yes" and Click "Next" on the detection window. 15. It should give you a "Dynamic IP Detected" or "pppoe detected" (type the Username & Password of your dsl account in case of pppoe detection) and then click next. 16. Click Apply. 17. Logout of the router. 18. Open up another browser window and try to access internet. Hope it can fix your issue happy to help Thanks for using Fixya