Welcome to Our Website!

 Jelly Bean 4.3 - August 19th, 2013 / 7:54am  That is essentially what CyanogenMod 10.2 is. Rather than start a new page with relatively the same info, we are continuing with this one. Google didn't think it deserved a new 'treat' name so we don't think it deserves a new page either.

    Most of this information was obtained from scotty85 and MrSmith317 and macpro88.

      And of course wildstang83's, Flyhalf205's and Neo's work at: CM10.1 and CM10.2

We have only corrected some English and Grammer(possibly erroring ourselves) -and- added some emphasis and a few tid-bits from our own experiences. However, any and ALL mistakes can, and will be, attributed to us. After all, it is our WebPage! Which probably contains to much verbiage and CYA.

 December 7th, 2013  Here is one called: LiquidSmooth


Actually, you will find that we have been all over the Web and gotten information from everywhere. We are assuming that it is Up-to-Date and that you will check it before using it.   In addition, the observant will notice that the following list contains 'jump points'.

 The steps: (as of 17 Jun 2013) 

  1. Backup ... Backup your stuff.   Backups  
  2. Get what is needed.   Needed  
  3. Backup ... Backup your stuff.   Backups  
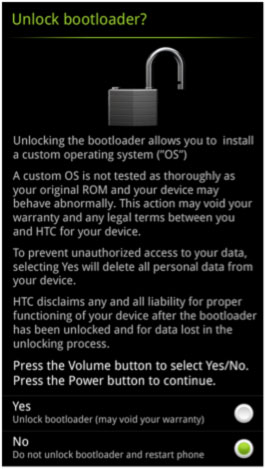
  4. YOU MUST BE UNLOCKED... IN ORDER TO ROOT, INSTALL A CUSTOM RECOVERY AND A ROM... In fact... you must be UnLocked in order to do much of anything fun and important. So, the first to do is... UnLock the bootloader via HTC.   UnLocking  
  5. Then you need to install a Custom Recovery, AmonRA 3.16 -or- preferably TWRP 2.6   Recovery  
  6. Then get 'root'.   Root'ing  
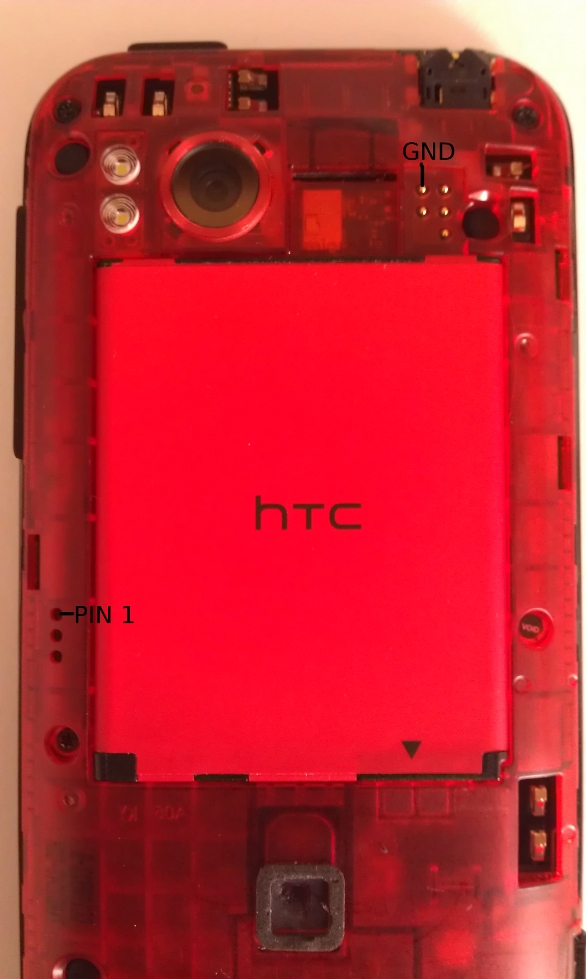
  7. Then S-Off if you want/need. IMHO highly suggested. Yeah it's a wire trick.   S-Off'ing  
    -or- we found a   NO-Wor S-Off  
  8. Flash ROMs to your hearts delight        CM10.1 Install    -    CM10.2 Install    -    Tron2 Install   - 
      TACHYON Install    -   PAC-Man Install  - 
  9. Separated things here:  -    Launchers    -    gapps    -    SetUp Apps  
  10. When/If, you get to a screen with a red icon, hold the 'Power' Button plus the 'Volume Up' Button for a few seconds and you should enter the 'Recovery Menu'. The icon is there as kind of a warning.
  11.   Back to Stock  
  12.   Easier Way???  
  13.   New Firmware  
Git Trainging - Git Reference
Basic Fastboot Commands - Wiki Fastboot - Android Tools - Terminology

What's New in Android 4.2 Jelly Bean - In Jelly Bean 4.3 - WiKi ReZound - CyanogenMod Main Page
Chad's GitHub -

 August 5th, 2013 / 12:45am  There is another!!
    [ROM][GPL][CDMA/GSM][Jb-4.2.2]=TRON-2.2=[06/17/13][PAC][GCC-4.9]
It looks good -and- Flyhalf205 has been over there doing some work!

Paranoid + Aokp + Cyanogen = PAC-man     -     Ultimate Guide
Uniflash for Android   -   ROM FAQ

Internal hardware such as accelerometers, gyroscopes and proximity sensors are used by some applications to respond to additional user actions.

Android homescreens are typically made up of app icons and widgets; app icons launch the associated app, whereas widgets display live, auto-updating content such as the weather forecast, the user's email inbox, or a news ticker directly on the homescreen. A homescreen may be made up of several pages that the user can swipe back and forth between.


This can be fun, and rewarding, and extremely frustrating... ALL at the same time!! As stated elsewhere, we have tried it all... and had some very worrisome results. In fact... our phone died during all this. NOT because of any of this -but- another hardware failure. We've had two since we received our first ReZound on January 5th, 2012. -BUT- we like the phone and plan on keeping it... and getting replacements as neccessary. (as long as they are available) Now then, there is a LOT of verbiage here, and even more on the sister page at:  HTC ReZound - Smartphone . We have made mistakes and blatently published them. Hopefully, someone else will read about them and NOT make the same mistakes. Enjoy reading... -or- not. Further down in the   Steps   section are jump points to the various sections of most interest... so you don't have to read everything. And there is the search box in the upper right hand corner.
Now then, we want to say this right up front:
You will have to setup either the Android SDK or Scott's mini-adb on your PC in order to do most of these operations. Actually in order to do any of them we think.
For Windows you will need to create a C:\AndroidSDK dir and on Linux you will just create an AndroidSDK dir in your home dir.


Please Note the word "LEARNING". IF you try ANYTHING on this WebPage WITHOUT first checking it... your fault... NOT ours. We have tried -and- performed all things mentioned on this Page ... -AND- some that are not. Why are they not mentioned?? Cause we probably missed making an entry -or- we just plain forgot. Some of the areas may be a little jumbled cause... there are a thousand different ways to do the same thing. Some things are described with AmonRA installed and some with TWRP installed. We tried to translate from what was; to what we had.     We may -or- may not have been successful in all areas.
   Remember it is YOUR CHOICE to perform ANY operations on this WebPage.


Warning
The instructions -and- information in this guide are intended for use with the HTC ReZound. Applying these instructions on another device or model may, and probably will, produce undesired outcomes.

 Note June 24th, 2013 / 8:12am  This started out as just another CM10 Install write-up -but-, as usual, we got carried away. There is so much info out there on the Web -and- so much info needed in order to really, really mess with your phone. So, read and enjoy ... -or- not. (This will be constantly revised in hopes of making it... as we learn... more and more... perfect.)

 First - What do we have??  

  •   An HTC ReZound   ADR6425LVW   vigor  
    To get the phone information:
    Power Fully Off - Remove/Replace Battery or UnCheck fastboot.
    ( Menu->Settings->Power-> Uncheck Fast boot       tm1618 on Droid Forums )
    Then - Hold 'Vol Down' and press 'Power' at same time.
    Bootloader Info presented...
Was:
  • *** UNLOCKED ***
  • VIGOR PVT SHIP S-OFF RL
  • HBOOT-2.27.0000
  • RADIO-2.22.10.0801r/2.22.10.0803r
  • OpenDSP-v14.6.0.7708.00.0507
  • eMMC-boot
  • Aug 6 2012,19:24:37
Is Now: (as of July 1st, 2013)
  • *** UNLOCKED ***
  • VIGOR PVT SHIP S-OFF RL
  • HBOOT-2.28.0000
  • RADIO-2.23.10.0123r/2.23.10.0124r
  • OpenDSP-v14.6.0.7708.00.0507
  • eMMC-boot
  • Sep 20 2012,17:40:22

Menu->Settings->About phone->Software Information

  • What we started with:
    [ICS][2.27][STOCK][8-12]PH98IMG.zip
  • ICS 4.0.3 - 4.03.605.2 710RD
  • Baseband 2.22.10.0801r, 2.22.10.0803r
  • HTC Sense 3.6
  • root'd on October 3rd, 2012 at 10:35pm!!
  • How we ended up:
    CM10.1 JB 4.2.2 for HTC Rezound[07-01-13]
  • JB 4.2.2 -
  • Baseband 2.23.10.0123r, 2.23.10.0124r
  • Trebuchet 1.0   Nova
  • root'd on July 1st, 2013 at 7:23pm!!

New Firmware Hboot 2.28 and Radios 2.23 at: http://d-h.st/BIj    June 18th, 2013.

Initial Q and A

 Important Q & A  That is why it is right up front and not buried deep in all our verbiage. Some of you arriving here are like us, just learning, and others who know it all (-Or- think they do, and piss off those of us who do.)

This comes from a QnA with redpoint73 on over at: xda-developers.

  1. Q: What is an RUU? Is it the original (stock) image the phone has? Or just an image in general whither it's stock or deodexed etc..
    A: ROM Upgrade Utility. Its a complete package, containing the ROM, radio, kernel, Hboot, and utility to install it, typically via a Windows PC. Most usually refers to a package from the manufacturer. Although I've seen some developers here use RUU to deploy certain things (rooted Gingerbread to Honeycomb update on the HTC Flyer, for one). But on the One X, the RUU's are all manufacturer's packages.
  2. Q: What is a ROM? I'm guessing a ROM is what replaces a RUU. Like maybe a modified RUU that has been deodexed.
    A: The Android OS firmware. Generic term, ROM can refer to stock or official firmware from the Manufacturer, -or- work by Independent Developers such as those on XDA
    (commonly called "Custom ROMs").
  3. Q: What is a BASE? This one is the reason I started this in the first place. I'm guessing this is the baseband for the radio?
    A: Where have you seen this referred? If a dev refers to a certain "base" they mean the firmware version that their Custom ROM is built from.
  4. Q: Deodexed? Is this basically when you take a built program (like an exe on a PC) and decompile it, turning it into something more along the lines of a script (kinda like turning an exe to a vbs script on a PC)?
    A: A type of compression that can be used for Android app APKs (Android Application Package). The apps on the stock ROM are typically odexed (presumably to save space). Often, mods are easier to implement for files that are deodexed.
  5. Kernel is part of the "firmware" in a broad sense. But it can be flashed independently of the ROM. In fact, it pretty much has to be, the way the bootloader lock works. The way HTC has done it, we are not supposed to be able to flash the kernel or radio. But the devs found a way to flash both of these in recovery.

Alllllrighty now... We have looked and scoured the Web for information on our HTC ReZound. Found lots... and placed it in a Web Page at: HTC ReZound... of our creation. However, it is all mixed up and covers a lot, perhaps to much. For some reason we just could not get it straight on installing another ROM. (Probably cause we worried to much about 'Bricking' our $700 phone.) So, this is our attempt... at getting it straight. Like always things will be copied from others -as needed-. We try to give credit... where credit is due... -but- IF you are reading this and you find something that you should get credit for -and haven't- please let us know and we will correct things as soon as possible. E-Mail click is at the bottom.
(However, as Friends and Relatives will tell you... we are very SLOW at reading our e-mails. And especially the ones from our Web Page -cause- we 'normally' don't get that much "Important Mail". And the junk is a bother. -But- it will eventually get read.)
Our Questions and Answers.

Now then, we feel that this one came out better than the other -but- still lacks the polish that we would like it to have. So, bear with us and look it over -and- check the referenced material. It get's a little difficult learning and relating at the same time. We have tried our best. -AND- We have decided that we are keeping both the 'old' and this 'new' version of our HTC ReZound Adventures. And we will keep adding stuff to both!


Please Note the word "LEARNING". IF you try ANYTHING on this WebPage WITHOUT first checking it... your fault... NOT ours. We have tried -and- performed all things mentioned on this Page ... -AND- some that are not. Why are they not mentioned?? Cause we probably missed making an entry -or- we just plain forgot. Some of the areas may be a little jumbled cause... there are a thousand different ways to do the same thing. Some things are described with AmonRA installed and some with TWRP installed. We tried to translate from what was; to what we had.     We may -or- may not have been successful in all areas.
   Remember it is YOUR CHOICE to perform ANY operations on this WebPage.


 Tools Used:  

  • AmonRA
  • TWRP
  • Java
  • Android SDK
  • HTC Drivers
  • Hasoon All-In-One Toolkit
  • JuopunutBear
  • Hunk of wire 'bout 6 inches long
  • My Computers - All both of them.
  • ... and a Fender thin guitar pick

  What is needed... and Preparation... Before you start


Required Resources for your PC

Windows users should have a passing familiarity with Command Line or DOS Box operations. Linux users, we assume that you already do.

If you haven't already, please make sure ALL these items are installed and Up-T0-Date. We have listed them here at the beginning so that you can get them before they are needed -- in the middle of these operations. Again, this is Windows Oriented -- Linux will come later.
Side note to self: This seems to be the 'same' as the setup for Linux below that we 'lost' in the HD Crash... and we have re-setup our Linux version. July 27th, 2013.

   #1. Java Runtime Environment:    

http://java.com
You also need the JDK in order to install the SDK. (The JDK includes the JRE.)
Java SE Downloads
To see IF you have it -and/or- which version enter:
        java -version
on a Windows Command prompt, -or- a Linux terminal window, and check it.

   #2. Google Android SDK -or- ADT zip:    

In the Android documentation, follow the steps to download and install the appropriate Android SDK bundle for your system. If the 64-bit JDK is installed, you need to install the 64-bit Android SDK bundle. With the 32-bit JDK, install the 32-bit Android SDK bundle. The bundle includes a version of the Eclipse IDE and a built-in Android Developer Tools (ADT) plugin.

Installed in openSuSE 12.3 via Yast2:
android-tools - Android platform tools (adb, fastboot)
Android Debug Bridge (adb) is a command-line tool used to communicate with and control Android device over a USB link from a computer. Fastboot is a command line tool used to directly flash the filesystem in Android devices from a host via USB.


If you already have Eclipse installed and want to add the Android SDK, in the Android documentation see Setting Up an Existing IDE.

As of today: June 14th, 2013 - OS is JB 4.2.2 and SDK is r22.0.1
Also Refer: Amazon.com for some good information. Got me clear on a couple of things.

The SDK Bundle was placed in C:\AndroidSDK
The ADT Workspace is C:\Users\ctaylor\workspace

We installed the adt bundle on our Linux. It was placed in an AndroidSDK dir in our 'home' dir.    ~/AndroidSDK/adt-bundle-linux-x86_64-2013052/

As you continue developing apps, you may need to install additional versions of Android for the emulator and other packages such as the library for Google Play In-app Billing. To install more packages, use the SDK Manager.

SDK Commands

  #3. HTC Sync (Windows Only) & HTC Drivers:    

http://www.htc.com/www/help/
Interestingly... the ReZound is NOT listed in the 'supported' phones. Do believe that this phone, like our previous LG Wave, has become a 'step child'. Doesn't matter, Most of the places tell you to NOT run HTC Sync when Unlocking -or- rooting your phone anyway.
About HTC Sync: The only reason you need HTC Sync installed is for the USB drivers that come with it. But the program itself has been known to cause conflicts. Make sure that HTC Sync is not running in the background by opening Task Manager in Windows and killing it if you find it lurking in there.

The main items needed are the HTC Drivers which are also available at:
MyTopfiles and Dev-Host -or- you can Google HTCDriver3.0.0.007.exe and download it from another location.

An excellent YouTube Toutorial on this SetUp: JDK, SDK, Eclipse SetUp

Is Android 32-bit or 64-bit

       [How to Boot Android Devices in Fastboot, Download, Bootloader or Recovery Mode]
  Refer: [Things to Do Before and After Installing a Custom ROM + Troubleshooter]
             [Download USB Drivers for Android Devices]

The following is more or less a table of contents of the above Reference, in the middle. Couldn't find any individual link points, so these are just the Hi-Lites of what you will find there. It was the first one we found. The other two, the top and bottom ones, were added later. -And- we have added some notes to this one. (more verbosity...)

  1. Ensure Decent Battery Level
  2. Backup Your Apps, Contacts, Messages, etc.
  3. Put Your Phone in Debugging Mode
  4. Backup Your Phone's IMEI
    1. From the home screen, press the Menu key.
    2. Tap Settings.
    3. Scroll to, then tap About phone.
    4. Tap Phone identity.
    5. The device number is located under IMEI.
    6. If the device is not functioning, the IMEI can be
      found on the back of the device, beneath the battery.
  5. Backup the Complete ROM (Important)
  6. How to Restore a Previously Backed up ROM:
  7. Installing a Custom ROM
  8. Installing Google Apps
  9. Getting Signature Verification Error While Installing?
  10. (Status 7) Installation Aborted Error
  11. Upgrading Custom ROM without Loosing Apps & Settings
  12. Recovering from a Bootloop
  13. How to Install a Mod or Patch or Kernel:
  14. Avoid Restoring Apps & Data Backed Up on Another ROM:
  15. Fixing Battery Heat Up and Drain:

  Easier way to flash PH98IMG

Tearin' the back off, removing the battery, pushin' both buttons, holdin' your tongue on the correct side of your mounth.... Arrrggg!!! There has got to be a better way!   And there is...     Another Web search found information from... who else?   Our man... Scotty.   This is a copy of his dissertation over on XDA Forums. For the most part only corrected spelling and grammer... and added a few little tid-bits, mostly emphasis.

Therefore, ANY and ALL mistakes are our fault(s).

        -But- as usual:   Your choice to use ... at your own risk.

 July 25th, 2013 / 9:26am  Just had a discussion with Scott on the Net and he straightened us out on a few things. We had a hard time getting our heads clear on a couple of the commands. Mainly cause we committed the terrible sin of "hurrying". -AND- had tons of interruptions!! Anywho, that is our excuse and we are holding to it!

Now then, "In our confusion" we posed a question to Scott:
One part bothers us... the "fastboot flash zip recovery.zip". Everywhere else that we look we only find "recovery.img" type files being used.
To which he cordially replied:
fastboot flash zip zipfilename.zip and fastboot flash partition imagename.img are completely different operations.
with the fastboot flash partition imagename.img you need to be unlocked or running a patched hboot(which is only possible if youre S-Off)
fastboot flash zip zipfilename.zip is a way to flash zip files that would normally be named PH98IMG and flashed via a FAT32 formatted sd card. as such,only those types of files can be used. they must contain a properly "named partition"(example hboot,recovery,or boot) and a correctly configured android info text document.
this type of file is a way to install various images with a stock,locked hboot.

Now then, after reading this a gazillion times our eyes were finally opened. However, in our defense, there is a little ambiguity in this 'command':
   fastboot flash zip name.zip -- where the 3rd arg is an 'action'
      which means with fastboot, flash the file format: zip named: name.zip
   fastboot flash recovery name.img -- where the 3rd arg is a 'location'
Now there is none IF you are familiar with the commands -and- you have the correct frame of mind.

We then quizzed him about the differences between zip and img. The question was not worded exactly like we meant it to be -but- we got a satisfactory answer.
Now 11+ months later we are getting our third one. Still would like the img versus zip clarification IF one is available. We have searched the Web and can not find the info.
We did not mean the difference in the files -but- the usage of them. Just asked the question wrong... -But- got a good respanse:
what clarification do you need,or what further questions do you have? you can searech for "flash PH98IMG" for info, basically all this guide is doing is flashing that type of file from fastboot instead of from the sd card. the advantages are:
1)you dont need to physically move the file onto and off of the sd card
2)proper name is no longer a factor - the zip file can be named anything(example ph98img-amon-3.14.zip) 3)sd card format is no longer a factor. this can be used even if an sd card is not present in the phone

Run the command "fastboot oem rebootRUU" Now you should see a black screen with a silver HTC logo. Look familiar? This is the screen you'll see when using the RUU.

From here you can re-flash an original HTC ZIP, with "fastboot flash zip filename.zip", where filename is the name of your signed HTC image.

As an added bonus, if your phone is S-OFF (even if you're not using the ENG SPL), you can flash ANY fastboot-compatible ZIP from here, signed or not.

When you're done, "fastboot reboot" will boot the device.

 [Begin Scott message] 
With S-Off(Security On/Off) here, more folks may be attempting to install things as PH98IMG files, which can cause certain fustrations. I personally have quit all together installing any PxxxIMG files on the SD card, on ANY of my HTC devices. What follows is a guide I've placed in other forums, and decided to include here as well.    HTC Names

All HTC phones utilize a PxxxIMG file system to flash RUUs and such in hboot. Having guides up here, the TB, the inc, and merge forums, and being active on the board I see alot of folks have trouble getting PxxxIMG (PH98IMG in case of the ReZound) to work. The problem usually has a simple fix, but sometimes causes folks an extreme amount of confusion.

-But- there is an easier way

I mess with my various HTC devices alot, and have found using fastboot is a much faster, easier way to flash PxxxIMG files. You dont need to transfer files to your SD, or boot to change files if you've got a couple to do.

In a nutshell, you're going to place your file into the folder, on your PC, where adb and fastboot live; (probably platform tools or tools if you're an advanced user that has the sdk installed), place the phone in fastboot, put it in RUU mode and flash the file with this command: fastboot flash zip <filename>.zip

If you rooted with revolutionary, and have no idea what fastboot or adb even are, here's a step by step:


Now then, one of the first things to do is; obtain a copy of md5sums.exe IF you do not already have it. This can be downloaded from: pc-tools.net


1) set up adb and fastboot: Download this file, which contains adb and fastboot.
http://www.mediafire.com/?hzf1u4bowjewhdq
md5 sum: 9d1c0e2a98f09bb65521889870334b65

Extract it, and place the extracted(not zipped) mini-adb folder on the root of the C: drive of your PC. In Windows 7, you should be able to just right click, then extract files. If not, you may need a utility such as 7zip

Re-install revolutionarys drivers, If you don't still have them on your PC from when you rooted.
These are the HTC drivers: HTCDriver3.0.0.007.exe

 [ Open a command window. ]  In Windows 7, just click the start bubble, then type "command" in the search box. This should open a small black command window. (Also known as a 'Dos Box'.)

Change to your mini-adb directory(folder) by the entering the following command at the prompt in your command window:
      cd c:\mini-adb
this should change your prompt to "mini-adb>" indicating that you've changed to that directory.

*Note if you unlocked with my guide, you can use your mini-adb_vigor file. Just cd to that directory
(cd c:\mini-adb_vigor)

2) flash your file Put the file(s) that you want to flash into the mini-adb folder. You can copy/paste, drag/drop or move them... however you are comfortable in moving files.

Make sure USB Debugging is selected in Menu > Settings > Developer options before connecting your phone to the computer. Connect your Phone and the PC with the USB cable... in CHARGE mode.
(Note: On Android 4.2 and newer, Developer options is hidden by default. To make it available, go to System settings->About phone and scroll to Build number at the bottom and Tap on it seven times. Return to the previous screen to now find Developer options listed.)

Enter the following commands. From here on, commands will be bold and italics, comments will be blue Indian Red. Each line is one command, enter them one at a time. You can copy/paste or type them in.

md5sums <filename>   This will output the md5 sum of the file you will flash.
                 Make sure it matches that listed for your download


adb devices   Should output your phones serial number

adb reboot bootloader   Will boot you into the fastboot screen(white with colored letters)
               Same screen you get by pushing the 'Vol Dn + Power" combo.

-OR-
adb reboot recovery   Wiil boot you into the recovery that you have setup

adb install _____.apk   Installs apk file in your device. Replace dotted space with an actual name of the apk file (Place the apk file in the same folder where ADB & fastboot files are located).

fastboot devices   Will again output serial number

fastboot erase cache

fastboot oem rebootRUU   Boot into RUU, which lets you flash HBOOT, radio, etc.

fastboot flash zip <filename>.zip

You will see a green line on your phone as the file flashes.youll see outut in your cmd window. sometimes when flashing a complete RUU you will get an error that says "failed,reflush immediately". dont panic,just run the above line again to reflash your file

After you get a "finished" message:

At this point, you could actually flash more files if you wanted. For example, a radio and a recovery. Just repeat the "fastboot flash zip" command until you've flashed all your files. Then:

fastboot reboot-bootloader   this will take you back to the white fastboot screen

fastboot reboot   Your phone should reboot

and of course, here's what the outputs will look like in the command window. Red are my inputs. In this example, I'm installing TWRP recovery on my Thunderbolt, with a .zip file called: twrp111rbox1_PG05IMG
Ok, we followed his example -but- used our ReZound. The 'only' thing we had to change was the zip file name; it became TWRP_2.6.1.0_Vigor_PH98IMG.zip. (which can be found at: ReZound TWRP) After using the following example commands... with the name change... and we switched to Linux ... we had TWRP installed on our ReZound
Code:
	openSuSE Linux [Version 12.3]
Copyright (c) 2013 SUSE LLC.  All rights reserved.

ctaylor@dusty-tr2:~>cd AndroidSDK/

ctaylor@dusty-tr2:~/AndroidSDK>md5sums TWRP_2.6.1.0_Vigor_PH98IMG.zip
18f2582b71ed61519f7746ebb8dbf2d0  TWRP_2.6.1.0_Vigor_PH98IMG.zip

ctaylor@dusty-tr2:~/AndroidSDK>adb devices
* daemon not running. starting it now *
* daemon started successfully *
List of devices attached
HT1BJS204850    device

ctaylor@dusty-tr2:~/AndroidSDK>adb reboot bootloader

ctaylor@dusty-tr2:~/AndroidSDK>fastboot devices
HT1BJS204850    device

ctaylor@dusty-tr2:~/AndroidSDK>fastboot erase cache
erasing 'cache'...
OKAY [  0.297s]
finished. total time: 0.297s
ctaylor@dusty-tr2:~/AndroidSDK>fastboot oem rebootRUU
...
(bootloader) Start Verify: 0
(bootloader) erase sector 130560 ~ 131071 (512)
OKAY [  0.319s]
finished. total time: 0.319s
ctaylor@dusty-tr2:~/AndroidSDK>fastboot flash zip TWRP_2.6.1.0_Vigor_PH98IMG.zip
sending 'zip' (6152 KB)...
OKAY [  1.290s]
writing 'zip'...
(bootloader) zip header checking...
(bootloader) zip info parsing...
(bootloader) checking model ID...
(bootloader) checking custom ID...
(bootloader) start image[recovery] unzipping & flushing...
(bootloader) [RUU]UZ,recovery,0
(bootloader) [RUU]UZ,recovery,14
(bootloader) [RUU]UZ,recovery,26
(bootloader) [RUU]UZ,recovery,40
(bootloader) [RUU]UZ,recovery,50
(bootloader) [RUU]UZ,recovery,66
(bootloader) [RUU]UZ,recovery,78
(bootloader) [RUU]UZ,recovery,88
(bootloader) [RUU]UZ,recovery,99
(bootloader) [RUU]UZ,recovery,100
(bootloader) [RUU]WP,recovery,0
(bootloader) [RUU]WP,recovery,100
OKAY [ 10.385s]
finished. total time: 11.675s
ctaylor@dusty-tr2:~/AndroidSDK>fastboot reboot-bootloader
rebooting into bootloader...
OKAY [  1.665s]
finished. total time: 1.665s
ctaylor@dusty-tr2:~/AndroidSDK>fastboot reboot
rebooting...

finished. total time: 1.666s
ctaylor@dusty-tr2:~/AndroidSDK>
May seem a little complicated, but once you do it a couple times, its quick and easy.

This method will work for S-On, or S-Off phones. It will be more of a PITA with an S-On device, as the Android info document inside the PH98IMG file will need to have the correct info.

To get any PH98IMG to flash on an unlocked S-On phone, you will need to:
1) Make sure the file only contains changeable images-i.e. boot, system, or recovery
2) Make sure the Android info document contains the same or higher main version than what is on your phone currently.

see Scottys noob friendly root guide-start to finish for some tips on dealing with main version errors
 [End Scott message] 

 [Begin Scott 2nd message] 
oops,saw this in an email,forgot to come here and actually reply to it

First Question:
Your explanations are great and they cover everything. Just have one more question (actually 1000's more, but just one for now). We have been 'playing' with the CM10.1 JB for the ReZound, and it appears that the procedure to install it should work for the AndroidPolice_4.03.605.2_PH98IMG.zip also... am I right??? This is using TWRP.
on your first question,zips intended to flash in recovery,i.e.,roms, are put together differently than zip files intended to be installed by the bootloader.

as such,cm10.1 will have to be installed via recovery,and the PH98IMG type files will have to be installed using hboot and the sd card,or fastboot and ruu mode(as described here)

Second Question:
Oooops a second question. Can the above System zip's be installed following your directions or do the System zips have to be installed differently.
im not sure what youre refering to as a system zip? im assuming that youre refering to a PH98IMG type file,wich will need to be installed via the bootloader.

a PH98IMG file contains an android info text document,wich basically tells the phone some important info about the phone. the main version,the CID allowed to flash it,wether or not to make the phone require a second flash after the bootloader and radios are installed(called a hboot pre-update) amongst other things.

also contained are one or more appropriately named images. example: system,boot,recovery,radio,splash1, etc. if these images are not named corrcetly,the phone will not flash them. the phone will flash whatever image you name correctly to that partition example,rename your boot image "recovery" and the phone will install recovery into the boot partition. this is just for information,dont actually do it. installing the wrong images can destroy the phones file system,potentially unrepairably. the point is to use caution what images you place inside a zip file for the phone to flash,as it will flash them. a corrupt image could much things up nicely.

the PH98IMG files can be signed,or unsigned. an s-off phone obviously will flash anything you pack up in the correct format.

an s-on phone,if unlocked will allow you to flash unsigned PH98IMG with boot,system,and recovery images only.

to flash a signed,full ruu file,the s on phone must be locked. attempts to modify the signed PH98IMG file will break the signiture,so the phone will not flash them.

last and not least,your rom install procedure is just fine for s off phones. if the device is s on,youll need to either fastboot boot recovery,or manually install the boot image.

you dont need to wipe things multiple times. electronic wipes are not like sweeping bread crumbs off the counter-leaving little electronic bits in place. wiping once is fine. i think the recomendations to wipe multiple times originated for the desire for rom devs to make sure folks did it at least once

hope that answered your questions sufficiently  [End Scott 2nd message] 

 Problem!! July 7th, 2013 / 6:45pm  ARRRGGGHHH!!!

We were warned...   the warnings have been posted...   DON'T DO ANYTHING WHEN RUSHED.   ALWAYS HAVE "LOT'S OF TIME"!!   And what did we do???   The above -- JUST BEFORE -- going to work.

On the way to work we made a long distance phone call using our Bluetooth to wish our daughter a Happy Birthday. Later at work we wanted to call an Associate and the phone went nuts!! Could not get it to stop on the phone numbers, it just kept scrolling. Then the Home Screen started messing up. Touch the phone and it would disappear! Tried to PowerOff and the Weather Clock went transparent. Pushed the Power Button and the phone blanked to the black screen. Pushed Power Button again and the Lock screen appeared. Slid the ring and got our Home Screen. Immediately pushed -and held- the Power Button. Got the Power Off menu and hit Power Off. It finally shut down. This last sequence is the only way we could get it to Power Off.
-AND- as it turns out it is nothing that we did. The phone just finally died!! Let's see now... the first, original one, lasted 7 months. Jan 5th, 2012 to Aug 14th, 2012. Now this one is from Aug 16th, 2012 to July 7th, 2013. Well, they are getting a little better. This last one was good for 11+ months. However, they are no longer selling these. Even though we purchased the "Extended Warranty" we're not sure what phone they will replace this one with. When our son had problems with his phone, which we believe was a Thunderbolt, they gave him a different one... cause they had quit selling the Thunderbolts!!

 September 9th, 2013  No time... just the day. We had problems with our third phone. This one was questionable when we got it -but- we stayed with it. The 'proximity sensor' was not good. We had many, many calls with a 'Black' screen -and- then we could not hang up cause we did not have a screen. Got Chad's proximity adjuster -but- it was only a little help ... for a while. Finally had to complain to Verizon and we got our fourth phone. This one like the last one has 'Shity' buttons. Yeah that's right ... Shity! In fact the only phone we had with good buttons was the first one!! This one didn't even make it two months!! BUT we still like the phone!!

 July 9th, 2013 / 9:11am  Before returning the phone to Verizon, we are gona try one more thing. We had installed the OTA-Global-Stock-4.05.605.14 710RD-Rooted.zip and still not good. We then installed the [ICS][2.27][STOCK][8-12]PH98IMG.zip and still not good. Next we locked our bootloader and tried rezound_AndroidPolice_4.03.605.2_PH98IMG.zip which is what we had been using. -But- this time we locked the bootloader first... even though we are S-Off. What the heck... nothin' else is working. Nope!! Gets warm and starts screwin' up. In our humble opinion -and electonic experience- we believe it is an Electronic Problem.... Back to the Store... We talked to the very co-operative Verizon Associates and 'Nick' in particular. He examined the phone and agreed that it was an Electronic Malfunction. He then said,
      "I would have a NEW phone tomorow." Wow! All I can say is... Wow!!! What good service. I hope 'all' the Verizon Stores are like this one.

Verizon Wireless
9184 W. Northern Ave Ste 101
Glendale, AZ 85305
Jose Roman Retail Sales Manager

Now according to their return policies:   If your current device is under warranty and experiences electrical or mechanical malfunction due to manufacturing defect, you will receive a   Certified Like-New Replacement (a like unit -or- one of comparable quality).

Well, just like last time, we do NOT want one of comparable quality... we want our HTC ReZound. According to 'Nick' that is what we are going to get. Yep!! That $6.99 per month for insurance is well worth it.


  Backups


Backup. Some think that is a 'Dirty Word'. -But- when their System crashes -or- they make a 'Big Mistake'... they wish that they had liked that word. We haven't Performed a backup on our phone...shame on us... until now. Mainly cause we really haven't done anything and Verizon kept a copy of our contacts on their 'cloud backup'. So far that is all we have had to worry or care about. -And- it almost became a disaster. (Read later the Contacts episode.)

For our first backup we just used the one that came with the phone. Entered by first 'Powering Off'. (Now then, even though we said above it was a Big Mistake, do it anyway. Cause IF your first attempt is NOT successful you will have this first back up to... ta da tah... fall back on.) Next 'Remove the Battery'. Wait a few and then 'Put the Battery back in'. Now 'Hold the Vol Down' and press the 'Power Button' at the same time. Keep holding them until the phone Powers On. Then you can release them and shortly thereafter, or at the same time, you should see the Bootloader selections. Select 'Recovery' and then select 'Backup/Restore' and then select 'Nand Backup' and press the 'Power Button' to execute it. Now wait till it is done.

  • [x] boot - this is the boot.img
  • [x] system
  • [x] data
  • [ ] cache
  • [ ] recovery - stock ??
  • [ ] sd-ext
  • [ ] .android_secure
  • [ ] .android_secure_internalsd
  • [ ] compress_backup
  • Perform Backup
  • Return

You can backup System,Data,Boot,Recovery,Cache

System , Data , Boot are selected by default which includes your ROM , Apps , Appdata , Kernel and you can choose to backup Recovery , Cache , things on your internal SD card like your contacts and photos and videos. TWRP also provides compression which is pretty handy if your backup becomes large. Android Enthusiasts Stack Exchange

The above is the 'standard' BackUp selection list. You may want more, or less. -And- actually you do. We spent a couple of hours trying and figuring out how to restore our Contacts. In fact, we screwed up by restoring just the 'data' section, cause that is where we 'thought' the contacts were. Upon ReBoot, the phone just sat there at the Wheel going round and round. We eventually had to remove the Battery and ReLoad CM10!! Fortunately, we had saved our contacts to our PC in the past. This is mentioned now cause... you, possibly, need to do the same thing. Save a copy of your pcsc_pcsc_00001.vcf (the number part will vary) file. That is your contacts. In order to 'create' the file:
In ICS -or- CM10:

Move into Contacts then press: menu->import/export->export to storage(SD card)
Then copy it to your PC.

We have, since the first, started using TWRP to make our backups. -AND- one last note... save your backups on your -External- SD card.

Jump over to GooManager & TWRP and we have used Verizon Backup Assistant -but- that may be a problem when 'Leaving Stock'.

  New Firmware

Hi-lites extracted from: Global update is official

Here's the new firmware without the boot.img and recovery.img. Since the zip was edited, you probably need to be S-Off for it to work. Both radios update. It is the full firmware part of the OTA without boot and recovery.
New Global Firmware

This little Q&A is concerned with the 'bootloader' install at 'Power On'. But the concept applies to our situation too.

Q: To be clear, if I am S-Off I can just rename this file to PH98IMG.zip and it won't replace my boot and recovery so I will retain AmonRa and my exisiting ROM will boot normally?
A: Yes.
Refer: S-Off vs Unlocked

 July 30, 2013 / 9:36am  We possibly have made some assumptions whilst we have been collecting and presenting all this info. As mentioned in other places there are two states that your phone 'must' be in, in order to accomplish a lot of the 'cool' things... UNlocked and 'root'ed. However, in order to get 'root'ed you need a custom recovery... and some of the ways to get a custom recovery involve being rooted already!! Hmmmm...

 From: FAQ - HBOOT and rooting - August 4th, 2013 / 4:45pm  
What's HBOOT?
It's immediately loaded when the phone is switched on. It's mostly responsible for checking and initialising the hardware and starting the phone's software, for flashing official software releases (RUUs via Fastboot), as well as a few other things. In some ways it's comparable to the BIOS on a PC.

But rooting depends on HBOOT version?
It doesn't.

Why does upgrading HBOOT remove root?
It doesn't. When you flash an official update your ROM is replaced with an official one, which is why root is lost.

How do I change HBOOT version?
By installing an official RUU/update...-or- a firmware update. There's no other way - the bootloader is protected by the phone's hardware security because a corrupt bootloader means a bricked phone with no way to recover. RUUs, and firmware updates, contain a version of the bootloader, which is automatically flashed.

Now then, we copied over the "important" parts, to us, of the above. We have a device that is:
      'Unlocked',
      'root'ed and
      'S-Off'ed.
We investigated, and found, the above which says we won't loose our conditions in this operation. 'Unlock' will 'go' in the beginning -but- be brought 'back in' at the end. We are NOT doing a ROM or RUU... just the firmware.

 TWRP recovery firmware install:   Now then, we had done this before... yesterday... -and- really didn't know just what in the heck we were doing. We are trying it again, on our newly Re-Installed Stock ROM. Only this time we have TWRP installed.

  • In order to get our "Button Free" operations we need to 'Install GooManager'... IF it is not already installed. This would be via 'Play Store'.
    -BUT- you must be 'root'ed in order to use GooManager. The following 'assumes' that you are at least UN-Locked and 'root'ed.   At this time, we were also S-Off.   S-On status will have to wait.

    At this point in time "USB Debugging" should be enabled.
  • GooManager - Reboot Recovery.
  • At TWRP make a backup; boot, data, system
    This will save your Root Checker and GooManager and other stuff.
    at Complete; only choice: Reboot System
  • Plug USB into Phone and PC - Charge mode only.
  • Open a command window on the PC.
  • cd c:\AndroidSDK
  • adb devices - Should see device Serial Number.
  • adb reboot bootloader - Wait for  White Screen  with  FASTBOOT USB 
  • fastboot devices - Should see device Serial Number.
  • fastboot erase cache -
    erasing 'cache'...
    OKAY [ 0.347s]
    finished. total time: 0.347s
  • fastboot oem lock - Relock bootloader (Necessary for firmware.zip installation)
    Lock successfully...
    TZ_HTC_SVC_DISABLE ret = -131073 (0xFFFDFFFF)
    FAILED (status read failed (Too many Link))
    The phone will go back to the Lock Screen. ... WAIT.
  • fastboot oem rebootRUU -
    - it then Rebooted to Main.
    This will send us back to the phone.
    ( waiting for device ) Had to GooManager Reboot Recovery
  • At TWRP Reboot -bootloader
    This will send us back to the command window. You will see on the Phone Screen a White HTC.
  • fastboot flash zip firmware.zip
    (it will fail for with pre-update flush again immediately error). So do it again
  • fastboot flash zip firmware.zip
    You will see on the Phone Screen a White HTC with a green status bar below it. It will complete.
    (it will say finish in the command window)

    when its done:
  • -fastboot reboot-bootloader - This will bring up the  White Screen  with  FASTBOOT USB  again.
  • -fastboot flash unlocktoken Unlock_code.bin - When you see the Unlock screen on the phone Press the 'Vol Up' key to get Yes and then Press 'Power Button' to select.
  • ---Phone System will restart again.(spends a couple of minutes on the 4G) Looks like it wanted to do the Setup again. It does.
  • ---Ok. So we are back to ground zero. NO GooManager.
  • Unless you know of another way, UnPlug the phone from the PC, wait a few and then Plug it back in. Charge Mode.
  • adb devices - Make sure we are still talking.
    -AND- You have re-enabled USB debugging... first.
  • adb reboot bootloader - When the  White Screen  with  FASTBOOT USB  appears, check the info.
    Should be HBOOT 2.28 with RADIO's 2.23.10.0123r/2.23.10.124r
  • Select REBOOT with the Vol keys and Press Power Button to ReBoot!
  • Now then, we have the 'latest' hboot -but- we have a clean slate and NO Custom Recovery.
  • ReInstalled Root Checker so we could re-check our 'root' status... cause 'root' is needed to install GooManager!     And we have it... 'root'
  • Installing GooManager & TWRP is described elsewhere. Just suffice it to say that is what we did. Or you can click on them to go see...
  • Now we use GooManger and ReBoot to Recovery.
  • ---TWRP screen should come up.
  • ---Select Restore. Select the package to restore...
    ... your back up from whence all this started.
    Restores System, data and boot.
    Reboot System..
  • We now have the latest firmware -and- all the Apps that we had installed.

You can only issue fastboot commands from an external device via USB while your ReZound is in 'fastboot mode' in the bootloader.

 AmonRA recovery firmware intall:  Copied from brenuga at: xda-developers. This deals with the 'firmware' UpGrade/UpDate. Going from Hboot 2.27 to 2.28.

  • Normal PowerOn
  • Connect USB to Phone and PC... select Charge Mode.
  • Open a command window on the PC.
  • cd C:\AndroidSDK and enter "adb devices"
  • Proceed with these steps....
  • -fastboot boot amonra recovery. make a backup
  • IF it says wating for device then you do not have AmonRa installed.
  • -adb reboot bootloader
  • -fastboot erase cache
  • -fastboot oem lock
  • -fastboot oem rebootRUU
  • -fastboot flash zip firmware.zip
    (it will fail for with pre-update flush again immediately error). So do it again -->
  • -fastboot flash zip firmware.zip
    (it will finish)
    when its done:
  • -fastboot reboot-bootloader
  • -fastboot flash unlocktoken Unlock_code.bin
  • -pull the battery and replace. Hold down 'Volume Down' button plus 'Power' button to boot into hboot, then press 'Power' button again to get into fastboot mode.
  • **** From here down we had troubles. We had used the 'regular recovery' to save our info. We had previously installed TWRP via GooManager which wiped out our install of amonra. So we kinda fumbled around and got the phone to boot back up -and- at this time we don't know how!! Maybe next time.
  • -fastboot boot amonra
  • -restore full backup
  • -reboot


  Unlocking HTC ReZound


Please Note the word "LEARNING". IF you try ANYTHING on this WebPage WITHOUT first checking it... your fault... NOT ours. We have tried -and- performed all things mentioned on this Page ... -AND- some that are not. Why are they not mentioned?? Cause we probably missed making an entry -or- we just plain forgot. Some of the areas may be a little jumbled cause... there are a thousand different ways to do the same thing. Some things are described with AmonRA installed and some with TWRP installed. We tried to translate from what was; to what we had.     We may -or- may not have been successful in all areas.
   Remember it is YOUR CHOICE to perform ANY operations on this WebPage.


Warning
The instructions -and- information in this guide are intended for use with the HTC ReZound. Applying these instructions on another device or model may, and probably will, produce undesired outcomes.

Unlocking Step by Step -- fastboot commands
  Most of this information was obtained from macpro88 and MrSmith317 and scotty85.
  1. Unlock ReZound's Bootloader - Is this necessary?? The Answer
  2. We have made changes to make it as 'ButtonLess' as possible.
    1.  First 'Unlock' the Bootloader   Make sure your phone has USB Debugging enabled. Then connect your device to the PC via the USB cable. Next Go to HTCdev site and create your own personal account.
    2. Now visit HTC Dev's Unlock Bootloader site. Sign in, if you are not already. The pages we borrowed this info from said that the ReZound was not listed in the compatible devices -but- it is now.
    3. On the Right, select the ReZound and then click on  Begin Unlock Bootloader .
    4. In response to the question about Continuing, click Yes - Unless you want to abort this whole operation.
    5. Next you are presented with 'CYA' terms -and- check both - Unless you want to abort. IF you don't then click on  Proceed to Unlock Instructions .
    6. Open a 'command' window and enter: adb reboot bootloader
      Wait for the bootloader screen to appear. It's white with colored letters.
    7. IF you have the Unlock_code.bin already jump to HaveCode-2
    8.    Unlocking:

      Navigate(move) to the "special" folder; by typing
          cd C:\AndroidSDK for Win -or- cd AndroidSDK for Lin
      in the Command Prompt window and hitting the Enter key.
    9. In the Command Prompt window type:
          fastboot oem get_identifier_token
      and hit the Enter key.
    10. You will see a long block of text. Copy and paste this text into the the token field in the HTCdev Website window (in the Command Prompt window:
          Right Click > Mark > highlight the block of text > hit Enter key to copy).
      More clarification: This is Step 9 in the HTCdev pages. They have pictures. They show the block of text that you must copy. It starts with:
      <<<< Identifier Token Start >>>> 
           and ends with
      <<<<< Identifier Token End >>>>> 
      You are to include both of those lines and everything in between them.
    11. Paste this string, or block, of text into the token field provided and hit Submit in order to receive your unlock code binary file. You will receive this information in your email... gmail.
    12. HaveCode-2: You will -or have- receive(d) an email with the attachment: Unlock_code.bin. Save this file in the special folder with your fastboot files (C:\AndroidSDK).
    13. In the Command Prompt type:
          fastboot flash unlocktoken Unlock_code.bin
      On the Phone Screen you will see the following message:
      Now then, you push the 'Vol Up' -or- the 'Vol Dn' Button to make your selection. In other words to move the Green Dot from one to the other. It is NOT a screen tap.
    14. On your phone you will see the above disclaimer. Please read this carefully as this action may void your warranty. Use the Volume buttons to highlight your choice, Yes -or- No, and then press the Power button to make your selection. If you select Yes, your phone will be reset to its' factory default settings, and your bootloader will be unlocked. If you select No, your phone will reboot and no modifications will have been made.
    15. Well, bouncing back and forth between reading, writing and doing got to be to much of a hassel. This was just an outline of what is to be done. IF you follow the Unlock ReZound's Bootloader above you will be ok. We did and we now have an Unlocked Phone.
  3. Question:
    Will 'unlocked', using the method detailed in this thread still result in having to wipe the phone (as mentioned on the HTCdev website)?
    Answer:
    Unfortunately yes. The unlock procedure performs a factory reset.
    No way around it, I'm afraid.
  4. Question:
    Can I root the ReZound without S-Off?
    Answer:
    Yes, you can root without S-Off, -but- you have to unlock the bootloader. No, there is no way to currently root without going through HTC to unlock the bootloader.
Also Refer: How to Unlock HTC Rezound

  Rooting an HTC ReZound

DO NOT ever attempt to accept an OTA while rooted.
Please refer: Scott's Verbiage

Please Note the word "LEARNING". IF you try ANYTHING on this WebPage WITHOUT first checking it... your fault... NOT ours. We have tried -and- performed all things mentioned on this Page ... -AND- some that are not. Why are they not mentioned?? Cause we probably missed making an entry -or- we just plain forgot. Some of the areas may be a little jumbled cause... there are a thousand different ways to do the same thing. Some things are described with AmonRA installed and some with TWRP installed. We tried to translate from what was; to what we had.     We may -or- may not have been successful in all areas.
   Remember it is YOUR CHOICE to perform ANY operations on this WebPage.


Warning
The instructions -and- information in this guide are intended for use with the HTC ReZound. Applying these instructions on another device or model may, and probably will, produce undesired outcomes.


  Most of this information was obtained from macpro88 and MrSmith317 and scotty85.

The information presented here is as accurate as we have found. We -nor- any of the sites referenced -or- mentioned will take any responsibility for your mistakes. Yep!! They will be your mistakes... cause to many have used these procedures and been successful. (Yep, even us!)   CHECK - LOOK - INVESTIGATE - RESEARCH - READ - BEFORE YOU DO ANYTHING.


 UNLOCK ???  Some say must... others say not necessary. However, IF you want to play with Custom ROMs and such... you MUST UNLOCK. The only reason for enabling 'root' is to get control of your phone. -And- you don't get FULL control unless you unlock the bootloader. So the point is mute. Make your first step an UNLOCK.   Just remember... it will void your warranty.  

Nope, you dont have to be S-0ff to be rooted, only UN-locked.

Refer: Why root??? and root??? and of course   ReZound - All Things Root


TWRP Touch Recovery On Your HTC ReZoundd
How To Backup Your Android Device Data
Hasoon2000 All-In-One Toolkit For The HTC ReZound v2.1 v3.2

And we found the definitive answer to the Lock/Unlock question: (RootzWiki)
Q: Why does unlimited.io say a prerequisite for their S-off is being root'd and unlocked via htc dev?
A: To be able to use adb you must be root'd. In order for that you must be unlocked.


IF you haven't guessed it by now... this is Windows Oriented. We are setting things up on our Windows 7 Laptop. We had started a Linux setup -but- that got squashed by our Hard Disk Crash. It will be revived later.
 It's later;  We are now using BOTH, Linux and Windows. The directions, for the most part, apply to both. Just read carefully... read... read... read. And think. IF you don't understand -ask-.

Warning
The instructions -and- information in this guide are intended for use with the HTC ReZound. Applying these instructions on another device or model may, and probably will, produce undesired outcomes.

Refer: Android ROM and rooting dictionary: all the funny words explained --- XDA-Developers forum
          and fastboot commands --- ReZound oriented
  1.  Now Install Custom Recovery   Now pay attention here. We found AmonRa first and then later TWRP. So they are BOTH mentioned and used in the following disertation. You can pick the one that you want -but- some of the operations are used for both.
    First, what do we need? We did, at least it is assumed that we did, the 'Unlock' via Windows 7 on our Laptop -and- we DID NOT have HTC Sync installed. Matter of fact, most of the places we have visited concerning 'Unlock' and 'root' have said... "Make sure HTC Sync is NOT running.".
    1. A few tools:
      • A passing familiarity with DOS/Command Prompt/Terminal Emulator
      • Android SDK (Win/Mac/Linux) : LINK **This install may take a while**
      • HTC Drivers (Win): LINK
      The observant will notice that the last two were already installed for the 'Unlock'.
    2. YOU MUST BE UNLOCKED IN ORDER TO ROOT
    3. First you'll need to download a Custom Recovery called AmonRa -or- TWRP... Why?? In HTC Android phones, the recovery image is a piece of software that can load a ROM image from the SD Card, -or- a PC, and Flash it into the internal ROM. The recovery image is accessed from HBoot.
           Here's a link to it: [Recovery] Amon Ra style vigor - xda-developers
                -or- TWRP 2.6   and some info on them...
           How To Install A Custom Recovery To An Android Phone / Device
      A custom recovery lets you perform several advanced operations on your Android device.
      A recovery image is the system level software for your Android device that lets you perform several maintenance and recovery tasks. The stock recovery image is quite limited in what it allows you to do and therefore, flashing a custom recovery image is required to gain full control of your device's administration. A custom recovery image allows you to perform the following tasks:
      • Wipe your phone's data (Factory reset) and cache,
      • Make, restore and manage backups of your phone's operating system and sotware.
      • Mount, unmount and format your phone's internal as well as external storage partitions.
      • Install a custom ROM or application from a zip file to your phone,
      • Wipe Dalvik cache and battery statistics, and
      • Make logs for error reporting and debugging.
      Now then, even though we have mentioned both "Custom Recoveries" we are going to primarily be focused on AmonRa in this first section. Mainly cause it was the first one we learned and at that time TWRP was questionable on the ReZound. So much for the excuses. At any rate we have a jump spot further down for the TWRP.
    4. Second open a Command Window. (In the following, when you are told to 'Type' or 'Enter' a command it will be in this Command Window.) Move to the proper dir:
          cd C:\AndroidSDK
    5. Third copy 'recovery-ra-vigor-3.16-gnm.img' to the C:\AndroidSDK dir created above. In the Unlock procedure above, we already copied the 'program' files(adb & fastboot) to this dir.
      Also need to download -and install on your SD card- UPDATE-SuperSU-v1.34.zip. This can be found at: XDA Developers Development Forum. We had a lot of trouble getting 'root' on our ReZound. We believe that this particular SuperSU - and doing it as a zip install - is the reason that we were finally successful. Now the last part down where it shows the install of this file may -or- may not, be a little mixed up. -But- at this time, we are NOT gona go over it again to find out all the corrections -if any- that are needed. Scott and the others did a lot of good work on their descriptions -but- they didn't quite work in the order that they presented them. Leastewise NOT for us. From our experiences, and judging what they wrote, we suspect that they finlly got it rooted and came away with the same attitude that we possess at this moment. It's done... it works... and we're moving on!! Clearifications will come later. Again, at this time we are not totally sure which 'fix' finally got us 'rooted'. In the beginnig we were trying to use the 'Temporary root' and finally here in the last we used the 'Permanent root' - which in or Web Searches appeared to be what the successful rooters were using. In addition to the change from Temp to Perm we used this latest SuperSU version. Don't know if it is 'THE' latest, but it is the latest that we used.
       Later:  Ok now, here is the scoop. We have learned that you 'must' clear the 'cache' and the 'Dalvik cache' BEFORE installing SU. In fact it is highly recomended that you clear them 2 or 3 times before the installation. Just an FYI.
    6. Fourth Check the md5 of your recovery image:
              'md5sums recovery-ra-vigor-3.16-gnm.img.zip'
      **make sure the resulting md5 matches the one that drellisdee lists for the image that you downloaded. **
      Please notice that the md5 check is, in this case, against the ZIP file for AmonRa.   LINK
    7. Fifth On the ReZound make sure USB Debugging is 'ON'.
      Menu / Settings / Developer Options and then check the box.
    8. Sixth Connect the phone to the PC via the USB in 'Charge Only' mode.
    9.  Seventh  Make sure youre connected by typing:  
          adb devices
      Should return the serial number. With the phone connected via the USB cable we entered the above command from the Command Window on the PC and we got the serial number plus the word device.
    10.  Eighth  Reboot your phone into HBOOT using:  
          adb reboot bootloader
      After entering the above command in the Command Window on the PC, our phone re-booted and came up with the white HBoot screen. At the top is says *** TAMPERED *** and
      *** UNLOCKED ***. Further down we have FASTBOOT USB and further down yet we have BOOTLOADER.
    11.  Nineth  Check for connectivity:
          fastboot devices
      Should return serial number. We entered the above command in the Command Window on the PC and got the correct results.

      Now here is where it got hairy and a little confusing. In our researching we got pros and cons on whether to 'Temp root' -or- 'Perm root'. Temp started out winning and we were trying it. As continuing to "follow" the procedures spelled out by all these experts (And that is NOT meant to be derogatory, it is just a statement of fact.) continued to fail, we started getting extremely frustrated. We have over 30 years of experience in Computers and Electronics and this little thing has had us baffled!! So, as in many times in the past with our Computer Programming, we just said screw it... went off and did our own thing and got it working. HOWEVER... in our haste we didn't write down what we did and now, as in the past, we aren't sure just what we did in order to accomplish the task!! The Lord I'm sure directed and guided us to the final solution.
       Later:  Have read more and some of the developers say to do the install twice!? That perhaps is what 'our fix' was... doing it again. Just an FYI.
      Now then, where the confusion was the heaviest was at the point after one of the following two commands. The screens, and what was on them, were not comming up with what was said. Now, possibly, half of the result of this was because the people writing these up were working with GingerBread and we now have Ice Cream Sandwich. We never tried the 'root' procedure with our GingerBread version. Ooooooo, can't belive I am gona say this... 'noob' fears of Bricking the phone!! There I said it. Hopefully we will be able to get this cleared up in the not to distant future. First need to learn how to "UN-root" and "RE-lock" it. Another challenge.

    12.  Relocking:(How-to IF you need to)      from mjh68 on   xdadevelopers  
      Quote:
      Originally Posted by heyis4horses View Post
      I saw that the rezound leaked ics is made for locked devices only, I've used the unlock tool but I haven't rooted. Is there a way to relock? Sent from my rezound using Tapatalk
      Yes, in fastboot in the Command Prompt type:   fastboot oem lock    and it will relock the phone.
      So basically using the same fastboot that you used to unlock .. same Command Prompt just type fastboot oem lock.
    13.     Continue on... from here... to continue the AmonRa rooting process.
                  Otherwise for TWRP jump to here.

      Now then, in all this confusion let me say this about that. In order to get 'root' for the first time on one of my phones, I have always used the AmonRa Recovery...permanent! Changed to TWRP through GooManager later. nuf said.
    14.  Tenth To temporarily flash recovery:
          fastboot boot recovery-ra-vigor-3.16-gnm.img
      * You'll see a (really fast) green status bar on the top right as your PC sends the recovery to your phone. You'll then see the HTC splash screen, then your recovery.
      -or-
       To permanently flash it:
          fastboot flash recovery recovery-ra-vigor-3.16-gnm.img
      * You'll see a (really fast) green status bar on the top right as your PC sends the recovery to your phone, then a (really,really fast) red bar as it flashes it. AmonRa is now permanently on your phone when you need it. Be aware that you can no longer accept OTAs, unless you reinstall the stock recovery at some point before the next OTAs are pushed.

      I believe part of the problem is that we were confusing the hboot and fastboot screens. When you boot to the screen that wants you to update, that is hboot. On top of that the following two screens are associated with AmonRA -NOT- TWRP.
       July 16th, 2014/6:36am  Naawwww... It was just my 'noob' confusion, misunderstanding and learning. The one on the right is the one you get when you "adb reboot bootloader". IF the verbiage in the Red does NOT include USB, then you are not in the right mode for fastboot commands. After waiting a few secs for the systems to catch up... IF it still does not have the USB... Get out and come back in.
             Bootloader Screen
      • *** TAMPERED ***
      • *** UNLOCKED ***
      • VIGOR PVT SHIP S-ON RL
      • HBOOT-2.25.0000
      • RADIO-1.22.10.0421r/1.22.10.0424r
      • OpenDSP-v13.6.0.7611.00.0104
      • eMMC-boot
      • Apr 12 2012, 16:47:46
      •  
      • FASTBOOT USB
      •  
      • <VOL UP> to previous item
      • <VOL DOWN> to next item
      • <POWER> to select item
      •  
      • BOOTLOADER
      • REBOOT
      • REBOOT BOOTLOADER
      • POWER DOWN
             Fastboot Screen
      • *** TAMPERED ***
      • *** UNLOCKED ***
      • VIGOR PVT SHIP S-ON RL
      • HBOOT-2.25.0000
      • RADIO-1.22.10.0421r/1.22.10.0424r
      • OpenDSP-v13.6.0.7611.00.0104
      • eMMC-boot
      • Apr 12 2012, 16:47:46
      •  
      • HBOOT
      •  
      • <VOL UP> to previous item
      • <VOL DOWN> to next item
      • <POWER> to select item
      •  
      • FASTBOOT
      • RECOVERY
      • FACTORY RESET
      • CLEAR STORAGE
      • SIMLOCK
      • IMAGE CRC
    15.  Now 'root' the phone   Either from following the previous directions -or- an HBoot start up, ( 'Vol Down'  +  'Power'  button combo), you got to this point and see a screen similar to one of the above. -But- since they are from the Gingerbread days ... probably a little different. But the concept it there. One has Recovery and one doesn't. IF the screen with a  fastboot  and a  BOOTLOADER  is showing, Push the 'Power Button' to go into Fastboot. There you can select  RECOVERY .

      * To get into recovery push the Power Button to select HBoot ... which... as it turns out... is the  BOOTLOADER  item in the selections. Once in HBoot wait for the green writing to flash and disappear, then select  RECOVERY ... and press the Power Button.
      * You'll then see the HTC splash screen, then your Recovery Menu... similar to the following.
    16. Android system recovery
      • Reboot system now
      • USB - MS toggle
      • Backup/Restore
      • Flash zip menu
      • Wipe
      • Partition sdcard
      • Mounts
      • Other
      • Format data system cache Ext4 | Ext3
      • Developer menu
      • Power off


      RA Revamped
      Build : RA-VIGOR-v3.15-getitnowmarketing
      Note on the above. It is what the Phone Screen looks like... EXCEPT our 'image' is not exact. -But- it is similar to the screen you will see.
    17.  Eleventh
      * This will bring you into the Custom Recovery Menu.
      *** IF you skipped the other parts, Wipe 'cache' and 'Dalvik cache' -before- Flashing zip
      * Use the Volume Up/Down keys to choose the 'Flash zip menu', and press the Power Button to accept.
      * Now choose the option that says 'Choose zip from SD card' and click the Power Button. We did and got the following:
      Choose a zip to apply
      or press BACK to return

      ../
      Alarms/
      Android/
      ~~~
      SuperSU-v1.51.zip
      ~~~

      * Now then it should be obvious that you will select a Zip file to install. In this case the SuperSU one. After selecting the Zip file via the 'Vol Up/Down' keys, press the 'Power Button' to install it.
      * Once this is complete choose Return then Reboot system now and press the Power Button. Your phone will reboot normally.
      Well, not exactly. We got mesages about Android Upgrading and something else but it flash by before we could memorize or write it down. The we got our initial lock screen.
    18. We removed the USB cable from the Phone and Computer.
    19. Twelfth
      Finally - Congratulations we are now rooted. October 3rd, 2012 / 10:35pm
    20. Refer: Scotty's noob Guide
    21. Hasoon2000's All-In-One Toolkit
      If I already have ics on my phone can I use this AIO to go back to GB? My mainver right now is 3.xx.xx etc. would this AIO help me with that?
      Not yet. Use con247's tool to fix the mainver so you can go back to a GB rom.

      Wow this is awesome.. I was thinking about making something like this... what did you use to make the GUI?
      I used KODA to make the GUI.

      Once I flash the amonra recovery in the bootloader where do I save the super user zip file to and how do I flash that? That is where I seem to be getting hung up on.....not exactly sure where to save that file to and where to access/flash it from.......
      Superuser.zip should be on your SD card. Once in amonra>flash zip menu>sdcard>superuser.zip
  2. Well it didn't work...!! We're unlocked -but- NOT rooted. September 30th, 2012
    Finally, it works!! UN-rooted on October 3rd, 2012 at 10:35pm!!
  3. Actually, we got Unlocked, S-Off'd and rooted again
    November 29th, 2012 / 10:37pm.
    -AND- Please notice --- No TAMPERED Bar.

    • *** UNLOCKED ***
    • VIGOR PVT SHIP S-OFF RL
    • HBOOT-2.27.0000
    • RADIO-2.22.10.0801r/2.22.10.0803r
    • OpenDSP-v14.6.0.7708.00.0507
    • eMMC-boot
    • Aug 6 2012,19:24:37
  4.  root via TWRP July 30th, 2013/5:00pm  Ok, as mentioned elsewhere, we already have TWRP installed, so let's use it. (Sorry, but for now, Installing TWRP first will be covered later. Yep. We are disorganized.)
    1. Assuming you arrived here from the above Step you will have the White bootloader screen staring at you. IF not jump to: In TWRP already
    2. In the Command Window enter: fastboot reboot
    3. You will be back at the Home screen on the phone.
    4. In the Command Window enter: adb reboot recovery
      In TWRP Already
    5. You will now have the TWRP screen staring at you.
    6. Tap the 'Wipe' Button.
    7. Tap the 'Advanced Wipe' Button.
    8. Now select the 'Dalvik cache' and 'cache' by taping the check box beside them.
    9. Now 'Swipe to Wipe'.
    10. Tap the 'Back' Button.
    11. Tap the Return - lil curly in bottom right
    12. Tap the Return one more time.
    13. You should now be back at the TWRP main screen.
    14. Tap the 'Install' Button.
    15. You will now be at the 'Storage Screen'.
    16. Right above the second 'Blue Line' you will see the current directory listed. It will be the root '/' or /sdcard or somethng else. We need for it to be the /sdcard. IF the dir is 'something else' then you will have to Tap the item at the top '(Up A Level)' and then look for the /sdcard using the scroll bar on the right side. IF you did not get to the 'root level' you will have to Tap '(Up A Level)' until you do. Then at 'root' '/' level find and select the /sdcard.
    17. With the '/sdcard' dir in focus we can now scroll the dir using the scroll bar on the right and find the SuperSU-v1.51.zip file that we want to install.
    18. Tap the SuperSU file and the Flash Install screen will appear.
    19. IF you are ready... 'Swipe to Confirm Flash'.
    20. Assuming it was successful, you will see a 'Zip Install Complete' screen.
    21. Tap 'Reboot System' ...
    22. It will Reboot and as it is you will see 'Android is upgrading'...
    23. Once back at our 'Home Screen' select the 'apps' Button and then select 'Root Checker'
    24. Tap on 'CHECK' and then 'Grant' permissions...
            and viola... it will say we are 'root'ed.

Refer: ReZound All Things Root Guide -and- HTC ReZound Overview
What are Unlocked Smartphones
Leslie Rooting Info ... RAM, ROM, What
Flash Memory ... Read Only Memory ... ROM Image
Android Basics
Unlocking, Rooting, ROM'ing, and FAQ Root, S-Off, Unlock BootLoader of any HTC Device


  The S-Off Portion

Warning
The instructions -and- information in this guide are intended for use with the HTC ReZound. Applying these instructions on another device or model may, and probably will, produce undesired outcomes.

A grateful thanks to Unlimited IO for this utility.
Fortunately this only has to be done once. UNLESS you for some reason turn 'S' back on.
-OR-
You get a new phone!!
Please read this over --- more than once --- before trying it.

July 16th, 2013 / 6:26am
Ahhh Shit!! Our Laptop is failing/screwing up/crashed... Seems we can't win with 'puters now-a-days!!

 Ah, there is another...  We have found, through the Forums, that there is a way to accomplish S-Off without doing the wire trick. Jump down to RumS-Off IF you are interested.


You might want to Skip down to the Rut-Roh BEFORE you start this... just a suggestion.

S-Off Step by Step... with JuopunutBear .

The following is a "checklist" that we created from the various places we visited concerning this operation. The reference at the top of this section is what we used the most for this checklist creation. You might want to copy and paste this list to an Editor and then print it out. Afterwards you can check each item off as it is accomplished -or- at least check off each item just -BEFORE- you do anything. You can get straight on these procedures anyway that you want. We just embeded it into our mind by re-writing the whole thing. Hopefully, presenting another approach that will help someone else. Why all the concern?? Well, besides the cost, $600 plus or minus, there would be the lack of a phone IF we goofed -or- jumped into something before we are ready. Just being our usual cautious...(cowardly) selves.

 Just a note:  Reason for the two dates should be obvious, we got a  new  replacement phone. The replacement came 'with' the latet software installed. This was good -and- bad. The good naturally cause we would have the latest, the bad cause with the new software we could not get our S-Off to work in the Windows version of JuopunutBear that we had. Tried to go back to previous ICS and could not because of hboot now being 2.28 and the previous being 2.27. Can't go lower UNLESS it is S-Off. So, in desparation we installed Ubuntu on our 'test' Partition and then followed the directions on Unlimited IO. It worked!! Thanks to the Lord for His guidance.

Prerequisites for Phone; At this time 26 Nov 2012 ... and again July 19th, 2013:

  1. Must be on a Stock RUU - Gingerbread -or- Ice Cream Sandwich
  2. Must be HTCDev unlocked
  3. Must be UNrooted... well... we root'd our phone BEFORE reading this in the JuopunutBear Docs. Then we couldn't UNroot it!! So, we went ahead and tried it... cause... the first time, Nov 26th, 2012, we were rooted... and it worked! -But- that was in the 'old' Windows version. This time we used the Ubuntu version. ALL was new to us... but, again, it worked. Take your own chances.
  4. Must have USB Debugging enabled.
  5. Must have Fastboot enabled... box is checked
  6. Must have 50% or more of a charge on the battery.
  7. Should have SD card backed up... -OR- you could replace it with a spare...
    YOU MAY LOSE DATA OTHERWISE.

Prerequisites for PC:

  1. Ubuntu 32-bit

The Steps

  1. You need a suitable wire. Some instructions say use an 8-inch insulated wire. Others will say you can use a large coated paper clip. Just remember... you are going to be touching electrical parts of your phone. These should be insulated from everything else -AND- static electricity. Suggest doing this in a NON-carpeted area.     A 'copper' wire will work the best.
  2. Read ALL of these steps before trying.
  3. Remove about 5mm of coating from both tips of the insulated wire -or- the coated paper clip, after straightening it out.
  4. Read ALL of these steps before trying.
  5. AFTER Power Off, Remove the back cover from your ReZound.
    You need access to Pin 1 and a Ground.
  6. Power on your ReZound.
    Just a normal Power On.
  7. Plug your ReZound into your PC.
    This is the USB cord from your PC to the Device.
  8. Watch the Video for the Wire Trick... IF it is still available.
    ReZound YouTube
  9. Study this picture:
    ReZound Back Cover Off
    When doing the wire trick, you will hold one side of the wire firmly in PIN 1 and use the other end of the wire to tap GND twice, with 1.75 seconds between taps. (tap, 1001, 1, tap)
    There are timers available on the Net. Google search.
  10. You might practice this a little -BEFORE- doing it.
  11. Read ALL of these steps before trying.
  12. When you feel confident... continue.
  13. IF you have a timing help... start it.
  14. ctaylor@Tasha-tr2:~/jpbear$ sudo ./ControlBear
    ========= ControlBear 0.11 beta for JuopunutBear S-OFF ==========
                  (c) Copyright 2012 Unlimited.IO
          If you have acquired this software from anywhere
          other than our website this version may be out of
          date and unsupported. Please see our website for
        instructions on how to use this tool and for support.
     This program may not be redistributed or included in other
       works without the express permission of Team Unlimited.
    
             www.unlimited.io    |    team@unlimited.io
    
    Starting up......
    Searching device.....
    Found device.....
    Found backups!
    Making room for beer......
    Loading sixpacks on sdcard......
    Loaded......
    Board vigor detected
       On the 2nd phone it failed in this area on the Windows version.
       We got a "Can not find Control Bear... is the bar closed?"
       Never even got to try the wire trick. 
    Rebooting into fastboot!!
    === Waiting for device....
    (3/45)
    Fastboot detected
    Do not remove sdcard from phone
    Do wire-trick now!! Look instructions on the web
    
    
    Do not remove sdcard from phone
    Do wire-trick now!! Look instructions on the web
    
            .....
    	 more of the same
            .....
    
    Do not remove sdcard from phone
    Do wire-trick now!! Look instructions on the web
    We had to many disappointments here. Our timing sucks.
    But after some restarts ... we got it.
    
    Waiting for device....
    (20/45)
    Found device...
    Waiting for device to settle... Please wait...
    Getting into bar.....
    Raising Glass
    SUCCESS - Taking a sip.
    SUCCESS - Beer is tasty.
    SUCCESS - Beer is tasty.
    SUCCESS - Beer is tasty.
    SUCCESS - Beer is tasty.
    SUCCESS - Buddies and Beer
    Checking alcohol level......
    Seems to be just right.....
    Let's take one more......
    Aaaah, nice sunny day!!
    Rebooting.......
    === Waiting for device....
    (3/45)
    Fastboot detected
    Beer is tasty, lets take another!!
    Please wait....
    
    Found device...
    Waiting for device to settle... Please wait...
    Beer......more beer......more beer...
    Rebooting RUU mode.......
    === Waiting for device....
    (4/45)
    Fastboot detected
    JuopunutBear S-OFF success
    Installing JuopunutBear hboot.....
    Waiting.....
    Flashing.......
    Rebooting......
    JuopunutBear hboot installed
    ctaylor@Tasha-tr2:~/jpbear$
    
    
  15. IF you were successful:
        Disconnect the ReZound from the Computer.
  16. Turn it OFF and Remove the Battery.
  17. Wait five seconds and Replace the Battery.
  18. Do the special Power On combo(Vol Dn + Power) to boot-up into the bootloader/hboot.
  19. At the top it should say S-OFF.
    ReBoot and ...
  20. We're done!!

Warning
The instructions -and- information in this guide are intended for use with the HTC ReZound. Applying these instructions on another device or model may, and probably will, produce undesired outcomes.

 Rut Roh!! November 27th, 2012 / 9:12pm   No we are NOT!!... We are not done. Got the Black Screen Green Arrow of Death!! (Hey, Windows has a Blue Screen of Death.) Well, not quite death but warmed over nothing. What happened??? Well, it was this way -or- to the best of our rememberance -which- is not the greatest anymore. We will probably be referring to this individual more as time progresses -but- at this time he inadvertantly helped us out. He and Scott will probably be the most referenced: CharliesTheMan and Scotty.

So what was it?? Well, the scenario of events went like this:

  1. First a message from Charlie (and probably many other experts):
    This is not a process to attempt when you're pressed for time, stressed out or anxious, or distracted. The process will probably take 5 to 10 minutes. But if you're needing to make a flight in 20 minutes, or expecting a life or death phone call in an hour, don't start on this process. Wait until you have a few hours and are rested and relaxed. We started it a couple of hours before work -and- that was a mistake. Especially for a first timer!!
  2. Now we followed the directions to the tee. We even, as you can see above, re-wrote them -and- changed some verbiage to suit our needs. -But- (that word again) there are just some things that they don't tell you, either cause they "forgot" -or- they just didn't think of them -or- they didn't think that they were that important to begin with. It is extreemly difficult, nearly impossible, for these amazing, wonderful people to think of, and cover, every situation "blindly", so to speak, over the Net... in a manner that EVERYONE can, and will, understand.
  3. Ok, AFTER we completed the process and happily saw our S-Off, AFTER many tries,(our timing was horrific) we pulled the plug(the USB) and ReBooted the phone. ARRRRGGGG!!! A Black Screen with a Green   JuopunutBear Arrow  ... and it stayed there!
  4. Fumbled around in a hurry, cause we had to go to work. And really accomplished nothing. We had placed a 'spare' 2GB card in before doing the S-Off procedure. Thought it was the problem and tried to read it in our PC. Could not! The PC wanted to format it. At this time we said NO.
  5. After work, with more time. Let's see... something about PH98IMG??? Ok, we searched the Net, like we always do when in trouble -and- read about other's troubles -and- cures, or at least some relief. That is when we found CharlieTheMan. From the blurb he had, plus other info gathered, we figured out that:
    1. We needed to format our 2GB SD Card... on the PC at FAT32. Yes it works. You may need an adapter in which to place your micro SD so that you can then place it in an SD slot on your PC. IF you don't have one then you will need to venture out to your local 'puter store and get the necessary materials. One of which could be a blank micro SD card. (-But- it is, or can be, fun to re-format it yourself.)
    2. Now you need to get a PH98IMG.zip. This appears to be the name used to install things via the bootloader on a ReZound. You rename the item to PH98IMG.zip and then place it on/in the root portion of your external -or- internal SD Card... depending on what you are doing.
      It appears that HTC uses a PxxxIMG naming convention.

      Flash via HBOOT Names
      Smartphone   RUU IMG file
      HTC ReZound = PH98IMG.zip
      HTC Incredible 2 = PG32IMG.zip
      HTC SENSATION XE/LE = PG58IMG.zip
      HTC Desire CDMA (Bravo C) = PH99IMG.zip
      HTC Thunderbolt = PG05IMG.zip
      HTC Evo = PC36IMG.zip
      HTC Amaze = PH85IMG.zip
      Desire S = PG88IMG.zip
      HTC One X = PJ46IMG.zip
      RootzWiki contains some PH images. And this is the HTC RUU directory.
      Now then, we possibly got carried away with the above names -but- we just had to learn/see why they used the names that they did. They are hard coded and unique to the individual phones. It appears that the code just looks for a zip file with this name in the SD card root during hboot time and unzips it. Then it takes the appropriate action depending on what the file is. --- More later AFTER some more investigaton. Ah!! Those names are based on their model numbers!!! Makes sense.

    3. Now what's that got to do with this? Again, words of wisdom from CharlieTheMan inadvertently helped us.
      Second Tip/Solution - If you attempt the S-Off and don't achieve s off, you will have a black screen with green arrow. To go back to booted into your Rom, simply use a card reader or another device to drop the PH98IMG.zip onto an sd card, reboot to hboot by turning off and power +vol down, and say yes to update, then reboot into your Rom.
      Now, the reason we say inadvertently is, we DID achieve S-Off -but- we got the black screen with the green arrow. We had tried other things which we will not go into. Suffice it to say that by following his advice to go back was the fix.
      • Power Off the ReZound before you remove the back. Don't forget a "Fender Thin" guitar pick can be used to help remove the back. That's for those of us with "weak" fingernails. DO NOT USE A BUTTER KNIFE OR SCREW DRIVER -OR- ANYTHING METAL. YOU WILL DAMAGE YOUR PHONE.
      • Remove the Battery and then remove the SD Card.
      • Re-format the SD card -or- obtain a blank one.
      • Place the SD Card in the SD slot on your 'puter.
      • Get a copy of the Gingerbread -or- ICS ROM zip file that suits your needs. RootzWiki would be a good place to look.
      • Re-name the file to PH98IMG.zip
      • Copy it to the SD card. IF you just reformated the card -or- you obtained a blank one, it will be in the proper location on the SD card. At the top or root.
      • Remove the SD Card from the PC.
      • Put the SD Card back in the ReZound.
      • Replace the Battery.
      • Optional: Depending on how careful you are, you can put the Back Cover on -or- not. The reason we say it is Optional is... IF you do not hold the buttons properly, you will have to remove the back cover again in order to remove the battery again. This part can be a vicious cycle. -And- the other part... being careful. The insides of your phone are exposed.
      • AFTER the Battery is back in, Press -and- hold the Volume Down control and then Press and hold the Power button. This will start your bootloader -or- hboot.
      • Follow directions and say 'Yes' to the update.
      • When it ReBoots you will have a working S-Off'd phone.
      • Power Down your phone and remove the SD Card with PH98IMG.zip on it. Replace it with your 'Normal' everyday card. IF you do not have another card and this card will be your 'normal' one, please erase it. DO NOT leave PH98IMG.zip on your card.
      • Put the phone all back together, turn it on and... enjoy it.

    4.     Done!!! With the S-Off Section


  Another S-Off - With NO Wires

The following was copied from: XDA Developers Forum. Why copied?? So's we do not lose it!! Have copies of the RumRunners pages too -BUT- those will NOT be put up on my Site -UNLESS- they give permission. Which they haven't yet. Any comments by me will be in Purple. There was/is some minor editing which will not be in Purple. It just consisted of some "Hi-Liting".

Welllll, there is a little bit more. Our usage of it. Jump to here.


Default [S-OFF]Rumrunner S-off works for Rezound!!!

If anyone is interested, the Universal Rumrunner S-off exploit works for our ReZound! I just got a new ReZound (me too!!) and used this method to obtain S-off. NO MORE WIRE TRICK! NO MORE WIPING OF INTERNAL OR EXTERNAL MEMORY! THE CURRENT ROM YOU ARE ON WILL NOT BE ERASED! YOUR CURRENT RECOVERY WILL NOT BE TOUCHED!

Disclaimer: I am not a Dev. I have no association/affiliation with Rumrunner and can provide no support. Try this at your own risk. It's not my fault if you Bork your phone! (me too!!)

www.rumrunner.us   <-- The site!

The download for our phone can be found on page three of the Rumrunner site
        http://rumrunner.us/downloads-2/.
It is under "Universal Downloads" and is called rumrunner_HTC_.0.5.0.

A few notes:
-You must be HTC dev unlocked
-You must be rooted
-You must have an unsecured kernel installed and a custom Rom
    Is it really necessary to have a custom rom for this process?
    Yes it is necessary to have a custom ROM and unsecured kernel.
-HTC Sync has to be removed from your computer
-Proper HTC drivers installed
-ADB set up
-USB debugging enabled
-Fast boot disabled
-Internet connection
-Turn off all antivirus and firewall software! I can't stress this enough! (If you get rows and rows of dots and the program never finishes it is likely that you forgot to disable one or the other)

Make sure you have a backup on your SD card just in case something goes wrong!

Hook your phone up to your computer in "charge only" mode and run the soju.exe file as Administrator. It will reboot several times and do its magic. It may take 10-15 minutes (or more) to complete.

It took a while for me to get it right, but it does work!

EDIT: I WOULD HIGHLY SUGGEST USING EITHER TWRP OR CWM AS YOUR RECOVERY WHEN RUNNING THIS PROGRAM. THE FEW PEOPLE HAVING PROBLEMS SEEMED TO BE USING AMONRA AT THE TIME.

Verified to work with: EclipticRez, PAC-man, Tachyon, Ineffabilis, Infection, CM, Carbon, and LiquidSmooth so far.

Your results may vary. Please post in this thread if it works for you!

Your hboot version will remain the same and will still say "Tampered" and "Unlocked"!

To eliminate the "Tampered" flag see scotty1223's thread http://forum.xda-developers.com/show....php?t=2589763

This is the original thread in the HTC One forum that I used for my HTC One http://forum.xda-developers.com/show....php?t=2473644.
Please note the instructions are not the same for the Universal exploit. DO NOT DOWNLOAD THE HTC ONE HBOOT!!!

I will not share any files from their site. Use the download links they provide, they work just fine:

"rumrunner s-off is the results of hundreds of hours of hard work by beaups and fuses. The binaries contained within the rumrunner package you download should not be shared, rehosted, bat’d, integrated into a one-click, repackaged, or otherwise distributed or reused. This software is NOT open source."


Credit:
@beaups @Fuses

 From Scotty   How-To-Remove Tampered

  Rumrunner S-Off Usage

Well, we used it... with half-assed success!! Probably more our fault than theirs -but- the only two things good about it were;
    #1) We got S-Off without a wire trick.
    #2) We both learned, and found out, how much we know and don't know about these Smartphones.

What we used was probably our reason for our "mishaps". In the beginning they state, unfortunately like the above 'wired' version, that a 32-bit Ubuntu Linux -is preferred. Well, we bullheadedly, went ahead and used our openSuSE 64-bit Linux. We had/have 32-bit libs installed -- as they said that 'may' work. On top of that we had CM11.0 installed on our ReZound.

We followed the instructions on their WebPage -and- it was looking good... until it got to pouring (2). Then we started getting HTC White Screen and CyanogenMod Wheel... alternating on the phone in a mini boot loop, with repeated rows of dots on our PC. After an hour plus, I killed it. Then the fun started... trying to "Restore our Phone"!!

We could not, successfully, get anything to Re-Load on our phone. Finally, as a last resort, we decided to use the RUU from Android Police. It changed our hBoot back to 2.27 and our radios back to 2.22 -BUT- it Re-Stored our phone! We then used the Global Firmware Update to get back to 2.28 hBoot and 2.23 radios.

Oh... did we forget to mention that we got S-Off!! Without a wire. Probably would have been much cleaner and smoother had we just broke down and used 32-bit Ubuntu Linux in the first place. -But- we like our openSuSE and "try" to use it for everything... that we can. -AND- we would like to get our test partition back. So Ubuntu may not live longer on our PC. We have some testing to do on the Newest openSuSE.

 Ah, the SD card  It got wiped!! Now please notice that we were NOT using the correct system and that could be the reason. At any rate, it got wiped. Wiped so bad that my PC, neither one, would recognize it!! AFTER I got my phone back in operation, on a whim, I put the SD card back in my phone and tried to format it. It did!! I was then able to take it out of the phone, place it in my PC and copy over the saved version. All is well... now.


  Back to S-On Section

WARNING!!!
DO NOT turn your secureflag on unless on a stock,signed hboot.

s-on with an eng signed or patched hboot will hard brick your device immediately.
(read: permanently bricked,unrecoverable)


in other words,ONLY use the writesecureflag 3 command AFTER running an RUU. never before.

Warning
The instructions -and- information in this guide are intended for use with the HTC ReZound. Applying these instructions on another device or model may, and probably will, produce undesired outcomes.

 WARNING:   First Pre-Requisite is to be Stock. -   Refer:   Back to Stock.
IF you don't go back to stock and obtain the correct Hboot, you will probably 'brick' your phone.

  1. Flash latest RUU for Rezound - Back to Stock
  2. *ADB required* - Which means a PC to Phone connection.
  3. Open a Command window on your PC.
  4. Connect the Phone and PC with a USB cable.
    1. adb devices
    2. adb reboot bootloader
    3. fastboot devices
    4. fastboot oem writesecureflag 3
    5. fastboot reboot-bootloader
    6. fastboot reboot (verify you are locked s-on)
Refer: HTC Rezound S-off to S-on


  Programming - Windows Section

Again, this section will be performed in Windows 7 on our Laptop. The "setup" has been performed for the most part already up in our "Unlocking" and "rooting" section. Please check the rooting a ReZound section for further info.

 June 7th, 2013  We finally setup the items below on our Laptop.

Refer: [how to] CREATE OWN ROM - Newts-OnE-XxX

  CM10.1 Install

Refer:
This ROM is CM10.1 which is currently built on Android 4.2.2...
The HTC ReZound gets Jelly Bean!!
HooRah!!

Charge the battery above 50% or for at least one hour. If the battery dies during the flashing process, you could hard brick the phone! Personally, I would get a FULL charge. -But- then I'm paranoid.

A ROM is basically a customized version of the Android OS. When a manufacturer like HTC or Motorola develops a device they take Google's Android source as a base then build their own works on top of that. That is a ROM. When you get your device and turn it on for the first time your are seeing the manufacturer's ROM. In most cases it looks very similar from one device to the next, but some look very different. If you've ever heard of the Nexus line of devices, those are pure Google. They don't contain any other things built into it but what Google has developed. Custom ROMs can offer performance tweaks and added features.
Refer: WhatisRoot-ROM

Those words are repeated from here. We are trying to make sure that this info doesn't disappear... -or- at least stays available to us. Had our phone for over a year and still haven't flashed in a different ROM. That is about to change. We like to investigate -and- re-write the instructions so that we... and possibly others... can understand things better and NOT screw up. Not that the current directions are not clear.. its... well... it is just us. Besides we would like to add our experiences and hopefully say that it works!!

Thanks to wildstang83, Flyhalf205 and Neo for all their efforts.

Features:
  • CM10.1
  • Koush's SuperUser is default
  • Android JB 4.2.2
  • Working OTA system - Requires TWRP 2.4.4.0 or later. Amon RA will not work.
  • Apollo
  • HDR Camera
  • CM's new "File Manager"
  • Lockscreen widgets - kinda
  • Scroll typed text with vol -/+ (CM settings)
  • Bluetooth Calling (Has been reported working, your results may vary)
  • Multi Language Support
  • Zipaligned
  • All images optimized

SDCARD:
They are using a slightly different mounting. Mounts are below:

    /sdcard0 = /sdcard = Internal Storage
    /sdcard1 = /extSDcard = External Storage

They are just Symbolic Links. Do not delete them (you'll need su to remove them anyways)
they are for the android 4.2 multiuser folders.
This litte notation is here to give notice to anyone else about the change. We had a problem deciphering things for use with our copy of File Expert Manager. -AND- File Manager inside CM10.1 was calling the 'external SDcard' sdcard0.?.? Before complaining we will install the latest [6-25-13].

Warning
The instructions -and- information in this guide are intended for use with the HTC ReZound. Applying these instructions on another device or model may, and probably will, produce undesired outcomes.


Installation Instructions

On this [6-25-2013] install we found that TWRP was NOT erased. Upon a ReBoot to recovery AFTER the install, we found TWRP instead of the 'normal' Recovery. Thought that all those erases and a 'new' System would remove it. ...not... Guess we don't understand everything that we know. However, GooManager was removed.
So, now then, depending on the phase of the Moon, and which side of your mouth that you have you tounge on, will depend on which set of instructions you need to follow. IF you have completely and totally and successfully 'Wiped' your device, then you will follow the first set of instructions. Which, of course you can follow anytime. However, IF you have 'not' totally 'Wiped' your phone then you can follow one of the next set of instructions. Our goal is to do as much as possible without touching the 'Power/Lock' or 'Volume' buttons on the phone. 'Some' of the touch screen buttons, naturally, will have to be pressed.

From CM10 Site Our Conglomeration
It is recommended that users of this ROM to be on the latest firmware and Hboot with an S-Off device. If you are not on the latest global firmware, here is how to do it.

NOTE: For recovery use TWRP 2.6.0.0. Some wipe options below may not be included in other recovery options. Still wipe what is available the best you can.
  1. Compare MD5 Sum
    Windows: MD5 Calculator
    LINUX: Open Terminal and type: md5sum [path to the rom on your sd card]
    Mac: Open a terminal and type: md5 [path to the rom on your sd card]

  2. Put the ROM .zip file on the root of your SD Card

  3. ReBoot to Recovery
  4. Select "Wipe"
  5. Wipe the following:
    Wipe ALL data/factory reset x2
    Wipe /data x2
    Wipe /cache x2
    Wipe Dalvik-cache x3
    Wipe /boot x2
    Wipe /system x3
    Optionally wipe:
    Wipe battery stats
    Wipe rotate settings
  6. Scroll to and press Return
  7. Install ROM from SD Card
  8. ReBoot and enjoy!

It is recommended that users of this ROM to be on the latest firmware and Hboot with an S-Off device. If you are not on the latest global firmware, here is how to do it.

NOTE: For recovery use TWRP 2.6.0.0. Some wipe options below may not be included in other recovery options. Still wipe what is available the best you can.

Now then, please notice that this is using 'fastboot' and 'TWRP'.
  1. Compare MD5 Sum
    Windows: MD5 Calculator
    LINUX: Open Terminal and type: md5sum [path to the rom on your sd card]
    Mac: Open a terminal and type: md5 [path to the rom on your sd card]

  2. Connect ReZound to the PC in Charge mode.
  3. Put the ROM .zip file in your AndroidSDK dir
    Actually, till we figure this out... copy it to your SDCard.

  4. adb devices - check that we are connected
  5. adb reboot recovery - Reboot to TWRP
  6. Wipe the following:
    Swipe to Factory Reset
    ... wait for it to finish...
    Tap Back
    Tap Advanced Wipe
    Select Dalvik Cache, Cache, Data and System
    Swipe to Wipe
    ... wait for it to finish...
    Tap Back
    Tap Return (curly at bottom right)
    Tap Return again (curly at bottom right)
  7. Tap Install
  8. Select the SDcard
  9. Scroll down to the CM10.1 zip and select it.
  10. Swipe to confirm Flash
    ... wait for it to finish...
  11. Tap Reboot System -
  12. Wait for the ReBoot and enjoy!

  Sideload

  Sideload Installation - August 12th, 2013/7:33pm    Like everything else this is in growing pains. We are trying to find all the info we can -but- have NOT tested it all. That's the reason it gets its own special area. Took some time to figure it all out. As usual ... use at your own risk.

Well, we tested it on August 26th, 2013 / 4:09pm and it works!!
What is Sideloading  -  WiKi Def  -  Sideloading Settings  -  For Beginners .

  Borrowed/Stolen from: phandroid.com  

"Sideloading" is just another word for installing an Android application onto your phone, from somewhere other than the Google Play Store. While this is generally a bad idea for beginners (you never know what kind of viruses you can catch on the internet), there are times when you need to test an app from a trusted developer, or even install a leaked version of something official (like a new Google Play Store, Google Maps, etc.).

Take heed. This should never be used as a way to circumvent paying for games or applications on Google Play. With Android being the most targeted mobile OS in regard to viruses and malware, stick to the Play Store if possible. This is actually one of the main reasons why Android doesn't allow sideloading by default (but this can be turned off)

  • Must have newer ADB binaries installed on your computer. Version 1.0.29 or higher. Can be checked with "adb version" at the command line.
  • Must have TWRP 2.3 or higher.
  1. Open a CMD Prompt window and Change Directories to where your adb.exe is...
  2. 'Copy' your zip file to this dir.
  3. connect phone via usb cable - Charge only mode.
  4. adb devices - make sure you are connected
    @dusty-tr2:~/AndroidSDK> adb devices
    List of devices attached 
    HT1BJS204850    device
    
  5. 'Reboot' into TWRP - adb reboot recovery

  6. Wipe the following:
    Swipe to Factory Reset
    ... wait for it to finish...
    Tap Back
    Tap Advanced Wipe
    Select Dalvik Cache, Cache, Data and System
    Swipe to Wipe
    ... wait for it to finish...
    Tap Back
    Tap Return (curly at bottom right)
    Tap Return again (curly at bottom right)
  7. In TWRP, Tap Advanced.
  8. Find and Tap ADB Sideload. Here you are given the opportunity to clear the Cache and the Dalvik Cache. IF you are so inclined you can clear them again.
  9. Swipe to start Sideload
  10. In the CMD Prompt window type adb devices and it should show your device conntected and say sideload
    @dusty-tr2:~/AndroidSDK> adb devices
    List of devices attached 
    HT1BJS204850    sideload
    
  11. Your ZIP file should already be in your adb folder
  12. You are now ready to push the zip
  13. Type adb sideload nameofzip.zip
    @dusty-tr2:~/AndroidSDK> adb sideload cm-10.2-20130826-vigor.zip
    sending: 'sideload'  100%
    
    Now then, just incase you didn't read everything, the file that you have selected will have a name change. Over on the phone it will become sideload.zip.

  14. Wait until it says 100%
  15. Only choice is to Reboot System .. Tap it.
  16. You will get a screen that says no OS installed.
    That's true... we just wiped it!!
  17. In the CMD Prompt type adb reboot recovery
    ... wait for TWRP recovery.
  18. Tap Install
  19. Select the SDcard
  20. Scroll down to the sideload.zip and select it.
  21. Swipe to confirm Flash
    ... wait for it to finish...
  22. Tap Reboot System -
  23. Wait for the ReBoot and enjoy!

The following verbiage is from TWRP themselves:

The file will be copied to your device to whatever the current storage location is that you have selected in the mount page.  It will always be placed in the root of that storage location and named sideload.zip (e.g. /sdcard/sideload.zip) and it will automatically delete / overwrite any existing sideload.zip you may have on your device.  As soon as the file is copied to your device, it will automatically be installed.  When the install is finished you will be presented with a reboot system button so that you can reboot to test your zip.

Note that sideload mode is a separate ADB mode. While in sideload mode, regular ADB commands will not work. Once the zip has been copied to the device and the install starts (or if you hit the cancel button) regular ADB mode will resume.


 June 17th, 2013 / 7:23pm  We did it!! Finally, after all this time and investigating and fighting computer problems... we installed our FIRST Custom ROM!! Took to long and we have all kinds of lame excuses -but- it has finally be done. -AND- it works.

Ok... we are in and at the Home Screen. Now what???????

 August 9th, 2013/2:29am  As mentioned down in the next section, Tron2.2 Install, we tried another. Mainly, to get some experience in installing. We have come back to CM10.1 on release 20130807.
First thing... Go into System settings, About phone and Tap on the Build number 7 times to enable the Developer Options in the settings list. Then Enable USB Debugging.

 GAPPS - as of July 30th, 2013 / 9:58am  How's 'bout we need to install the gapps-jb-20130301-signed.zip so's we can get -and- use Google Play Store to install the rest of our goodies. Now we have checked after our latest install and we do NOT have gapps -nor- Root Checker -nor- Play store. --- AND we have switched from Windows to Linux (openSuSE 12.3). The steps are essentially the same.
There is another...  Gapps Ver 4.3   ...on July 31st, 2013 at 10:39am.

 August 1st, 2013/11:00am  My Birthday!! Today we learned something about the Gapps. Yep, there is a newer version -BUT- it won't work on Android 4.2.2!! Matter of fact, in researching about the 'newest' Gapps,  we learned that ...  gapps-jb-20130301-signed.zip  ... is the only version that will  work with Android 4.2.2!! Once again we were kinda doing this by rote. Need to pay closer attention from now on... part of the learning process.

And a month later, September 2nd, 2013, we learn:
Originally Posted by mjones73 View Post
He's got the right ones, they updated the 4.2.2 gapps package, they are 'one day off' in date now (which is annoying)

CM10.1 is 20130812,     CM10.2 is 20130813
Downloads here

 Gapps install 

  1. Open a command -or- terminal window.
  2. Put the gapps file in your working Android dir. This would probably be the one that contains adb and fastboot commands.
    Now then, at this point we have a copy of the gapps in our C:\AnsroidSDK dir on the PC and the root dir of our SD card on the phone. Which one to use?? A lot depends on whether TWRP is still installed -or- not. (and how much more we learn)
  3. adb devices - To see if we are connected. Well, we weren't. Leastwise not in the proper mode. With our ReZound, and probably all the others, we have two modes of connetion to the PC. One is just for Memory Transfers and the 'other' is for everything else. It is usually refered to as the Charge Mode. At this point we do not know of any way to change modes other than disconnecting from the PC and then plugging back into it. The Charge Mode is the default mode. -BUT- don't forget to dismount the USB connection on the PC -BEFORE- pulling the plug.
    -AND- Enable USB Debugging.
  4. adb reboot recovery - This will take you to TWRP. IF it is still installed.
    July 30th, 2013/11:52am - Huray! It appears that it is.
  5. Select Install
  6. IF /sdcard in not the default dir, listed at the top, then Tap Up a Level and then Select sdcard
  7. Scroll down and Select the gapps file.
  8. Check that file is correct and then Swipe to Confirm Flash ..
  9. Wait for finish...
  10. Reboot System and enjoy... June 24th, 2013/5:22pm & July 30th, 2013/12:052pm

 August 12th, 2013/11:26am  Well now, this was AFTER doing the above 'gapps' install and setting up afterwards. One of the items in Google is restoring your system. We hadn't got it straight before as to how Root Checker and GooManger were showing up after our manual 'CM UpDates'. Now we know. It was Google. We got into our 'Apps' screen to see what 'gapps' had added and saw the 'App Icons' popping in. Finally Realized and Co-ordinated the actions. (See what happens when you pay attention.?.?)

 December 7th, 2013  From the Liquid Smooth pages at: XDA Developers
I'll be posting a new build later this evening. Was able to reproduce issues with Gapps and believe they are all resolved at this point. Wanna run through a few more tests, maybe tweak a couple things. Then rebuild one more time, retest, and then upload.

The biggest thing is that Google Services wants to update after flashing those Gapps. If you sign in and then let things sync, and then reboot and then use Google apps, it should be fine. But doing anything Google related prior to getting the services prompt and updating would cause issues. So I would sign into Google Play Store, then close it. Wait a few minutes, do nothing, reboot, then open the Play Store. Then it should be the updated Play Store and new Google Services Framework installed which then allows the other Google apps to function properly. Anyways, I believe I have it 100% sorted out and an update should be uploaded tonight. Sorry for any troubles with the last build.

Install, sign into Play Store, dismiss the notification about the 4 apps needing updated and close the Play Store. Wait a minute or so, and open the Play Store back up, it should have updated. You can then carry on without any issue. G+ will likely prompt you to update Google Services Framework, do so.

I didn't have any at least and I tried doing it without using the above steps as well, and things still worked. But the above will make it the smoothest.

To all of those having trouble with GApps, this is straight from the Liquid team's site:
Quote:
Flashing Instructions
With this update you should be able to flash gapps right after flashing the rom if you get gapps force closes please follow the "Old Flashing Instructions" below.

Old Flashing Instructions
wipe data/factory reset
wipe cache partition
wipe dalvik cache
format /system
Install ROM, NOT GAPPS YET!!
Reboot system, first boot may take a few minutes, don't panic ;-D
Set Up your phones settings, anything that isn't Google related
or let your phone sit for 5 minutes
reboot back into recovery
wipe cache and dalvik
then flash gapps
reboot and enjoy

 UN-Locked and root'ed  We need to make sure that we are in this condition. Since we just installed an new OS, we probably are not. -And- to get our 'ButtonLess' operations we need this condition. So, first we will install 'RootChecker' via 'Play Store'. Hmmmmm... it is already installed. And we do not have 'root'. In this July 30th attempt, GooManager and Root Checker were installed with the gapps -but- we were NOT 'root'ed. Get 'root'ed with TWRP.

 GooManager  The next thing to get would be GooManager... IF it is not already on your phone. There was talk about including it in some ROM's and it may be in the Google apps(Gapps). Think it is cause after we installed the Gapps above we found GooManager in our apps. We saw it and then didn't see it and then saw it again. Can't remember the state of our phone at the various sightings. Next time... which isn't to far away since they are UpDating this every 4 days.
 June 21st, 2013  Ok; It is NOT in the ROM. It is NOT in Gapps either. So, it was installed through PlayStore AFTER installing Gapps. Ok, now don't wince... but laugh at us. We are flashing memories and we think we saw it, GooManager, as a zip file on our SD card. -But- we didn't do anything with it. Once again... next time. These thoughts are comming from the install experience(s). It really didn't download and install these last couple of times. There just wasn't enough activity in the PlayStore operations.

 TWRP Manager - August 12th, 2013/5:12pm   TeamWinRecoveryProject has come up with another jewel. This is an 'App' that you can run from your 'home' screen. Can install apps, roms, make backup and do restores. It is still in 'alpha' stage -but- it is working pretty good.
Refer: TWRP Manager

Went into the app.
Clicked Install
Selected to wipe everything. (There is also a backup option but I already did that)
Swiped to initiate and so far so good.
Wiped everything and installed a new rom with no issues.

 Contacts   We spent a couple of hours trying and figuring out how to restore our Contacts. Fortunately, we had saved them to our PC in the past. This was mentioned above, and is repeated, cause... you really need to do the same thing... for "comfort's" sake. Save a copy of your pcsc_pcsc_00001.vcf file. That is your Contacts. In ICS or CM10:
   Move into Contacts then press:   menu->import/export->import -or- export to storage(SD card)
   Then copy it to -or- from your PC. Unfortunately, we didn't do it 'just before' and all we had was our old
   one. Lost a lot of the recent contacts that we had added. Verizon Backup Assistant was NOT installed ... therfore we did NOT get our contancts... like in the past. Live and learn. Hopefully someone else will read this BEFORE they make the same mistake.

  • [x] Plantronics Bluetooth - Paired

 Problem June 29th, 2013 / 11:48am  SD Card; We for the first time used the File Manager inside CM10.1 to delete a file. Our old contacts. Now we can't read the SD Card whilst it is 'plugged' into the PC via an adaper -or- via the USB connection. Matter of fact, with our so called 'normal' SD Card we can ONLY read it whilst it is in our phone. The USB connection doesn't even offer itself. (This was cause of USB Debugging being enabled.)

Now then we put our 'spare' SD Card in the adapter and the PC could read it!! However, it could not make the USB connection either! Then we checked and found that we had USB debugging on and unchecked it. Both cards could then be read via the phone on the USB.


  CM10.2 Install

Refer:
This ROM is CM10.2 which is currently built on Android 4.3...
The HTC ReZound gets Jelly Bean!!
HooRah!!

Specific Instructions
We are no longer utilizing a customized default.xml, and repo init's via the vigor .git file.
We are now using a local_manifest for the vigor/rezound specific projects, and repo init'ing directly from CM
use the "initrepo.sh" script to grab your source

Charge the battery above 50% or for at least one hour. If the battery dies during the flashing process, you could hard brick the phone! Personally, I would get a FULL charge. -But- then I'm paranoid.

Now then, it should be intuitively obvious that the following was copied from above. And why not?? It works the same.

Our Conglomeration
It is recommended that users of this ROM to be on the latest firmware and Hboot with an S-Off device. If you are not on the latest global firmware, here is how to do it.

NOTE: For recovery use TWRP 2.6.0.0. Some wipe options below may not be included in other recovery options. Still wipe what is available the best you can.

Now then, please notice that this is using 'fastboot' and 'TWRP'.
  1. Compare MD5 Sum
    Windows: MD5 Calculator
    LINUX: Open Terminal and type: md5sum [path to the rom on your sd card]
    Mac: Open a terminal and type: md5 [path to the rom on your sd card]

  2. Connect ReZound to the PC in Charge mode.
  3. Put the ROM .zip file in your AndroidSDK dir
    Actually, till we figure this out... copy it to your SDCard.

  4. adb devices - check that we are connected
  5. adb reboot recovery - Reboot to TWRP
  6. Wipe the following:
    Swipe to Factory Reset
    ... wait for it to finish...
    Tap Back
    Tap Advanced Wipe
    Select Dalvik Cache, Cache, Data and System
    Swipe to Wipe
    ... wait for it to finish...
    Tap Back
    Tap Return (curly at bottom right)
    Tap Return again (curly at bottom right)
  7. Tap Install
  8. Select the SDcard
  9. Scroll down to the CM10.2 zip and select it.
  10. Swipe to confirm Flash
    ... wait for it to finish...
  11. Tap Reboot System -
  12. Wait for the ReBoot and enjoy!

 Sideload - August 26th, 2013 / 3:55pm  The Sideload mentioned/described above will also work for this one. In fact we wrote it whilst installing this latest version of CM10.2-8025.

 August 24th, 2013 /11:16am  Not sure when the first 4.3 was put out, but our first use was the release on August 18th. We just got the latest which is labled as EXPERIMENTAL insteak of UNOFFICIAL... cm-10.2-20130824-EXPERIMENTAL-vigor.zip. The release on the 18th did not have the calibration for the proximity sensor. Hoping it is in this one... Nope. It is not there.

 November 17, 2013 / 12:23am  There were a lot of new features, including TRIM and changes to drawing screen content. Enough that I think it justified a change to 4.3. Each release of 4.x has had a point of focus. 4.0 New UI, 4.1 Optimizations, 4.2 Multi User and Quick Toggles, 4.3 Gaming(semi 4.3 independant) and Optimizations.

The Bluetooth updates, TRIM, and OpenGL ES 3.0 are pretty big features, and they deserve a .1 update. And if you look to what's constituted a 0.0.1 update in previous updates, they've been nothing more than bug fixes and small enhancements. But you're right. A lot of it is internal and there aren't any new big features built into 4.3. I've noticed though that the Jellybean updates are getting smaller and smaller featurewise. 4.1 was huge, with Project Butter, Google Now, expandable notifications, etc. 4.2 was a good update, with Butter improvements, Quick settings, and lockscreen widgets. Now, 4.3 is an under-the-hood update. I think Google is looking to polish JB and fix it up, before they leave it for 5.0, which will be something big (I hope).
Refer: JB 4.1, 4.2, 4.3 Compared


 November 17th, 2013 / 2:34pm  With your Samsung friend on a sense rom, have her enable a hotspot on her phone with the single press of a button from the status bar and connect multiple pc's via wifi to it granting all of them internet access, or show off the multitasking/windows switching options of both HALO and PIE, or the ability to invert most apps with the push of a button in PAC-man, ability to control resolution per app, or overclock your kernel for extended speed, etc. It's hard trying to show someone how much more potential an unlocked and rooted android device has when they're satisfied with the eye candy of sense on a device that, for now, doesn't cause any lag. The facts stand however that a phone running AOSP will be better on battery and options and the only thing sense has going for it is glamour... At the cost of battery Even HTC admitted that their gui is a memory/battery hog doe it's no secret.
Not to dog sense any further, but if visual effects is what you want in a rom, then sense is definitely the way to go. For performance and everything else, AOSP is the route.


  PAC-Man

Recommended Installation Procedure

Coming from another Custom ROM:
  • Wipe Data/Factory Reset (This does not affect your Internal/External storage)
  • Format /System (This does not affect your Internal/External storage)
  • Flash ROM
  • Flash Gapps
  • Wipe Cache
  • Wipe Dalvik Cache
  • Reboot
Coming from Stock Samsung ROM:
  • Root Phone - Get CWM Recovery
  • Wipe Data/Factory Reset (This does not affect your Internal/External storage)
  • Format /System (This does not affect your Internal/External storage)
  • Flash ROM
  • Flash Gapps
  • Wipe Cache
  • Wipe Dalvik Cache
  • Reboot
Updating from previous version:
  • Flash ROM
  • Flash Gapps
  • Wipe Cache
  • Wipe Dalvik Cache
  • Reboot

 September 24th, 2013/9:13am  Well, 'Last-Today' we installed this PAC-Man cause it sounded great. After installing it we found that it has the "Proximity Calibrator" that we like. However, it did not have a 'cool' clock like we like. There were a few other things that it didn't have and because of the time, we could not 'play' with it. So, we wanted to go back to our ICS. -But- we didn't want to use the RUU method cause the only one that we have, and the only one we can find, has hboot 2.27 and we want to maintain our hboot 2.28.


  Paranoid for ReZound

Paranoid for ReZound

Didn't get to far on this one. It is 'only' Jelly Bean and we wanted to get into KitKat.


  Tron-2.2 Install

Refer:

As mentioned in the beginning, we were searching the Net for something else and found this ROM. We did not see an "Installation Guide" -but- since it was based on the AOSP and AOKP we figured those install instructions would work.

 August 6th, 2013 / 5:20am  Actually... we just said heck with it and used the CM10.1 procedure above. It apparently worked... we are on Tron-2.2 on our phone. However, good and bad. When it started up it was using 'Nova Launcher'. This was good 'except' it had two dialog windows that would NOT go away. One was red and asking if we would like to 'import', the other was blue and asked if we would like to 'restore' our setting from previous. Well, this was our first time soooo... 'we don thin so'. Finally found if we 'long pressed' on them we got the option to remove. Which we did.

Now then, we swear that someone is watching and looking over our shoulder. The three apps that we 'normally' install right off the bat, so we can get everything else, were included!! These are:
      Play Store
      Root Checker
      GooManager
Well, that was a short lived joy. We are NOT 'root'ed.

Ok, in trying to continue with our 'Buttonless' operations, we are moving over to adb and fastboot. Plug the device into the PC and it displays 'USB connected'. With an option to 'Turn on USB storage'.
    adb devices
Nope. Nothing. Nada. Check on USB debugging. It wasn't enabled, so we Enabled it. Now:
    adb devices - - produces:
List of devices attached
HT1Bxxxxx850      device

    adb reboot recovery
We already had TWRP on our phone with the Previous ROM. It did NOT get over written in this install cause 'recovery' was NOT part of it. So, you should be greeted by the TWRP SignOn and Menu. Think about it.
So, now jump to rooting... and then return here.

Ok. If the instructions were followed we should be properly 'root'ed now -and- we should be UN-Locked cause you must be UN-Locked in order to get 'root'ed. However, we can check:
Goomanager - Reboot Recovery
We will be greeted with the TWRP Main Menu.
Tap Reboot - Tap Bootloader.
On the phone you will see the HTC   White   Bootloader Screen. At the top you will have:
      *** UNLOCKED ***
      VIGOR PVT SHIP S-OFF RL
      HBOOT-2.28.0000
      RADIO-2.23.10.0123r/2.23.10.0124r
Now in the command window:
      fastboot devices - to see that we are still connected
      fastboot reboot - and back to our Main Home Screen
No Buttons!! Gona get there yet.

 August 9th, 2013/2:26am  Well, this was a nice experiment -but- it will not do. The 'dev' has not pursued his endeavors on this and it has lots of 'discrepancies'. It did, however, have some nice features and gave us some ideas on things to add to 'our version' of CM10.1 ... IF we ever make one!!

From here down was collected for analyzation 'BEFORE' the initial Tron install.

From: Things to do Before and After

  1. Download the ROM file
  2. "wipe data/factory reset"
  3. "wipe cache partition"
  4. Go to advanced and "wipe dalvik cache" and "wipe battery stats"
  5. Go to mounts and storage and "format system"
  6. Then go to "install zip from sdcard> choose zip from sdcard" and select the ROM file you want to install.
  7. In case, the developer has recommended to install GApps too, you should install it just after flashing the ROM (use Step 5).
  8. When it is installed, reboot the device.

How to Install AOKP Android 4.1.2 Jelly Bean ROM on HTC Rezound

  1. Connect your HTC Rezound to PC using USB cable.
  2. Copy all downloaded zip files to the SD card of your phone. Important: Don't extract any file.
  3. Disconnect USB and then turn off your phone.
  4. Boot into recovery by pressing and holding Volume down and the Power buttons together until the device boots into recovery. Once in the bootloader wait a few seconds for checks to complete and then select recovery. The device will then boots into CWM recovery.
  5. Perform a Nandroid backup of your existing ROM that you can restore later if this new ROM not work or you want to go back. To perform a backup, select Backup and Restore, then on the next screen, select Backup again. Go back to main recovery menu after backup is complete.
  6. Then perform data wiping task. To do so, select wipe data/factory reset, then select Yes on next screen to confirm your action. Wait few minutes till the data wipe is completed.
  7. Select install zip from sdcard, then select choose zip from sdcard. Now, locate the aokp_vigor_unofficial_Jan-03-13.zip file that you copied earlier in Step 2 and select it by pressing Power button. Confirm installation by selecting Yes - Install _____.zip on the next screen. The ROM installation will begin.
  8. Once the ROM installation process end, repeat the step 7 but choose gapps-jb-20121011-signed.zip instead of ROM zip to install the Google apps package.
  9. When installation is completed, go back to the main recovery menu and select reboot system now to reboot the smartphone and boot up into customized AOKP Jelly Bean ROM. The first boot will take time, so be patient!
  10. Returning to Previous ROM: To go back to your previous ROM, boot into recovery, select backup and restore then restore your previous ROM by selecting it from the list.

Congrats! Android 4.1.2 Jelly Bean based custom ROM AOKP now installed and running on your HTC Rezound.

How to Install AOKP Custom ROM on HTC Rezound and Update to ICS 4.0.4

  • Download the ROM file from here.
  • Download Google Apps package from here.
  • Save the files to your computer.
  • Connect the handset with the computer.
  • Use the USB cable for this.
  • Copy the downloaded files (all of them) to your phone's SD card.
  • Disconnect the device from the PC.
  • Turn it off.
  • Reboot in bootloader.
  • For bootloader: press and hold Volume Down button while powering one.
  • Then, from bootloader choose to boot in recovery mode.
  • From recovery select "Wipe -> user data factory reset".
  • If you are using TWRP recovery, select "Wipe-> Factory reset".
  • Then, select "Flash zip" followed by "choose zip from sd card" ("install" if you use TWRP).
  • Pick the ROM file and install it.
  • Next, do the same for flashing the Google Apps package.
  • When all the processes ends, select "return" and "reboot system now".
  • That's all.

Congratulations, you have succeeded in installing the AOKP Custom ROM firmware on your HTC Rezound. Your phone was updated to the Ice Cream Sandwich 4.0.4 platform so now you can start using and testing the same. I know that is not Jelly Bean but be patience as maybe a suitable Android 4.1 update will be made available in the future. So, stay close as we will be the first to update you with the same.


  T A C H Y O N

Refer:

This has been talked about for days over in the CM10.2 forum -but- we could never find it. Just randomly searching today we found it... the day after it was 'Officially' posted.(or at least this version) What luck. Not the usual for us. This is the creation of Neo the new Moderator over on the CM10.2 site for the ReZound.

CDMA/GSM PMEM/ION ANDROID-4.3 CM-10.2 AOSP MAXIMIZED

What sets this particular rom apart from a standard CM-10.2 rom?
Observe:
*Built using my newly created GCC Freedom method which does the following at source level:
-Builds the kernel 100% with SaberMod's 4.8 optimized GCC
-Builds the rom 100% with SaberMod's 4.9 optimized GCC
-Builds the rom and kernel with -Os compiler flags for cleaner code, better memory, and longer battery
-Builds the rom and kernel with a full strict aliasing method set to error at "3" to optimize the entire build source
*linaro patches to improve performance and cleaner code
*Several cherry-picks for memory leaks
*Fast Charge enabled in kernel
*3 other governor options enabled in kernel
*kernel pre-set back to 192 for minimum as the bsod fix is implemented now.
*Option to pay through the app store via billing your wireless account (if your account is provisioned)
*No annoying 160 text message splitting
*Debloated MUCH further than a stock rom
*Battery Bar option added
*Copy and Paste ability in GTalk
*Entropy Generator Mod for massive lag reduction and massively improved system response time! (Thanks lambgx02, Ryuinferno, and pepoluan!) (Please allow a few minutes for the rom to settle on first boot and allow first time application launches the time to cache. Rom is Incredibly quick with this mod)
*Supercharged with the Supercharger mod
*Maximum Overdrive Multitasking Mod
*Framework Speed Transition mods (Thanks Snuzzo)
*Facebook Contacts Sync. Your facebook pictures will now sync with your contacts.
*Option to automatically connect to a remembered wifi location
*Ability to configure the delay for snoozing calendar reminders.( This allows both configuring the default snooze delay as well as ask for the delay whenever snoozing a reminder.)
*PowerUsage: show more apps with a more accurate percentage in battery info( - Increases the maximum displayed items from 10 to 20. - Make visible items with lower usage percentage (from 1 to 0.1) - Display two significant values (84%, 2.6%, 0.32%)
*GPS connectivity mod for improved "lock"
*Reduced City and Weather Condition font by 2sp to avoid ending dots for long city names in Cronus.
*init.d tweaks for battery and performance
*SEVERAL NEW Build.prop tweaks for optimized battery performance, internet speed, and system speed.
*New assortment of ringtones, notification tones, and alarms.
*Hot new boot animation

********GAPPS ARE BAKED IN********


WHAT DOESN'T WORK/WORK RIGHT

-Camcorder is 50/50
-Mms (picture, audio, media) sends perfectly until reboot. Receives fine.
-You tell me?   <-- The developer... Neo


  Back to Stock

  • To go back to 'Stock' use:
            Rezound_Global_ICS_4.03.605.2_Full_RUU_PH98IMG.zip
    Most stable Stock ROM as of August 31st, 2012... -and- notice the 'FULL' designation.
    July 16th, 2013: OK... We have a problem. Our phone died. We got a replacement. July 10th, 2013. It has a different Serial Number. It also has the "Latest" ICS -AND- hboot. It was Locked and UN-root'd. Also was/is S-On. However, JuopunutBear would NOT work and we could NOT get S-Off. It would run and produce the message:
            "Could not find Bear... is the bar closed?"
    -AND- we could NOT find the meaning of that error. Now to make matters worse... we could NOT go back to the previous ICS on which this worked cause... the hboot was newer!! Now to make matters even worse... Windows is no longer used NOR is it supported by the JuopunutBear crew. -And- the System that they say JuopunutBear works with, Ubuntu, will NOT work properly on either of our Computers. We really didn't want to have to install -and fight- another OS on our computer... just to get S-Off... -but- it appears that is going to be the only way to get S-Off on our 'newest' phone!!
This will not work if you used the HTC Bootloader Unlock Tool. Your device must be fully stock with a locked bootloader -or- you must have S-Off (method).
Installing the RUU will wipe your data.
  • Conditions: We had:
         root, UnLocked and S-Off
         Hboot 2.28,
         Radio 2.23.10.0123r, 2.23.10.0124r,
         OpenDSP-v14.6.6.7708.00.0507 ... annnddd..
         CM10.1
  • After downloading the RUU zip file(mentioned at the top of this pink sectio),
    renamed it to "PH98IMG.zip" (without the quotes)
  • Place the renamed file onto the root of the SD Card; ie the uppermost level.
  • Power down your device... and Remove / Replace the Battery.
  • Now Reboot into the bootloader by holding 'VOL DOWN' + 'Power'
  • The flashing process should begin automatically...
        It did. However, it takes some time, 10 to 15 minutes, and there is little to no indication of anything happening. (A lie!! There is a vertical progress bar along the top right.) After the first finish (7-8 min) you are questioned as to whether to UpDate or not.
    Then it will perform the following operations:
    SD Checking...
    Loading PH98DIAG.zip
    No Image
    Loading PH98DIAG.nbh
    No Image or Wrong Image
    Loading PH98IMG.zip
       Parsing...[SD ZIP]
       []Bootloader
       []Boot
       []Recovery
       []System
       []splash
       []Userdata
       []sbl1
       []sbl2
       []sbl3
       []trust_zone
       []rpm
       []adsp
       []pg2fs_spcustom
       []mdm9k
       []mdm_cust
       []tp
       []radio_v2
       []radio_cust
    Do you want to start update?
    <VOL UP> Yes
    <VOL DOWN> No


    Naturally, we said UpDate. Then it flashed 'Updating', then 'OK' next to a number of the above items, then it went black. And then it looks like it starts over again -but- be patient. After another 7-8 mins we watched it finally doing something.(during this time, there is a vertical bar in upper right) It once again flashed 'Updating', then 'OK' next to a number of the items in the following list:
    Parsing...[SD ZIP]
    1. BOOT
    2. RECOVERY
    3. SYSTEM ... longest time in this part was here
    4. SPLASH
    5. USERDATA
    6. ADSP
    7. PG2FS_SPCUSTOM
    8. MDM9K
    9. MDM_CUST
    10. TP
    11. RADIO_V2
    12. RADIO_CUST
    Update is in progress...
    Do not power off the device!
       after 4-5 mins it stated:
    Update Complete...
    Press <POWER> to reboot
    Only obvious changes, while still in the bootloader - Conditions:
         Hboot returned to 2.27,
         Guess it wasn't 'FULL' - Radio's stayed at 2.23 instead of going back to the 2.22
         However, it stayed Unlocked and S-Off
         -But- Became UN-root'd.

    It finished and we will ReBoot.
    RutRoh... sitting on 4G LTE a long time... well it was only 2-3 min.
  • Oh!! A BIG Sigh of Relief!! It rebooted ok... and we got the Setup Wizard.
    Now we got a long time on "Registering"... and checking status.
    Then we get "Unable to connect to the server". Ouch!!
    But upon pressing the OK we got the next screen which was "Set up additional accounts".
    We did not. Cancelled -or- skipped items on the next screens and got to our Home Screen. We then Powered down the phone. Waited and then Power back ON. Oh darn. Fastboot was checked so it did not really power down. We unchecked fastboot and Powered Down again. Waited and then Powered ON.
  • This is our second go around at this ... going back to stock from CM10.1. However, this time our 4G is not working. Think the mismatch of Hboot and Radio is affecting us this time. We are gona make them match by doing the firmware UpDate.
    Actually... the antenna is in the 'back' of the phone. Need to put the back on!!
  • We are back on 'Stock ICS'.

   Yay!

 June 23, 2013 / 7:06am  Well, our joy was short lived. One of the 'cautions' from our Web Grabbings down below was/is:
     Installing only the Radio or ROM with incompatible counterpart will result in a, complete loss of
    data signal.
    Radio vs. RUU?
Well, it did... -or- so it seemed -or- so we thought -or- somethin'... Computers, Electronics -and- Cell Phones are strange aminals -and- they can do wierd things. 'Last' today when we ReInstalled the 'stock' RUU we had difficulties with getting the Weather to show on our clock. You know that big two digit one the HTC's are famous for?? Anywho, that was last night -and- early this morning. Then we got a phone call, on our SmartPhone -and- the first one since our change back to Stock, from a friend requesting I meet him for coffee. During the coffee break ---- the Weather part of our clock widget started working. This was almost 24 hours later. Well, maybe not quite 24 but close. Shame on us, we forgot to place the time of our stock return in this document!! We think it was around 10 or 11:00am on June 22, 2013. Now did that phone call have anything to do with triggering this Weather fix?? We doubt it -but- one never knows... The main point is... if something isn't working right away, don't dispare and don't try a lot of fixin'. Wait!! 24hrs and then see what happens. Things are NOT necessarily all that instantaneous.
Note: We just went back to stock again on July 4th, 2013 at 3:23am. After the Restore -and- ReSetup, we Powered Down, removed the battery, swapped the SD cards, replaced the battery -and- the back, then Powered On. Guess what??? Right there on our Home Screen was the HTC Weather Clock in FULL glory -- Time -and- Weather!!       Go figure...

Anywho, the whole point of this little section was to say something about Properly Returning the Phone to a Stock ROM condition. As you can see, or we hope you can. It, or we, didn't necessarily obey all the rules. We have a mixed Hboot and Radio situation. We thought that the RUU would put the 2.22 Radios back -- it didn't. However, it did put the 2.27 Hboot back. We will update the phone with the 'latest' firmware, again, which is listed after the listing for the RUU. We want to see how it works with ICS.

 June 23rd, 2013 /11:50am  We are back in ICS:
     Unlocked
     S-Off
     root'd
     TWRP
     GooManager
-And- not really sure how we got here!!!!! Would like to sit and do this one time WITHOUT getting interrupted.

  Note: July 4th, 2013 / 3:39am    Maybe, just maybe we can get our UN-interrupted time. The Restored phone has Gapps on it. So manufacturer's RUU's have them. First to 'Settings' -> 'Power' and 'UnCheck Fast boot'. GooManager is not there... neither is Root Checker. Get it first. (UNLESS otherwise stated, all apps will be obtained from the PlayStore.)

  • Root Checker obtained and installed and shows we are NOT rooted.
Power Off. 'Vol Down' + 'Power' and hold till Hboot. And we see that we are:
  • UNLOCKED   and
  • S-OFF
  • Do NOT have TWRP. In fact recovery got us NOTHING!!
  • ReBooted
Need to enable 'USB Debugging' then 'root' the phone.
  • OK. We are 'root'd and have AmonRA 3.16 for the recovery. Why?? Cause my notes on 'root'ing haven't been changed and I couldn't quickly figure out how to change from AmonRA to TWRP. AmonRA is an img and TWRP is a zip. Not sure, or confident enough on what I know to chance it. We needed 'root' in order to get the other stuff.

 Jun 23 07:18 PH98IMG contents  

-rwxrwxrwx 1 root root 6.0M Aug  9  2012 adsp.img
-rwxrwxrwx 1 root root   94 Aug  9  2012 android-info.txt
-rwxrwxrwx 1 root root 3.9M Aug  9  2012 boot_signed.img
-rwxrwxrwx 1 root root 3.2K Aug  9  2012 dzdata_16g.hdr
-rwxrwxrwx 1 root root 211K Aug  9  2012 dzdata_16g.img
-rwxrwxrwx 1 root root 1.0M Aug  9  2012 hboot_8x60-lte_2.27.0000_120803_MR2_signedbyaa.nb0
-rwxrwxrwx 1 root root  23M Aug  9  2012 mdm9k.img
-rwxrwxrwx 1 root root 128K Jun  5  2012 mdmrcdata_3.01_002.img
-rwxrwxrwx 1 root root 2.1M Aug  9  2012 pg2fs_spcustom.img
-rwxrwxrwx 1 root root  24M Aug  9  2012 radio.img
-rwxrwxrwx 1 root root 445K Aug  9  2012 ramdisk.img
-rwxrwxrwx 1 root root 128K Feb 17  2012 rcdata_1.16.002.img
-rwxrwxrwx 1 root root 5.3M Aug  9  2012 recovery_signed.img
-rwxrwxrwx 1 root root 116K Aug  9  2012 rpm.img
-rwxrwxrwx 1 root root  89K Aug  9  2012 sbl1.img
-rwxrwxrwx 1 root root 104K Aug  9  2012 sbl2.img
-rwxrwxrwx 1 root root 593K Aug  3  2012 sbl3.img
-rwxrwxrwx 1 root root 1.9M Jul 18  2012 splash1.nb0
-rwxrwxrwx 1 root root 1.2G Aug  9  2012 system.img
-rwxrwxrwx 1 root root  74K Aug 20  2011 tp_atmel224e_1101.img
-rwxrwxrwx 1 root root  97K Aug  9  2012 tz.img

 Jun 23 07:18 firmware contents  

-rwxrwxrwx 1 root root 6.0M Mar 12 03:31 adsp.img
-rwxrwxrwx 1 root root   94 Mar 13 21:08 android-info.txt
-rwxrwxrwx 1 root root 3.9M Mar 13 21:08 boot.img
-rwxrwxrwx 1 root root 1.0M Mar 13 20:56 hboot_8x60-lte_2.28.0000_120920_MR2_signedbyaa.nb0
-rwxrwxrwx 1 root root  23M Mar 12 03:37 mdm9k.img
-rwxrwxrwx 1 root root 128K Mar 13 20:56 mdmrcdata_3.02_002.img
-rwxrwxrwx 1 root root 1.0M Mar 13 20:56 mdmrfg_1.3.02_002.img
-rwxrwxrwx 1 root root 1.0M Mar 13 20:56 mdmrfg_2.3.02.002.img
-rwxrwxrwx 1 root root  24M Mar 12 03:37 radio.img
-rwxrwxrwx 1 root root 128K Mar 13 20:56 rcdata_1.18_002.img
-rwxrwxrwx 1 root root 5.3M Mar 13 21:08 recovery.img
-rwxrwxrwx 1 root root 1.0M Mar 13 20:56 rfg_1.1.18_002.img
-rwxrwxrwx 1 root root 1.0M Mar 13 20:56 rfg_2.1.18_002.img
-rwxrwxrwx 1 root root 593K Mar 12 03:31 sbl3.img
-rwxrwxrwx 1 root root  74K Mar 13 20:56 tp_atmel224e_1101.img
-rwxrwxrwx 1 root root  97K Mar 12 03:31 tz.img

 June 21, 2013 / 6:23pm  Stuff we grabbed off the Web, NOT organized... yet. Oooooooo... now it is sounding like our last HTC ReZound WebPage creation. -But- IF you bounce back and forth between these two pages I guarantee that you will learn a 'little' something.

=================== Begin Grabbed Stuff ====================================
============================================================================
============================================================================
Upgrade HTC Phone
============================================================================
Look Here First
If you don't quadruple check that you flash the correct RUU to your phone, you will brick your device. Keep that in mind.
ReFlash after bricking
what is meant bricking phone
============================================================================
the ROM is basically the android operating system, sense ui, and the standard apps contained in a file that is loaded onto the phone.

RUU as stated above is a Rom Update Utility, an executable file that checks the phone, prepares it and installs the ROM contained within it onto your handset.
====================
You are S-OFF, so if memory serves me correctly you can safely just install a stock RUU the old fashioned way, copy to SD card root, rename to PH98IMG.zip and reboot into the bootloader, should be automatic from there. With the unlocked bootloader you can change roms and remove apps ,but can not change radios. With S-off you can change or remove almost anything including radios.
Sorry, forget where we got this one. From one of the forums.
=================
In a nutshell, S-OFF means that the NAND portion of the device is unlocked and can be written to. The default setting for HTC's devices is S-ON, which means that neither can you access certain areas of the system nor can you guarantee a permanent root. Furthermore, signature check for firmware images is also ensured by the S-ON flag.

In their devices, HTC have installed a sort of security check whose level is determined by S-OFF/S-ON. Essentially, this security level is a flag stored on the device's radio that checks signature images for any firmware before it is allowed to be written to system memory. This hinders using any custom ROMs, splash images, recovery etc., and also restricts access to the NAND flash memory. However, when security level is set to S-OFF, the signature check is bypassed, allowing a user to upload custom firmware images, unsigned boot, recovery, splash and HBOOT images, as well as official firmware that has been modified, this enabling maximum customization of your HTC Android device.

Furthermore, S-OFF also reduces restrictions on accessing the NAND flash memory on the device, allowing all partitions (including /system) to be mounted in write mode while the operating system is booted. Addictive Tips
================== =========================

  Launchers and Themes and SetUp

How-To's on Theming - Part 1 Cust ROM - Part 2 Cust ROM
Android Internals Overview

Well now, we finally installed a 'Custom ROM' 'last today' and are only partially joyful. It is different -and- it is missing things. Yeah we know... they can be added -but- first we need to figure out what is what.

"ADW Launcher is probably the best for basic operation and functionality, it's the default launcher of CyanogenMod." (or it was at the time I copied this line) What is a Launcher? Ah ha... as you learn things.
    Settings -> System Settings -> Launcher and read.
The default in this version is "Trebuchet 1.0".

 An Interesting Note June 24th, 2013:   We had, in our previous trials of this CM10.1, installed Gapps, GooManager, Jelly Bean Extreme CM10 and Sense 5 CM10.1. The Installation Processes "Knew" that we had done so.

  Launchers

 Launchers  Launcher - this is the program that allows you to view and start all your apps, add widgets to your home screen and customize the way you interact with your phone.
What are Custom Launchers
How-to Install an Android Launcher
How-to Setup Your Launcher

 Nova Launcher  Got it through PlayStore. Nova Launcher The reviews and writeups looked good so we installed it -and- liked it. For now we are gona keep it as our primary Launcher.
Oh, this gets so confusing... on one side of their mouth they tell you, "Your apps and SetUp will be lost when you re-load -or- re-install a ROM." But then we do it and MOST of the stuff is still there!!!
Refer: Nova Launcher

 Everything.me  Got it through PlayStore. Everything.me Move from a smartphone to a Dynamic PhoneTM - a phone that gets you and instantly adapts.
Some new concepts and we will 'play' with it to see...

  Launcher Terminology

  • (Dock)   Area along bottom of Screen that holds 5 icons.

  Themes

 June 20th, 2013   How-to Theme Development Describes how to make a theme and stuff, good starting point.
Refer: xdaDevelopers Forum

 Jelly Bean Extreme $1.99 Got it through PlayStore. Jelly Bean Extreme We really like this one. Primarily cause of the way the settings screens look. May be a silly reason -but- to each his own.
We questioned their statement, "This theme is NOT for launchers." Mainly cause we just installed it in CM10.1 and are using the Nova Launcher... Granted, it was installed in "System Settings" and NOT via the "Nova Settings" but it does work within Nova. That is why we question your description. This Theme will work under Nova it just has to be selected under the System Settings.
BigDX replied on June 26, 2013
I see what your saying. The reason for describing it as I have is because I get many users that install this theme that are not rooted and running a custom ROM. They think if they install this on their stock device it will look like the screenshots. I have to put that disclaimer so users know it will not apply via launcher. Thanks for your support!

 HTC Sense 5 $1.50 Got it through PlayStore. HTC Sense 5 We didn't really care for this one. Got it expecting the HTC Weather Clock Widget.

 HTC.EleganceX  Got it through PlayStore. HTC.EleganceX Again this one was obtained in hopes of getting the HTC Weather Clock Widget.

  SetUp Apps and Widgets we want

PlayStore Apps

 September 9th, 2013 / 6:00am  We found something on the Web at xda-developers and have copied it here for ourselves and others. This concerns the Ultimate Online Theme Kitchen, which we haven't even used yet!! But the info we were looking for, Battery amount, was in it and it looked like something that we wanted to try.

How-to 'Undo' a UOT Kitchen Mod:
Make yourself an "undo" backup...
1) You already have a copy of the files you uploaded to the kitchen, right?
   Of course you do.
2) After downloading your newly baked UOT-XX-YY-ZZ.zip file,
   make a COPY of that -- UOT-XX-YY-ZZ-UNDO.zip
3) Open the Undo.zip, and simply replace the files with the ones you originally uploaded.
   (i.e. app/SystemUI.apk & framework/framework-res.apk)
You now have a flashable UNDO if you ever want to revert back to the original.

 Mod the Settings Menu   Change Settigs Menu

 HTC Widgets Weather Clock  We like the Weather Clock that came with the Phone and we looked at how we could get it back. Looks like it is on Play Store.
Widget Weather/Clock is a widget with a clock, weather forecast and realistic animation. You can watch clouds floating across your desktop, rain drops slide down your screen and even lightning striking here and there. The quality and accuracy of weather forecast are guaranteed by The Weather Channel and MSN and others.

 So far the best we can find is:   Sense V2 Flip Clock & Weather -Free

 HTC Sense 4 ADW & NOVA Weather Clock   HTC Sense 4 ADW & NOVA Theme. This didn't work and we are waiting for a reply from the developer.
Got a reply! They suggested getting: Fancy Widgets and we did. It actually comes in two parts. The first one is free and the second, the UnLock Key, costs $2.59. It is well worth it. With the UnLock you get, for lack of a better explanation, the "Desktop Animations". Fortunately, it was cloudy here in Phoenix today and we got to see some animation right off. We're happy.

 HTC Sense Weather Clock   HTC Sense Weather Clock

-Some of- These have been suggested - But let's just make this a SetUp check list: And that all changed -after- we found a way to list -and- save the apps that we have downloaded and installed. At least the ones through PlayStore. Any others and we are on our own. This list is stored on the SD card and can be used to 're-load' the apps.

  1. []
  2. [] 400 - This is really Sense5 CM10.1
  3. [] A.I.SmartKB -From our ICS
  4. [] Amazon AppStore -From our ICS
  5. [] AndroidPIT App Center -From our ICS
  6. [] AnySoftKeyboard -From our ICS
  7. [x] App List Backup - Works fine like we expected.
    The app saves a backup of your application list (or the part of it that you choose) onto the device's SD card or other storage. If both the old and new devices have an SD card slot, simply move the SD card from the old to the new device, and restore your apps. If one or both devices don't have an SD card slot, connect the old device to a computer, copy the folder called AppListBackup (from the root of the device's storage) to your computer. Then copy that same folder to the root of the new device's storage and run App List Backup to restore your apps.
  8. [] AppBrain
  9. [] aSpotCat -From our ICS
  10. [] Cyberon Voice Comdr -From our ICS
  11. [] Everything - New and experimental.
  12. [] File Expert Mngr -From our ICS
  13. [x] Gmail - gapps
  14. [x] Google Play Books - gapps
  15. [x] Google Play Services - gapps
  16. [x] Google Play Store - gapps
  17. [x] Google Search - gapps
  18. [x] Google+ - gapps
  19. [x] GooManager This app is for ROOTED USERS ONLY!
    This app is a front-end for the popular free Android file hosting site, Goo.im (formerly Goo-Inside.me). It allows for downloads of ROMs, Google Apps packages, kernels, apps, and any other file available via the website. Update notifcations are available for ROMs and Google Apps packages. Please note that notifications are not via GCM (push messages) but run at start-up, and every 2-24 hours (configurable in-app).
  20. [x] HTC.EleganceX - requires xhdpi - which our ReZound has.
  21. [x] JB Extreme
  22. [] Mahjong -From our ICS
  23. [] Mobile avast! -From our ICS
  24. [x] Maps
  25. [] Notes Taking -From our ICS
  26. [x] Nova Launcher - We are using and like.
  27. [] RealCalc -From our ICS
  28. [] Retouch -From our ICS
  29. [] Robotic Guitar -From our ICS
  30. [x] Root Browser
  31. [x] Root Checker 1 -From our ICS
  32. [] Root Checker 2 -From our ICS
  33. [] Sense flip clock & Weather
  34. [x] Sense V2 flip clock & Weather
  35. [x] SIM Card Manager
  36. [] SkyDroid Golf GPS -From our ICS
  37. [x] Slacker
  38. [] Stop Watch -From our ICS
  39. [x] Street View
  40. [x] SuperSU
  41. [] Touch Writer -From our ICS
  42. [x] Titanium Backup
  43. [x] VideoSurf
  44. [x] YouTube
  45. []
  46. []
  47. ===== The suggestions =====
  48. [] Adfree
  49. [] Blackmart-which lists all root apps
  50. [] Set CPU
  51. [] Copy Paste It
  52. [] Titanium Backup
  53. [] AutoStarts
  54. [] Wifi Tether for rooted users
  55. [] Screencast
  56. [] DroidSail App2SD
  57. [] Absolute System
  58. [] Rom Toolbox
  59. [] Check out GSAM battery monitor.
  60. []

  Questions and answers

Some of these "Questions" and "Answers" came from wildstang83's and Flyhalf205's work at: CM10 FAQ. We didn't copy everything, only the items important to us at the time. We will be adding in our own -and- we are not gona differentiate which is which. However, the first few will be from them. This is gona be not only an FAQ, but also a what-does-what, for lack of a better place, at this time, to put it.

   Where did the Developer options in settings go?   

Google/Android has hidden this feature in JB 4.2.1 and up. Follow these steps to re-enable the feature: Go to settings > about phone. Tap Build Number 7 times. Tapping Build Number 7 times re-enables the Developer Options in settings.

   Where did the reboot menu go?   

In Android 4.2.2 this menu is hidden by default in CM10.1 and must be enabled.
Quote:
Step 1: Enable Developer options using the method described in above.
Step 2: Go to Developer options and check the Advanced reboot box.
Step 3: Go to System settings > System > power menu. Insure the Reboot menu box is checked.

   Is this ROM GSM compatible?   

Yes. You must enter Mobile Networks and change preferred network list to GSM.

   How do I zoom in the camera?   

In the camera app place two fingers on the screen and spread rapidly

   Reason for HTC Dumlock   

To avoid using fastboot... which personally we don't think is a problem. -But- to each their own. Well, OK, Uncle. Guess IF you don't have a PC then it is a valuable tool.
You can only issue fastboot commands from an external device via USB while your ReZound is in fastboot mode in the bootloader.
Refer: HTC Dumlock