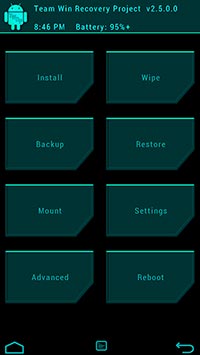
As soon as you boot your Android into the latest build of TWRP,
the following menu will serve you, known as the main menu.
The main menu consists of 8 tabs (Install, Wipe, Backup, Restore, Mount,
Settings, Advanced & Reboot), each having its own sub-tabs and functions. Let us now begin with the
first tab on the screen.
July 12th, 2013 / 3:07am Before going on we need to mention
the three little buttons along the bottom. Mainly the middle one. We looked long and hard before we
could find any info on it, and then that was only fleeting. The button on the left, that looks like
a home, will do just that. Returns you to the Home menu and if you are already there... nothing. The
middle button is a full screen of the terminal. If you do something (ie wipe, flash, etc) that
(updating partition details...) is the default
text on the screen. You don't need to wait because it isn't doing anything. Push the icon again and it'll
bring the buttons back up.
(courtesty of: Android Master on
RootzWiki) And finally, the swirl on the right is a Return key. Tapping it will return to your
previous screen.
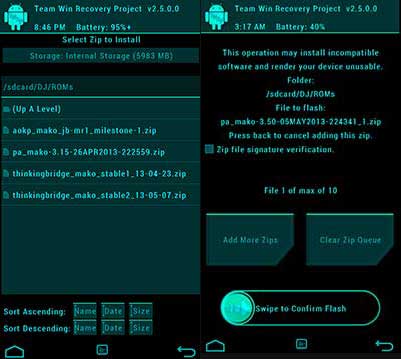
The Install tab is simple and make its role in flashing files (ROMs/Kernels/Mods).
Another thing that is unique here, is that you can add a queue of files and the same will be flashed in the
respective order.
Now, lets get to know how simply this works.
- Press on the "Install" tab.
- Browse and choose the file that you desire to flash.
- Press on Add more zips if you desire to flash another zip(s).
- Swipe the round button present on the bottom of the screen to initiate the flashing process.
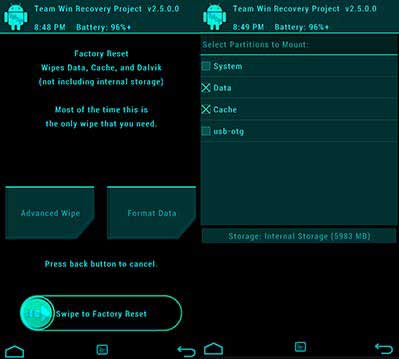
This tab serves the function of wiping the partitions on your device. Wipe-able
partitions include System, Data, Cache, Dalvik Cache, Internal Storage and USB-OTG (if any). Wiping the partitions
is necessary as a pre-flashing process and is different for Installing ROMs/Kernels/Mods and updating them. So,
before you set yourself for opening this menu, make sure to know what you're doing.
Advice: Backup your storage as sometimes when you're in haste, you might mistakenly
wipe it and lose all the data on your storage.
Here, we're gonna mention some basic wiping steps for Installing ROMs/Kernels. Note that
these are universal for every ROM and Kernel, until and unless the developer himself states some specific steps.
Wiping before Installing a Custom ROM:
- Press on "Wipe" tab.
- Press on "Advanced Wipe".
- Select the partitions: Dalvik Cache, System, Data & Cache.
- Swipe the round button present on the bottom of the screen to initiate the wiping process.
Wiping before Installing a Custom Kernel:
- Press on "Wipe" tab.
- Press on "Advanced Wipe".
- Select the partitions: Dalvik Cache & Cache.
- Swipe the round button present on the bottom of the screen to initiate the wiping process
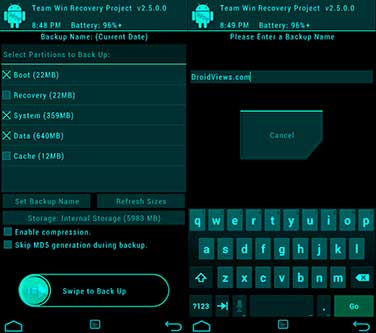
The Backup tab holds a very important and useful function. Situations might arise
when you accidentally Install a wrong (corrupted/damaged) or may be un-desirable ROM/Kernel/Mod. Post these
situations, we find ourselves stuck. So, the Backup option gives us an helping hand to come out. This option
is also well known as Nandroid Backup, but is now certainly referred to as a common term; Backup.
TWRP offers some unique privileges in the Backup option too. A user can simply
select the partitions that he/she might want to backup viz Boot (Kernel & Ram-disk), Recovery (Present Recovery),
System (Firmware files), Data (User Apps and Information) & Cache (Dalvik Cache and Cache).
To Backup your current ROM, simply follow these steps:
- Press on "Backup" tab.
- Select the partitions you want to backup (Usually, ROM backup includes System, Data, Cache & Boot).
- Swipe the round button present on the bottom of the screen to initiate the backup process.
Apart from backing up, you can also Set Backup Name (set a specific name for your backup),
Enable compression and Skip md5 generation during backup.
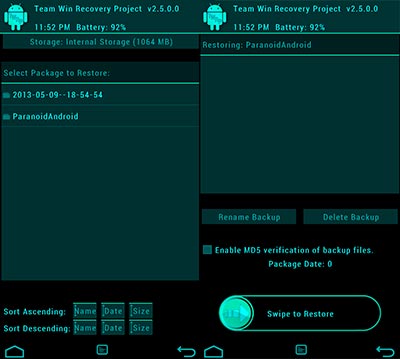
The Restore option in simple words, restores the Backup. A backup made with the Backup
tab is to be restored from this tab. This option also allows you to delete a previous backup and even enable md5
verification.
Restoring a backup is quite easy:
- Press on "Restore" tab.
- Press on the backup you want to restore.
- Swipe the round button present on the bottom of the screen to initiate the restore process
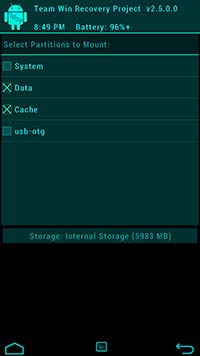
It certainly is essential to mount partitions while flashing some specific files.
Mount-able partitions includes: System, Data, Cache, Internal Memory, SD-card and USB-OTG (if any).
To mount a partition:
- Press on "Mount" tab.
- Select the partitions to mount.
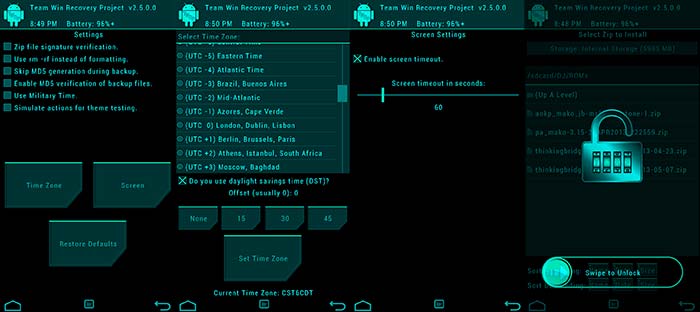
This tab holds all the settings related to the recovery subsystem.
The following come under this tab:
- zip file signature verification (Enable flashing only if the zip file is signed properly).
- Use rm -rf instead of formatting (Option enables manual rm -rf command to wipe instead of automatic formatting)
- Skip md5 generation during backup (disables the generation of md5 sum during backup process)
- Enable md5 verification of backup files (enables restore of backup, only if md5 sum verifies)
- Use military time (Use the time format followed by Military/Army)
- Simulate actions for theme testing (enables modification of actions during theme testing)
- Time Zone (Set time zone according to your country)
- Screen (Enable/disable/set screen timeout)
- Restore defaults (Restores all the settings to their default value)
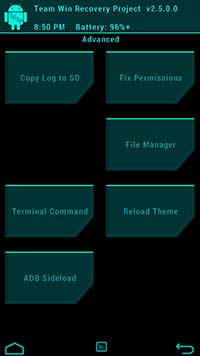
In the Advanced section, you�ll find some further features that many users might
not require. You can copy the recovery's log to SD card for accessing it later, which can be useful for debugging
purposes. You can also fix file permissions, which can help if things aren�t working properly due to improperly
set permissions for important files. There�s also a Reload Theme option that is useful for those developing a
custom theme for TWRP.
Advanced functions include:
- Copy Log to SD (Transfers the error log generated to the SD card)
- Fix permissions (Fixes the permissions of the System files to fix errors)
- File Manager (In-built recovery file manager to manage files on Internal and External memory)
- Terminal Command (In-built terminal emulator to execute commands)
- Reload Theme (Reloads the theme from TWRP/theme, necessary when applying a new theme)
- ADB sideload (Initiates sideload over ADB to flash zips)
The ADB Sideload mode is also accessible from here, which essentially allows you to put your phone into a mode
where files can be flashed to it from a computer using the ADB sideload command. This mode shouldn�t generally
be required by anyone who doesn�t already know how it works, and those unfamiliar with it don�t really need to
worry about it. For those who are going to use it, the Wipe Cache and Wipe Dalvik Cache options can come handy
to ensure that both these cache partitions are wiped after the ADB sideloading process completes.
How to Use
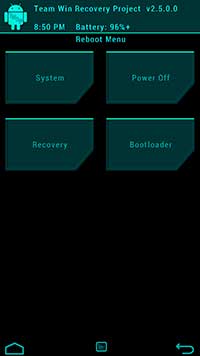
This menu lists ways to reboot the device to various locations. You
can reboot your device into the following modes just with a simple gesture. You can perform the
following actions within the Reboot menu:
- System (Boot your device normally into the OS)
- Power Off (Powers down your device completely)
- Recovery (Reboots into the recovery mode)
- Bootloader (Reboots the device into bootloader/fastboot mode)
To reboot:
- Press on "Reboot" tab.
- Press on the desire button where you're willing to boot.
- Swipe the round button present on the bottom of the screen to initiate the rebooting process.
That's all about TWRP, that every user needs to know and understand. Every
function that this recovery offers is unique, which in turn makes itself the one-of-the-kind in its line.
Are you having trouble while Installing this recovery on your device? Or you're curious to enquire about
something? Feel free to comment and let me know.
You'll have to go to
Droid Views created by: Dhananjay Bhardwaj
to leave comments.
Comments